> ## Documentation Index
> Fetch the complete documentation index at: https://docs.realtimelca.com/llms.txt
> Use this file to discover all available pages before exploring further.
# Material Mapping
> Link the elements in your model to materials in the Library so the calculation has real data to work with.
**Material Mapping** is where you connect the building components in your project to materials in the [Library](/user-guide/library). Until a type is mapped to an EPD or a construction, it contributes nothing to the calculation — mapping is the step that turns geometry into carbon.
Open it by clicking the **Material Mapping** tab in the [Project Dashboard](/user-guide/project/project-dashboard) header.
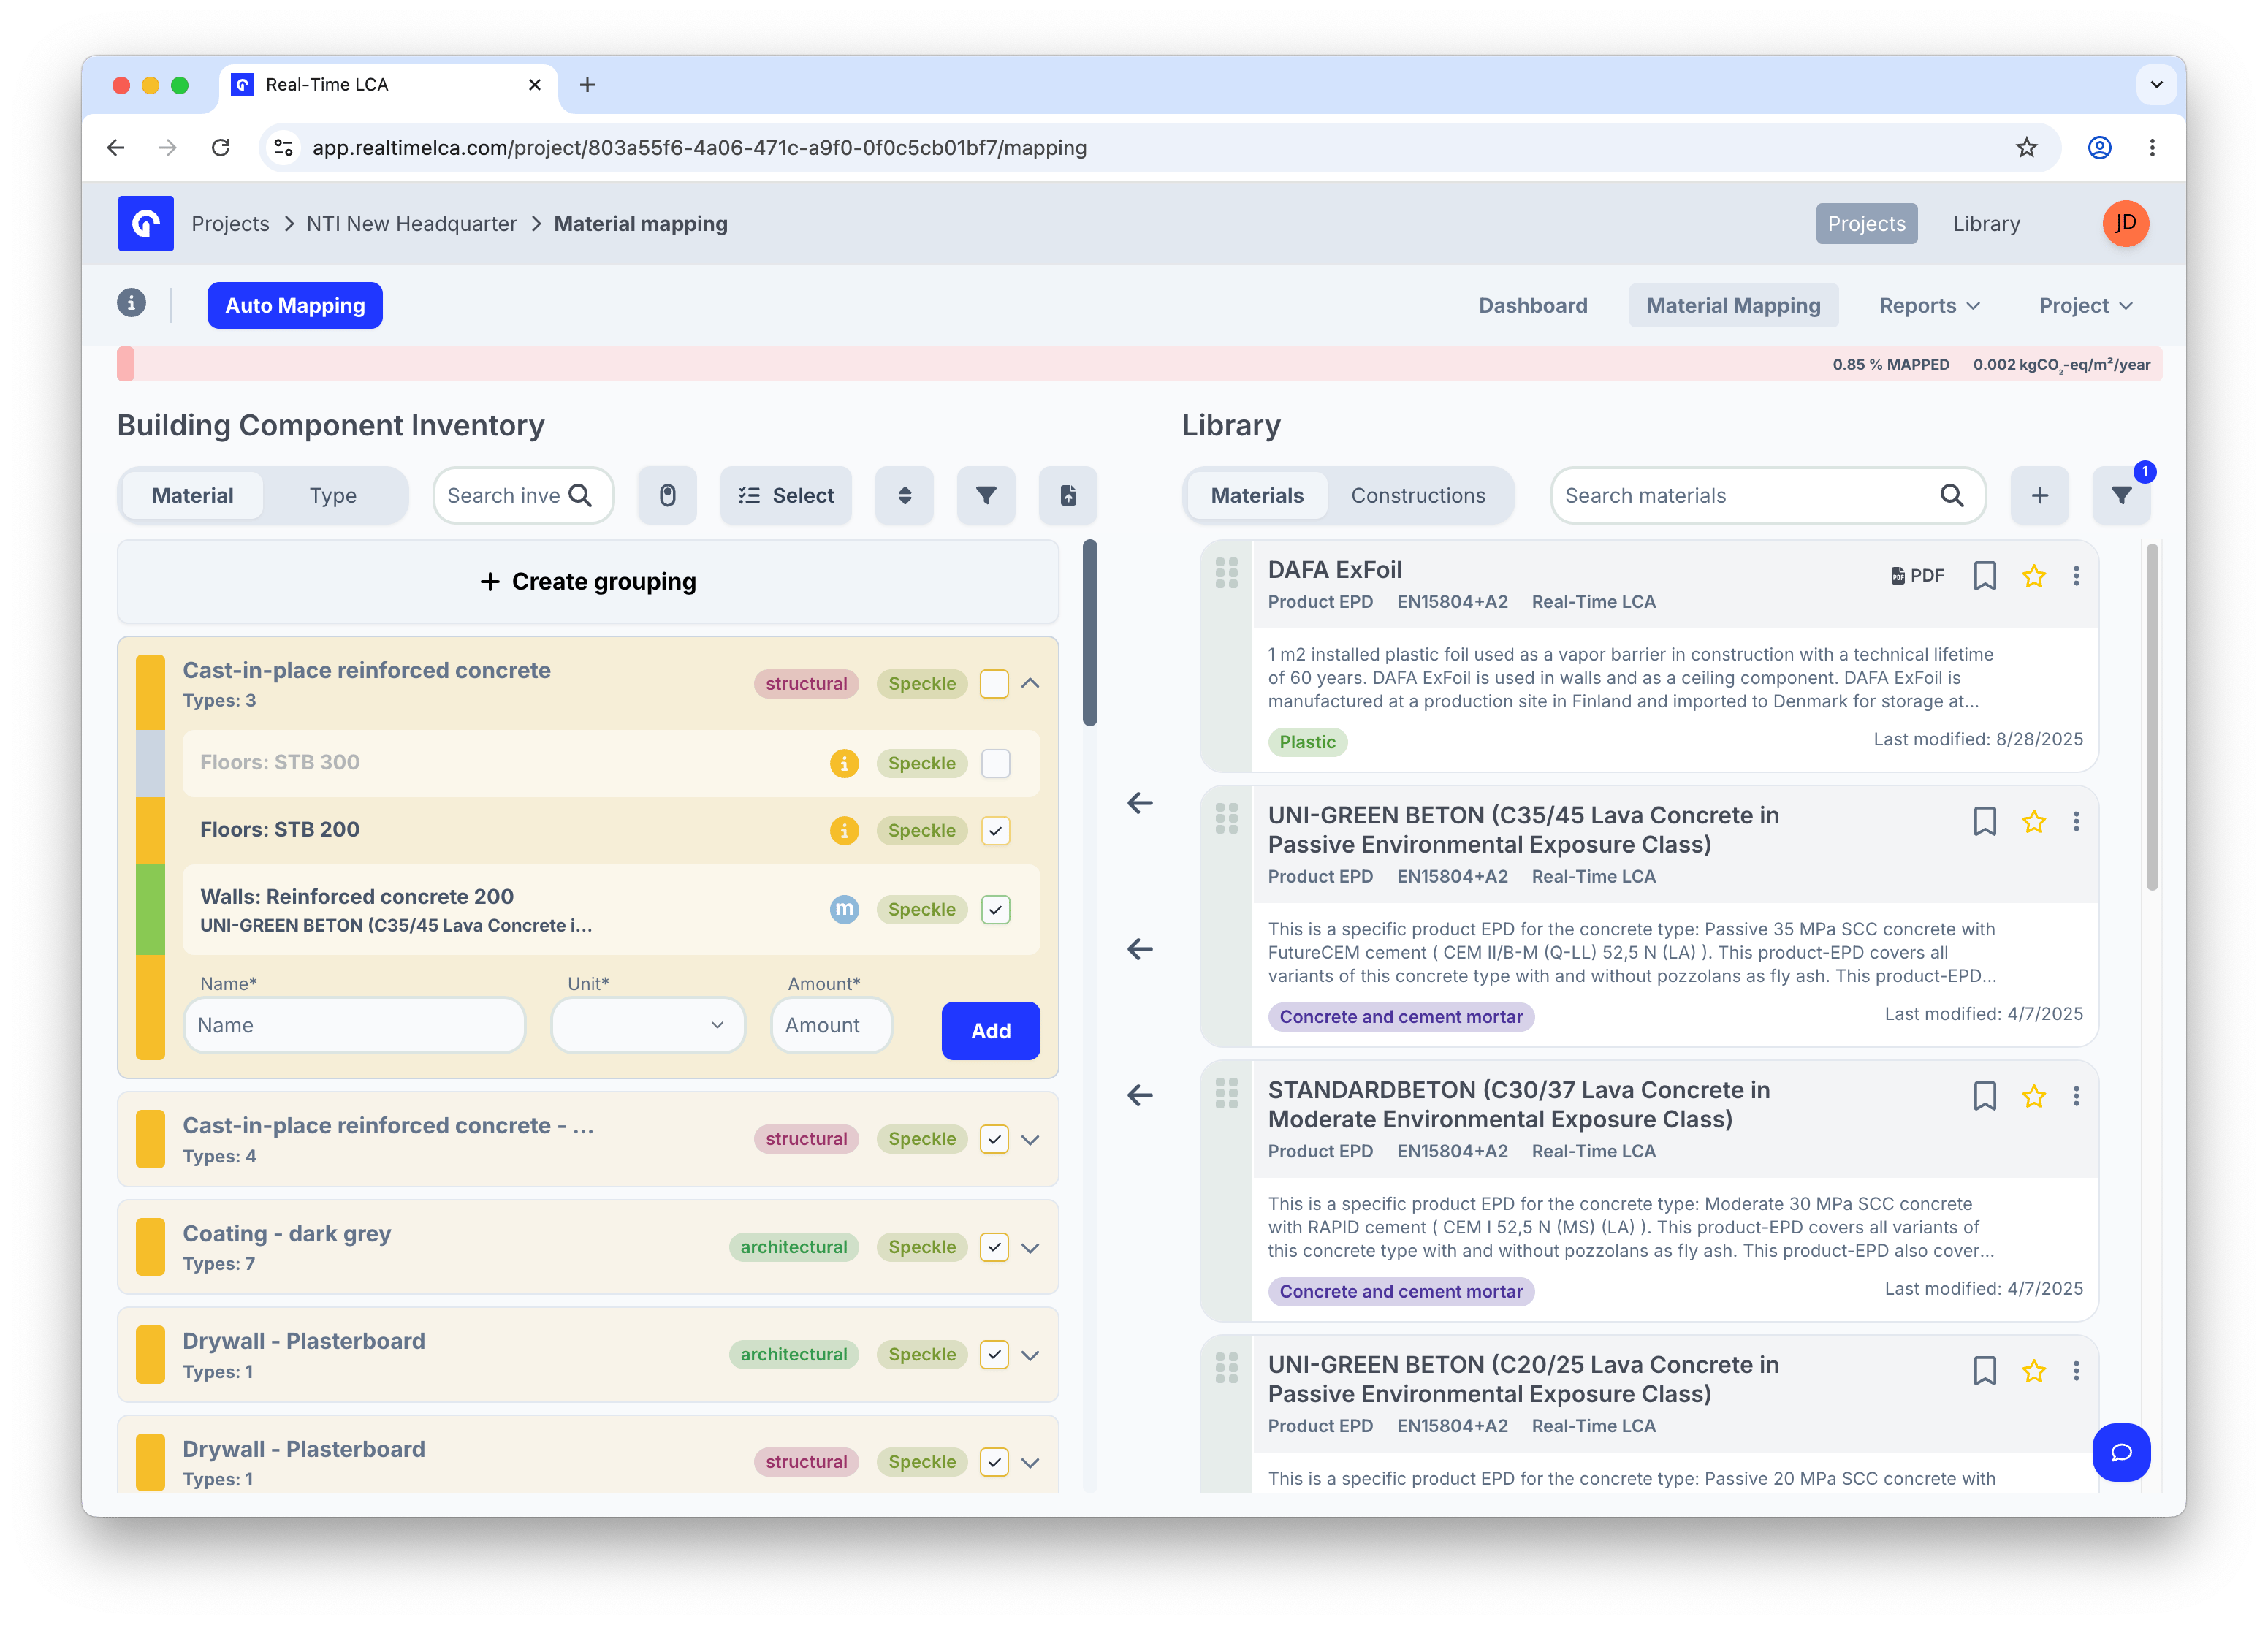
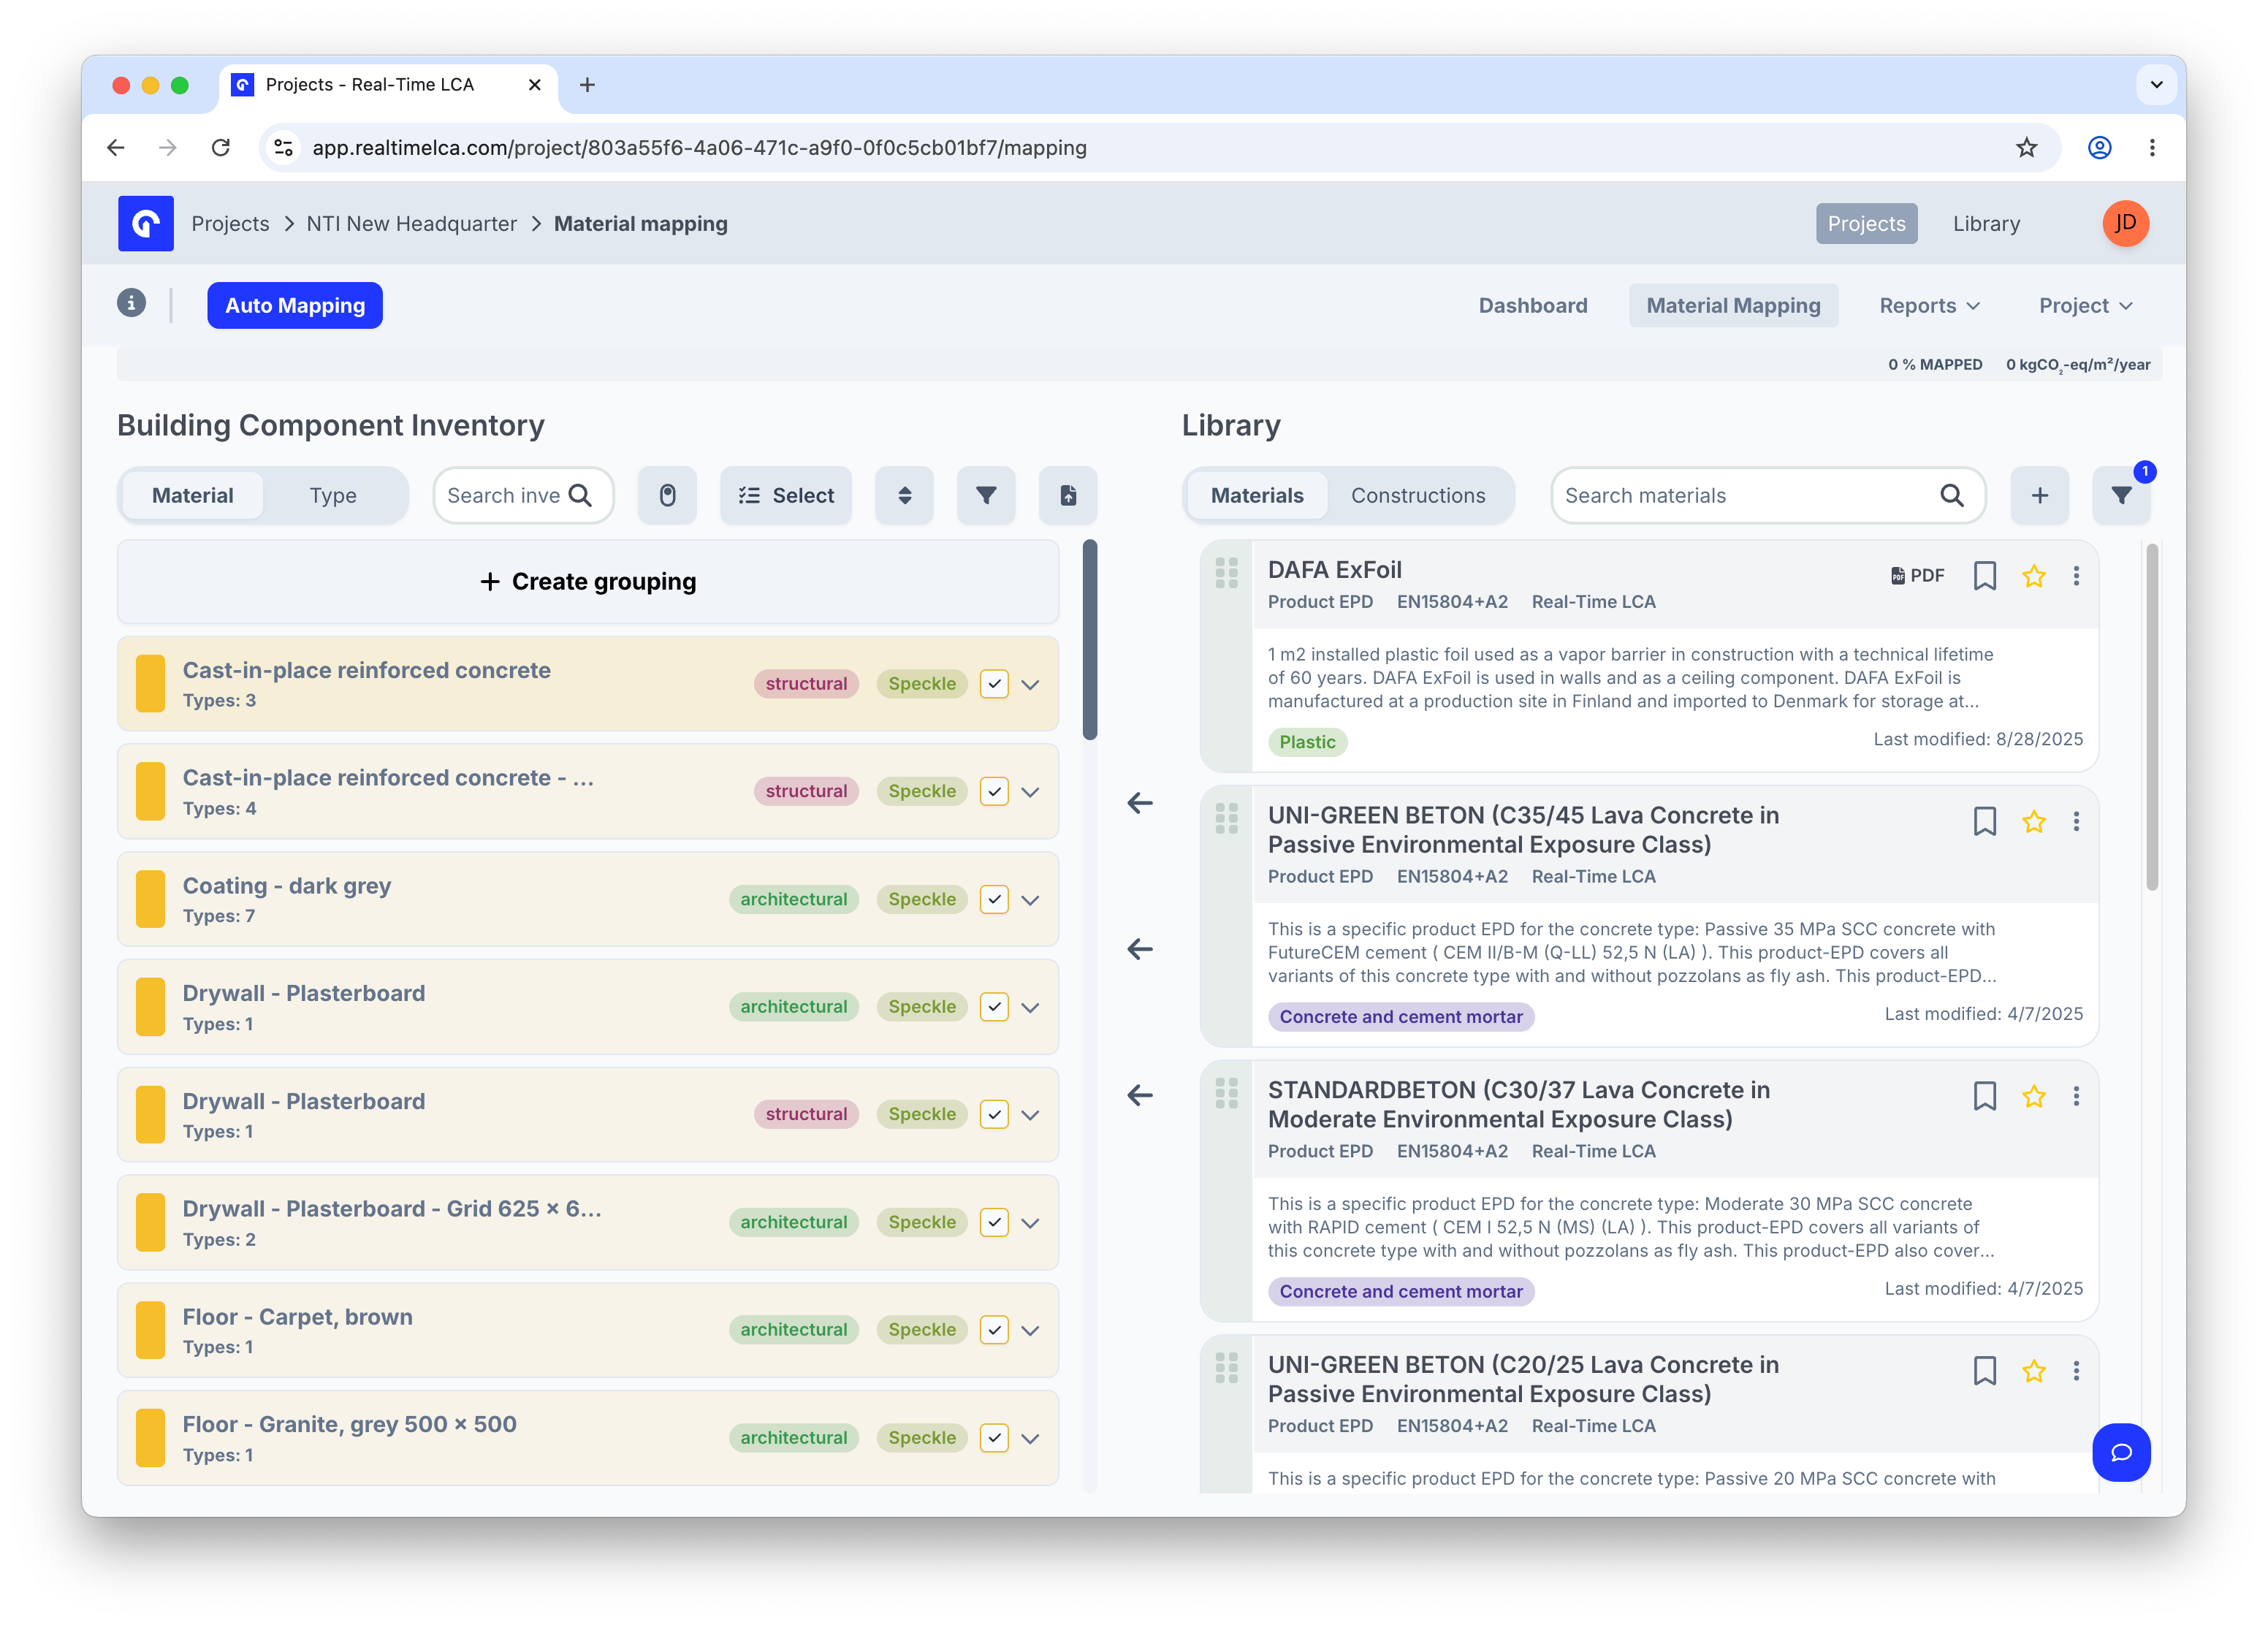 ## Page layout
The page is split into two panels that work together:
| Panel | Purpose |
| --------------------------------------- | ------------------------------------------------------------------------------------------------------------------------------------- |
| **Building Component Inventory** (left) | The items and groupings that came from your model or upload. This is what you need to map. |
| **Library** (right) | Materials and constructions you can drag onto inventory items. Switch between the **Materials** and **Constructions** tabs as needed. |
The **Auto Mapping** button in the top-left runs an automated pass across the whole inventory — see [Auto mapping](#auto-mapping) at the bottom of this page.
The header strip also shows two live numbers:
* **% MAPPED** — share of inventory items currently linked to a material.
* **kgCO₂/m²/year** — current intensity based on what is already mapped.
Both update as you map, unmap, or change an item's properties.
The intensity unit (and the reference area it is divided by) is calculation-specific — it follows the framework selected for the project. See [National compliance](/methodology-and-compliance#national-compliance) for the rules per country.
## Building Component Inventory
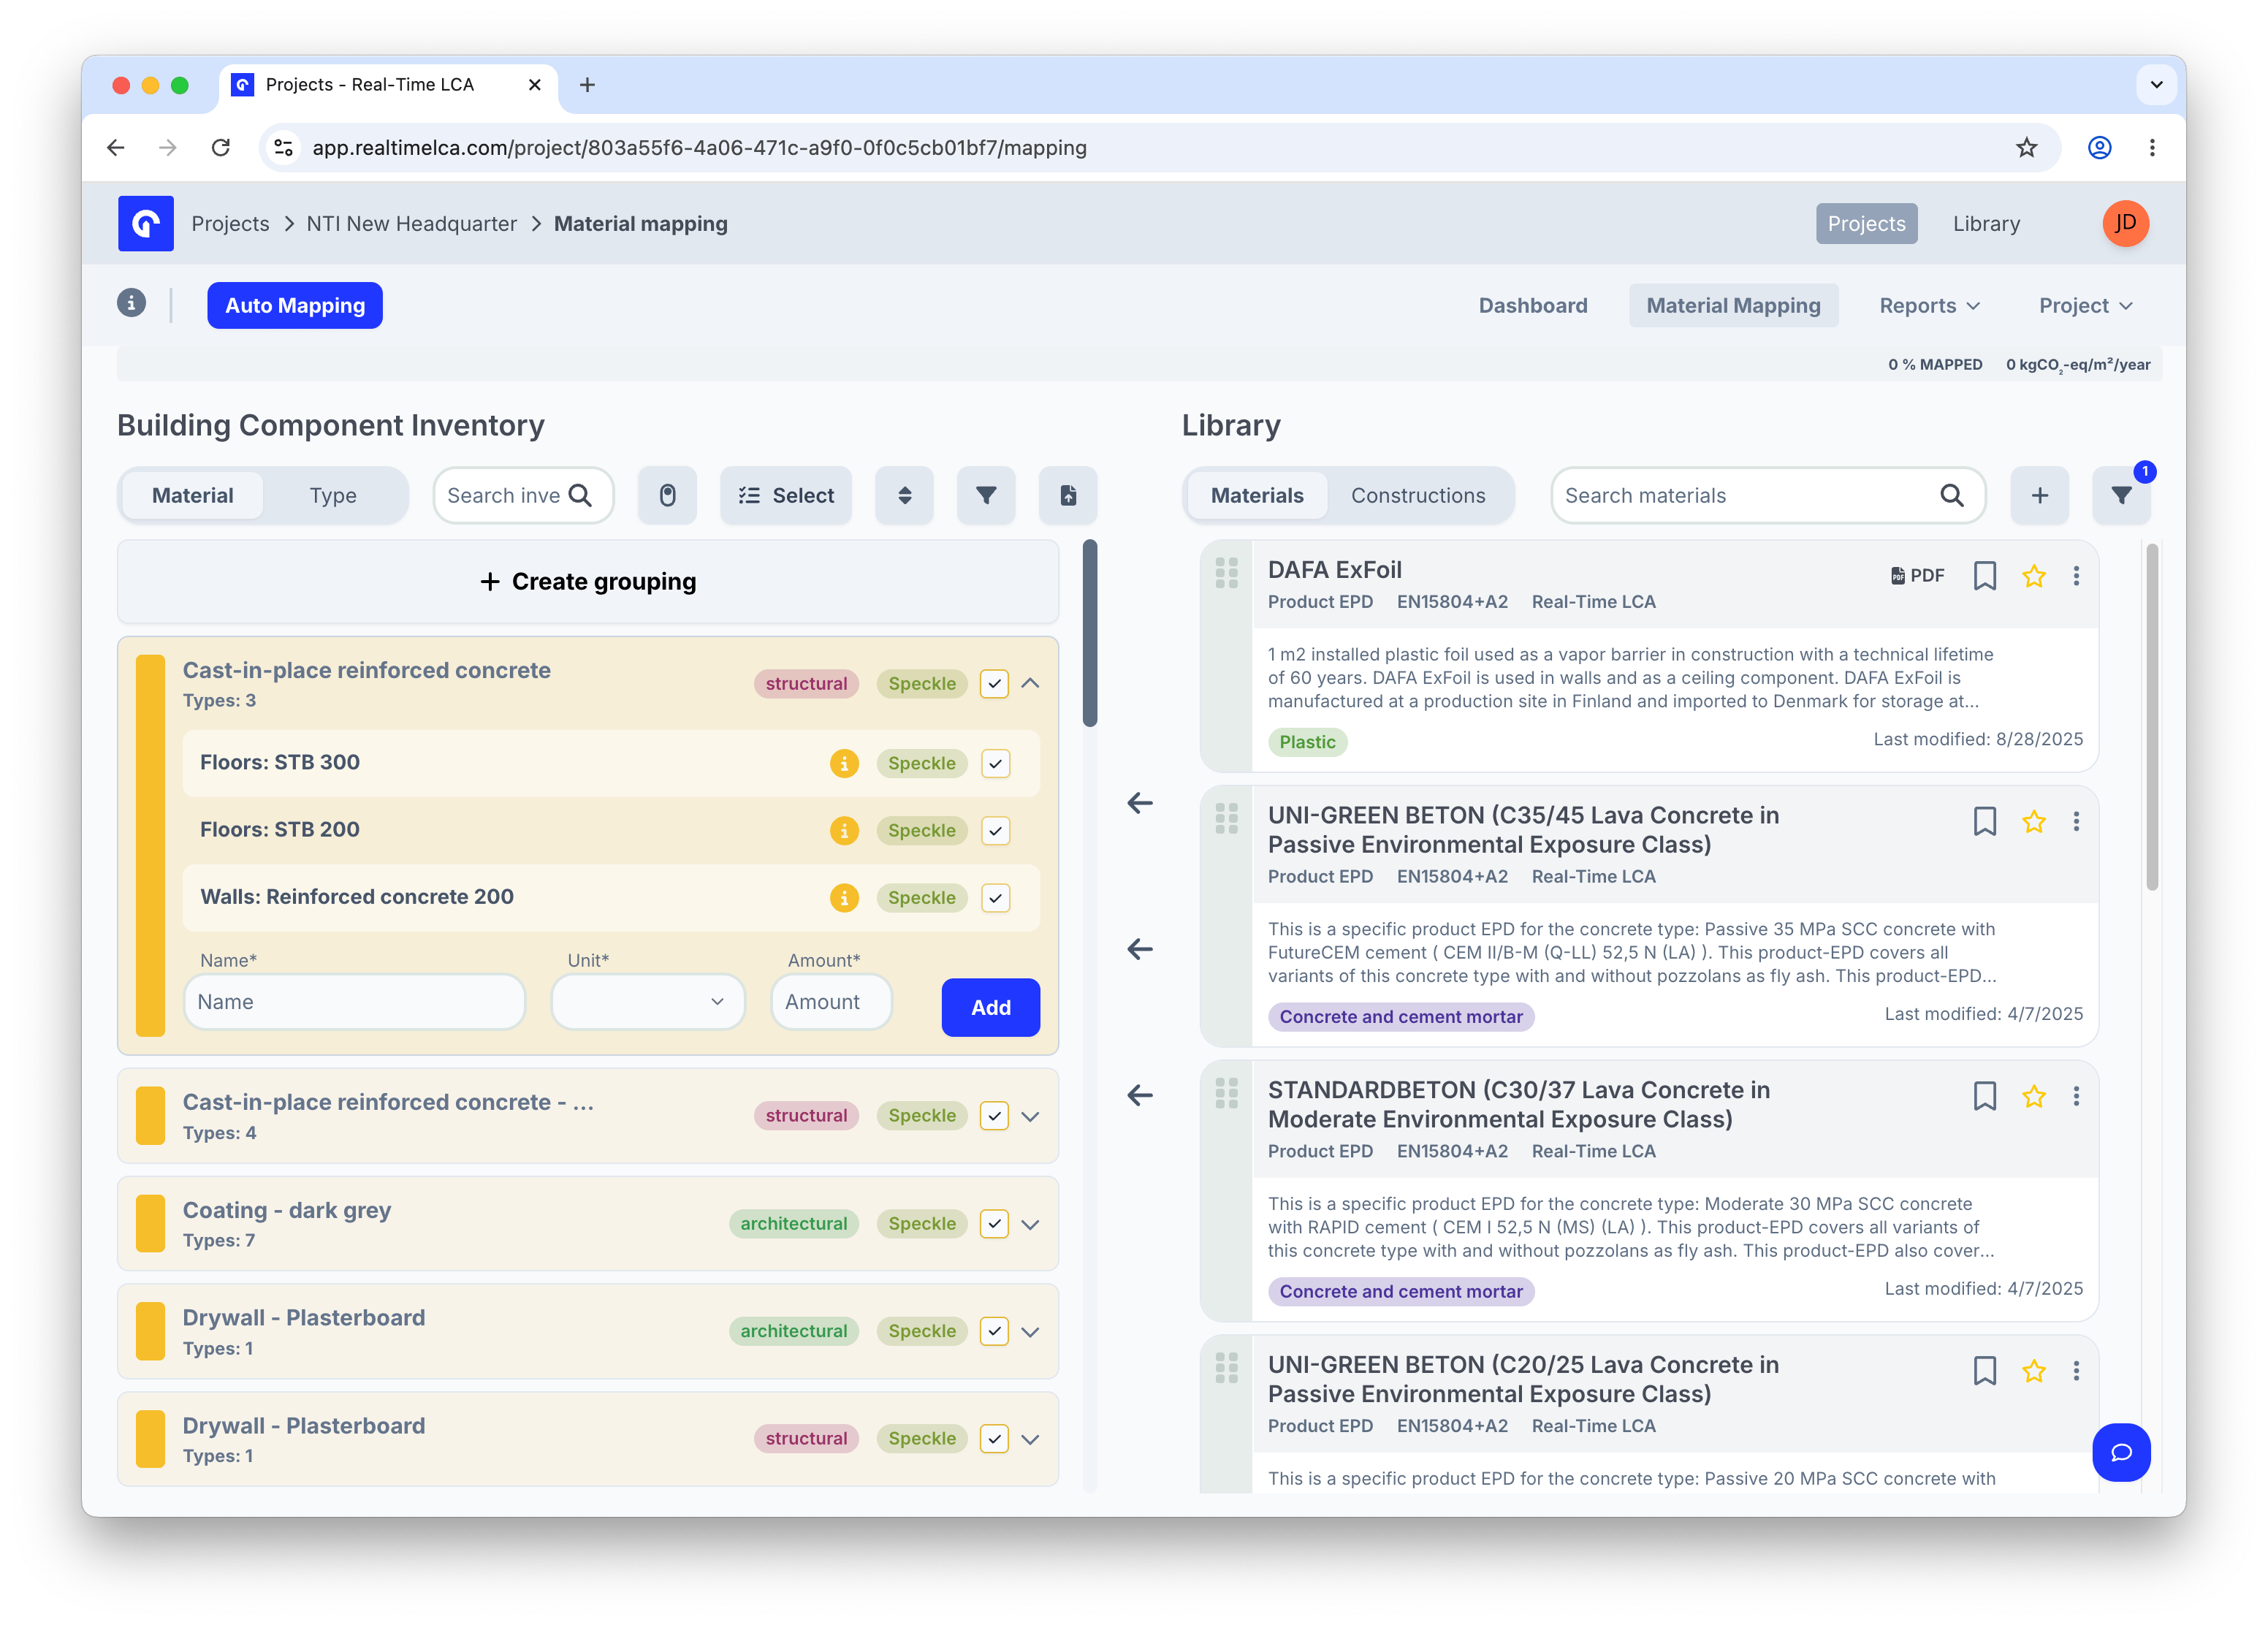
### Group by material or by type
Use the **Material** / **Type** toggle at the top of the inventory to change how items are grouped.
* **Material** — types are bundled by the material they share (for example, all *Cast-in-place reinforced concrete* types in one group). Map once at the group level and every type inside inherits the mapping.
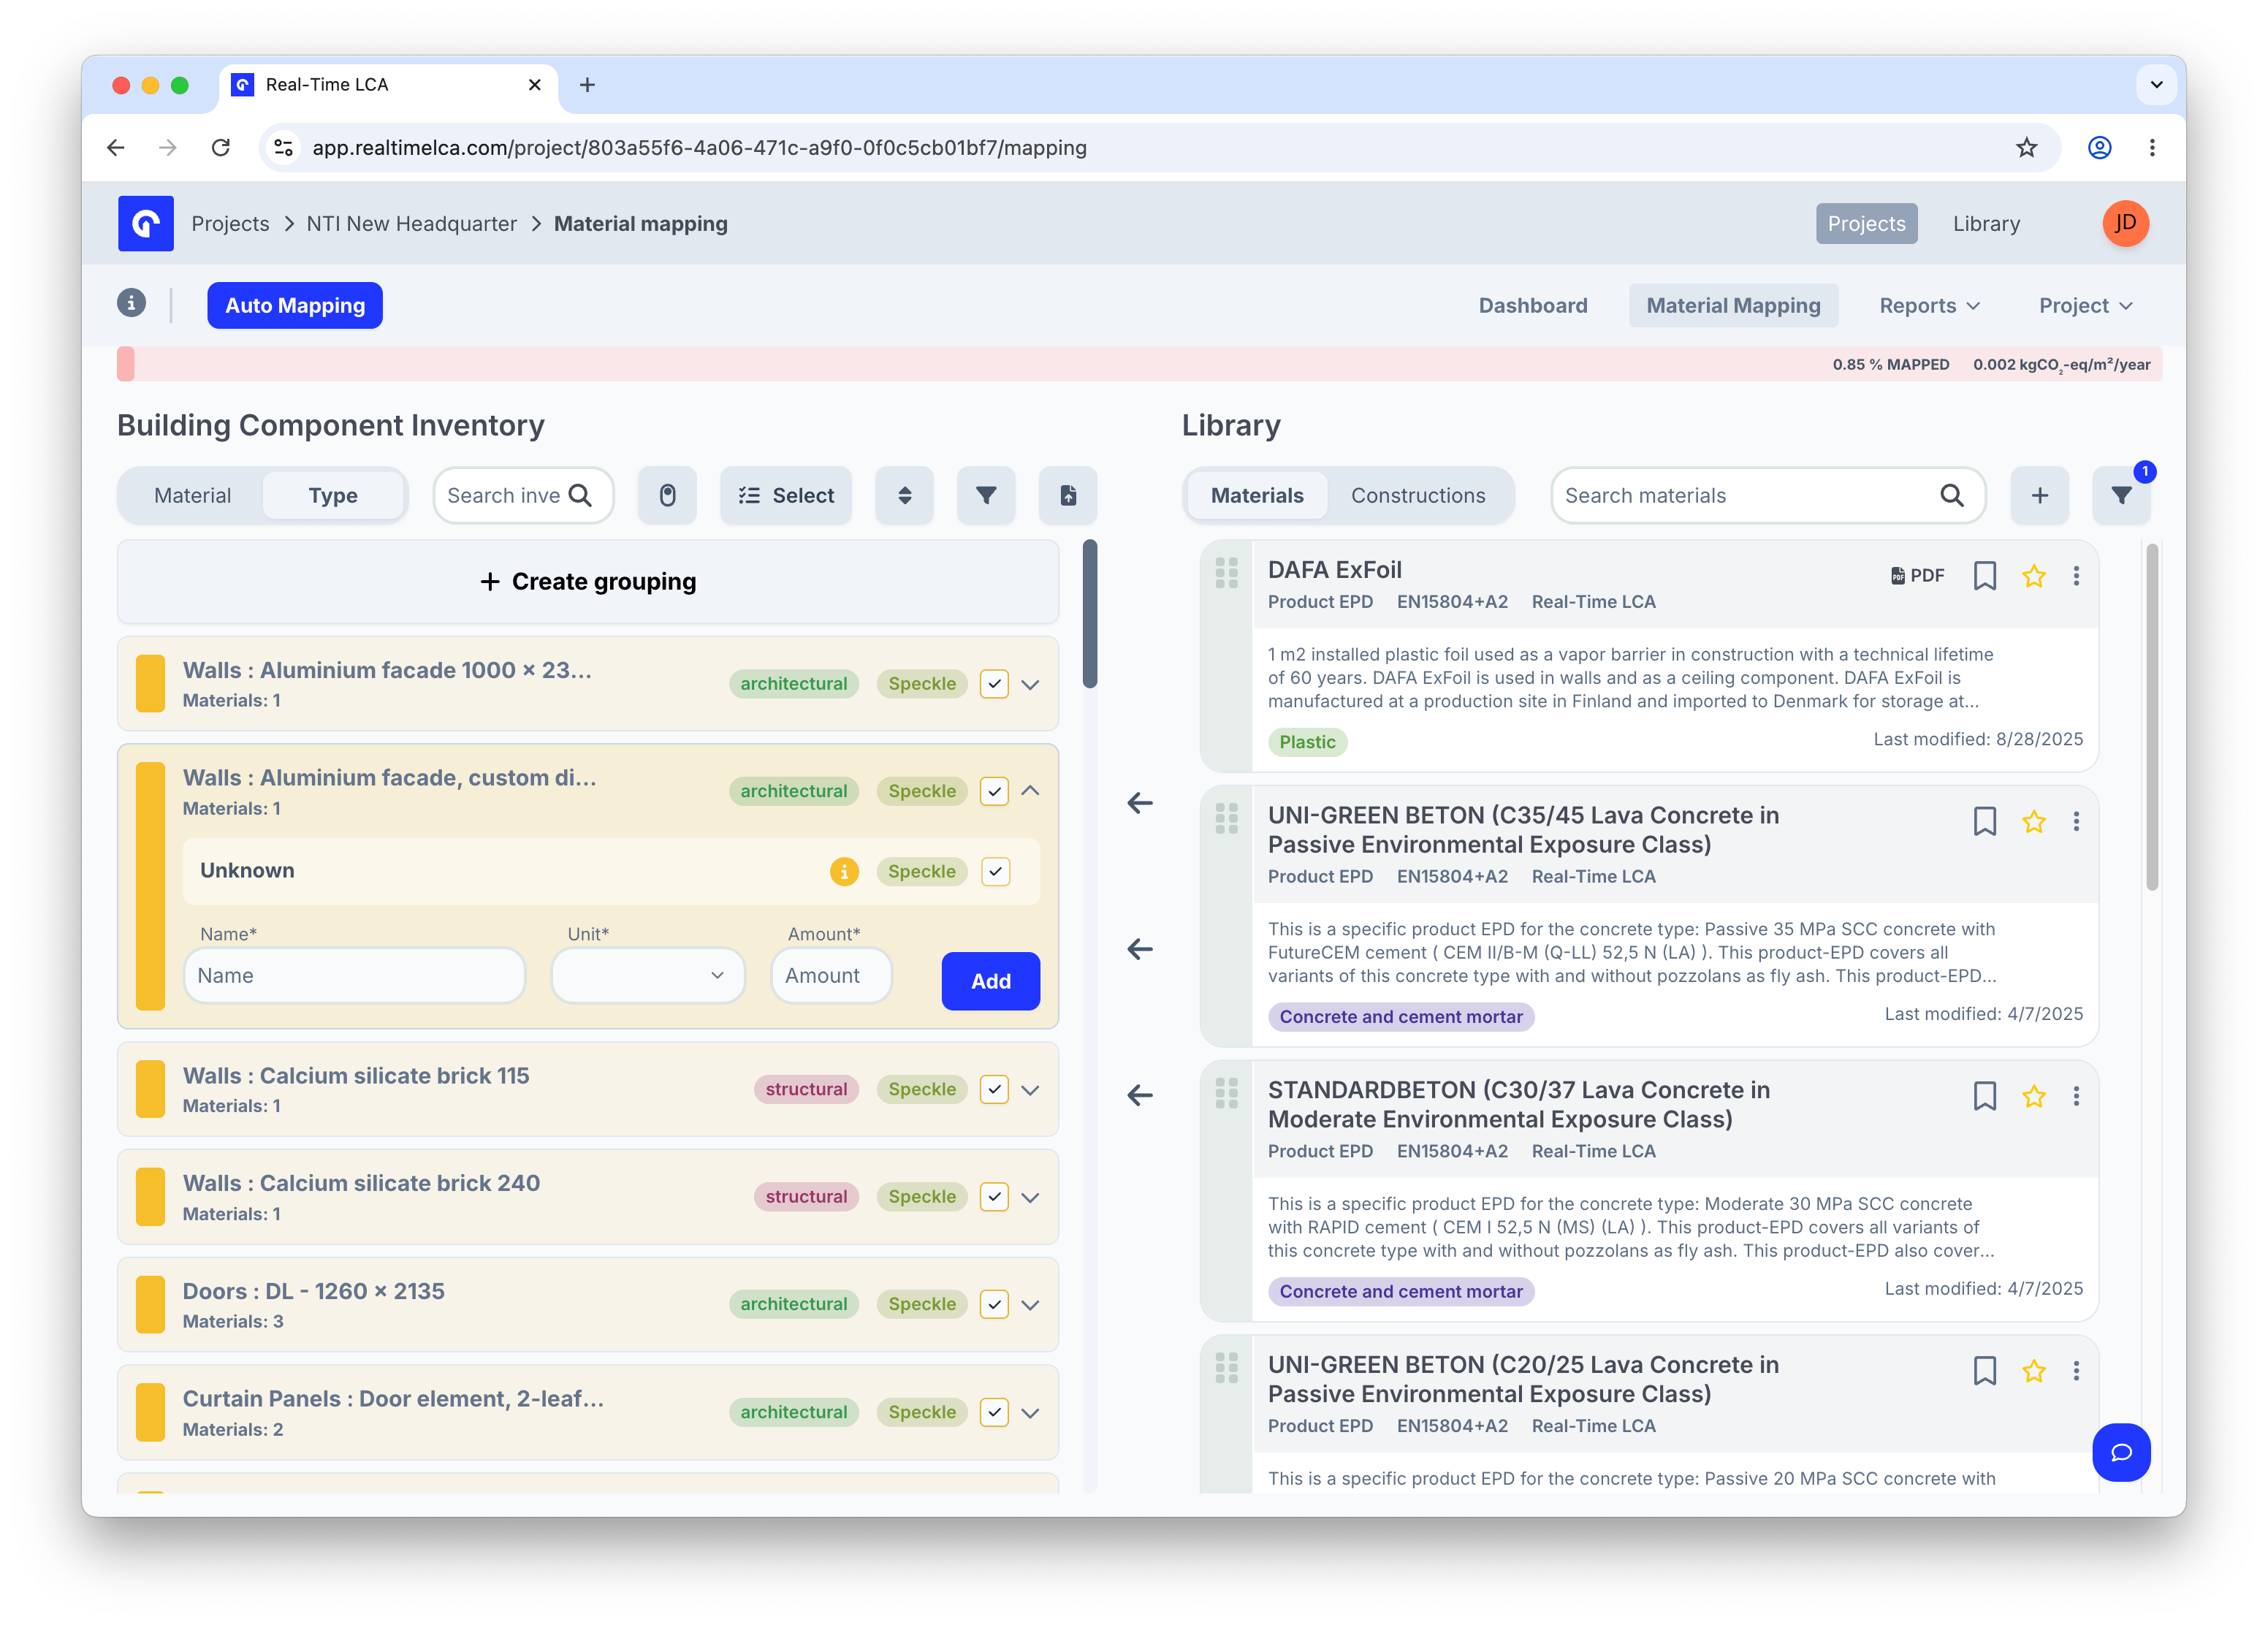
* **Type** — every type is listed individually. Useful when you want to map types one by one or inspect a specific type's properties.
Click the caret on a group to expand it and see the types it contains.
## Page layout
The page is split into two panels that work together:
| Panel | Purpose |
| --------------------------------------- | ------------------------------------------------------------------------------------------------------------------------------------- |
| **Building Component Inventory** (left) | The items and groupings that came from your model or upload. This is what you need to map. |
| **Library** (right) | Materials and constructions you can drag onto inventory items. Switch between the **Materials** and **Constructions** tabs as needed. |
The **Auto Mapping** button in the top-left runs an automated pass across the whole inventory — see [Auto mapping](#auto-mapping) at the bottom of this page.
The header strip also shows two live numbers:
* **% MAPPED** — share of inventory items currently linked to a material.
* **kgCO₂/m²/year** — current intensity based on what is already mapped.
Both update as you map, unmap, or change an item's properties.
The intensity unit (and the reference area it is divided by) is calculation-specific — it follows the framework selected for the project. See [National compliance](/methodology-and-compliance#national-compliance) for the rules per country.
## Building Component Inventory
### Group by material or by type
Use the **Material** / **Type** toggle at the top of the inventory to change how items are grouped.
* **Material** — types are bundled by the material they share (for example, all *Cast-in-place reinforced concrete* types in one group). Map once at the group level and every type inside inherits the mapping.
* **Type** — every type is listed individually. Useful when you want to map types one by one or inspect a specific type's properties.
Click the caret on a group to expand it and see the types it contains.
 ### Inventory card information
Each inventory row carries one or more badges and chips that tell you something at a glance:
| Label | Meaning |
| ------------------------------------------------- | ------------------------------------------------------------------------------------------------------------------------------------------------------------------------------------------------------------------------------------------ |
| **Model (e.g. *Modelname*)** | The source model the item came from. When several models are linked to the project, this is how you can tell them apart on the row. |
| **Data source** — *Speckle*, *Excel*, or *Custom* | Where the item entered Real-Time LCA. **Speckle** comes from a connected Speckle model, **Excel** from an uploaded spreadsheet, and **Custom** from items added through the frontend or the [REST API](/user-guide/integrations/rest-api). |
| **Auto Mapped** | The item was mapped by the [auto-mapping](#auto-mapping) flow and has not yet been accepted. |
| **Unknown** | The item came in from an authoring tool (Revit, Archicad, …) with geometry but no material assigned — there is nothing to identify it by, which is why we label it *Unknown*. Set a material and classification before mapping. |
| **Material: N** | Number of children inside the group, mapped or not. Lets you see the size of a group without expanding it. |
### Inventory card information
Each inventory row carries one or more badges and chips that tell you something at a glance:
| Label | Meaning |
| ------------------------------------------------- | ------------------------------------------------------------------------------------------------------------------------------------------------------------------------------------------------------------------------------------------ |
| **Model (e.g. *Modelname*)** | The source model the item came from. When several models are linked to the project, this is how you can tell them apart on the row. |
| **Data source** — *Speckle*, *Excel*, or *Custom* | Where the item entered Real-Time LCA. **Speckle** comes from a connected Speckle model, **Excel** from an uploaded spreadsheet, and **Custom** from items added through the frontend or the [REST API](/user-guide/integrations/rest-api). |
| **Auto Mapped** | The item was mapped by the [auto-mapping](#auto-mapping) flow and has not yet been accepted. |
| **Unknown** | The item came in from an authoring tool (Revit, Archicad, …) with geometry but no material assigned — there is nothing to identify it by, which is why we label it *Unknown*. Set a material and classification before mapping. |
| **Material: N** | Number of children inside the group, mapped or not. Lets you see the size of a group without expanding it. |
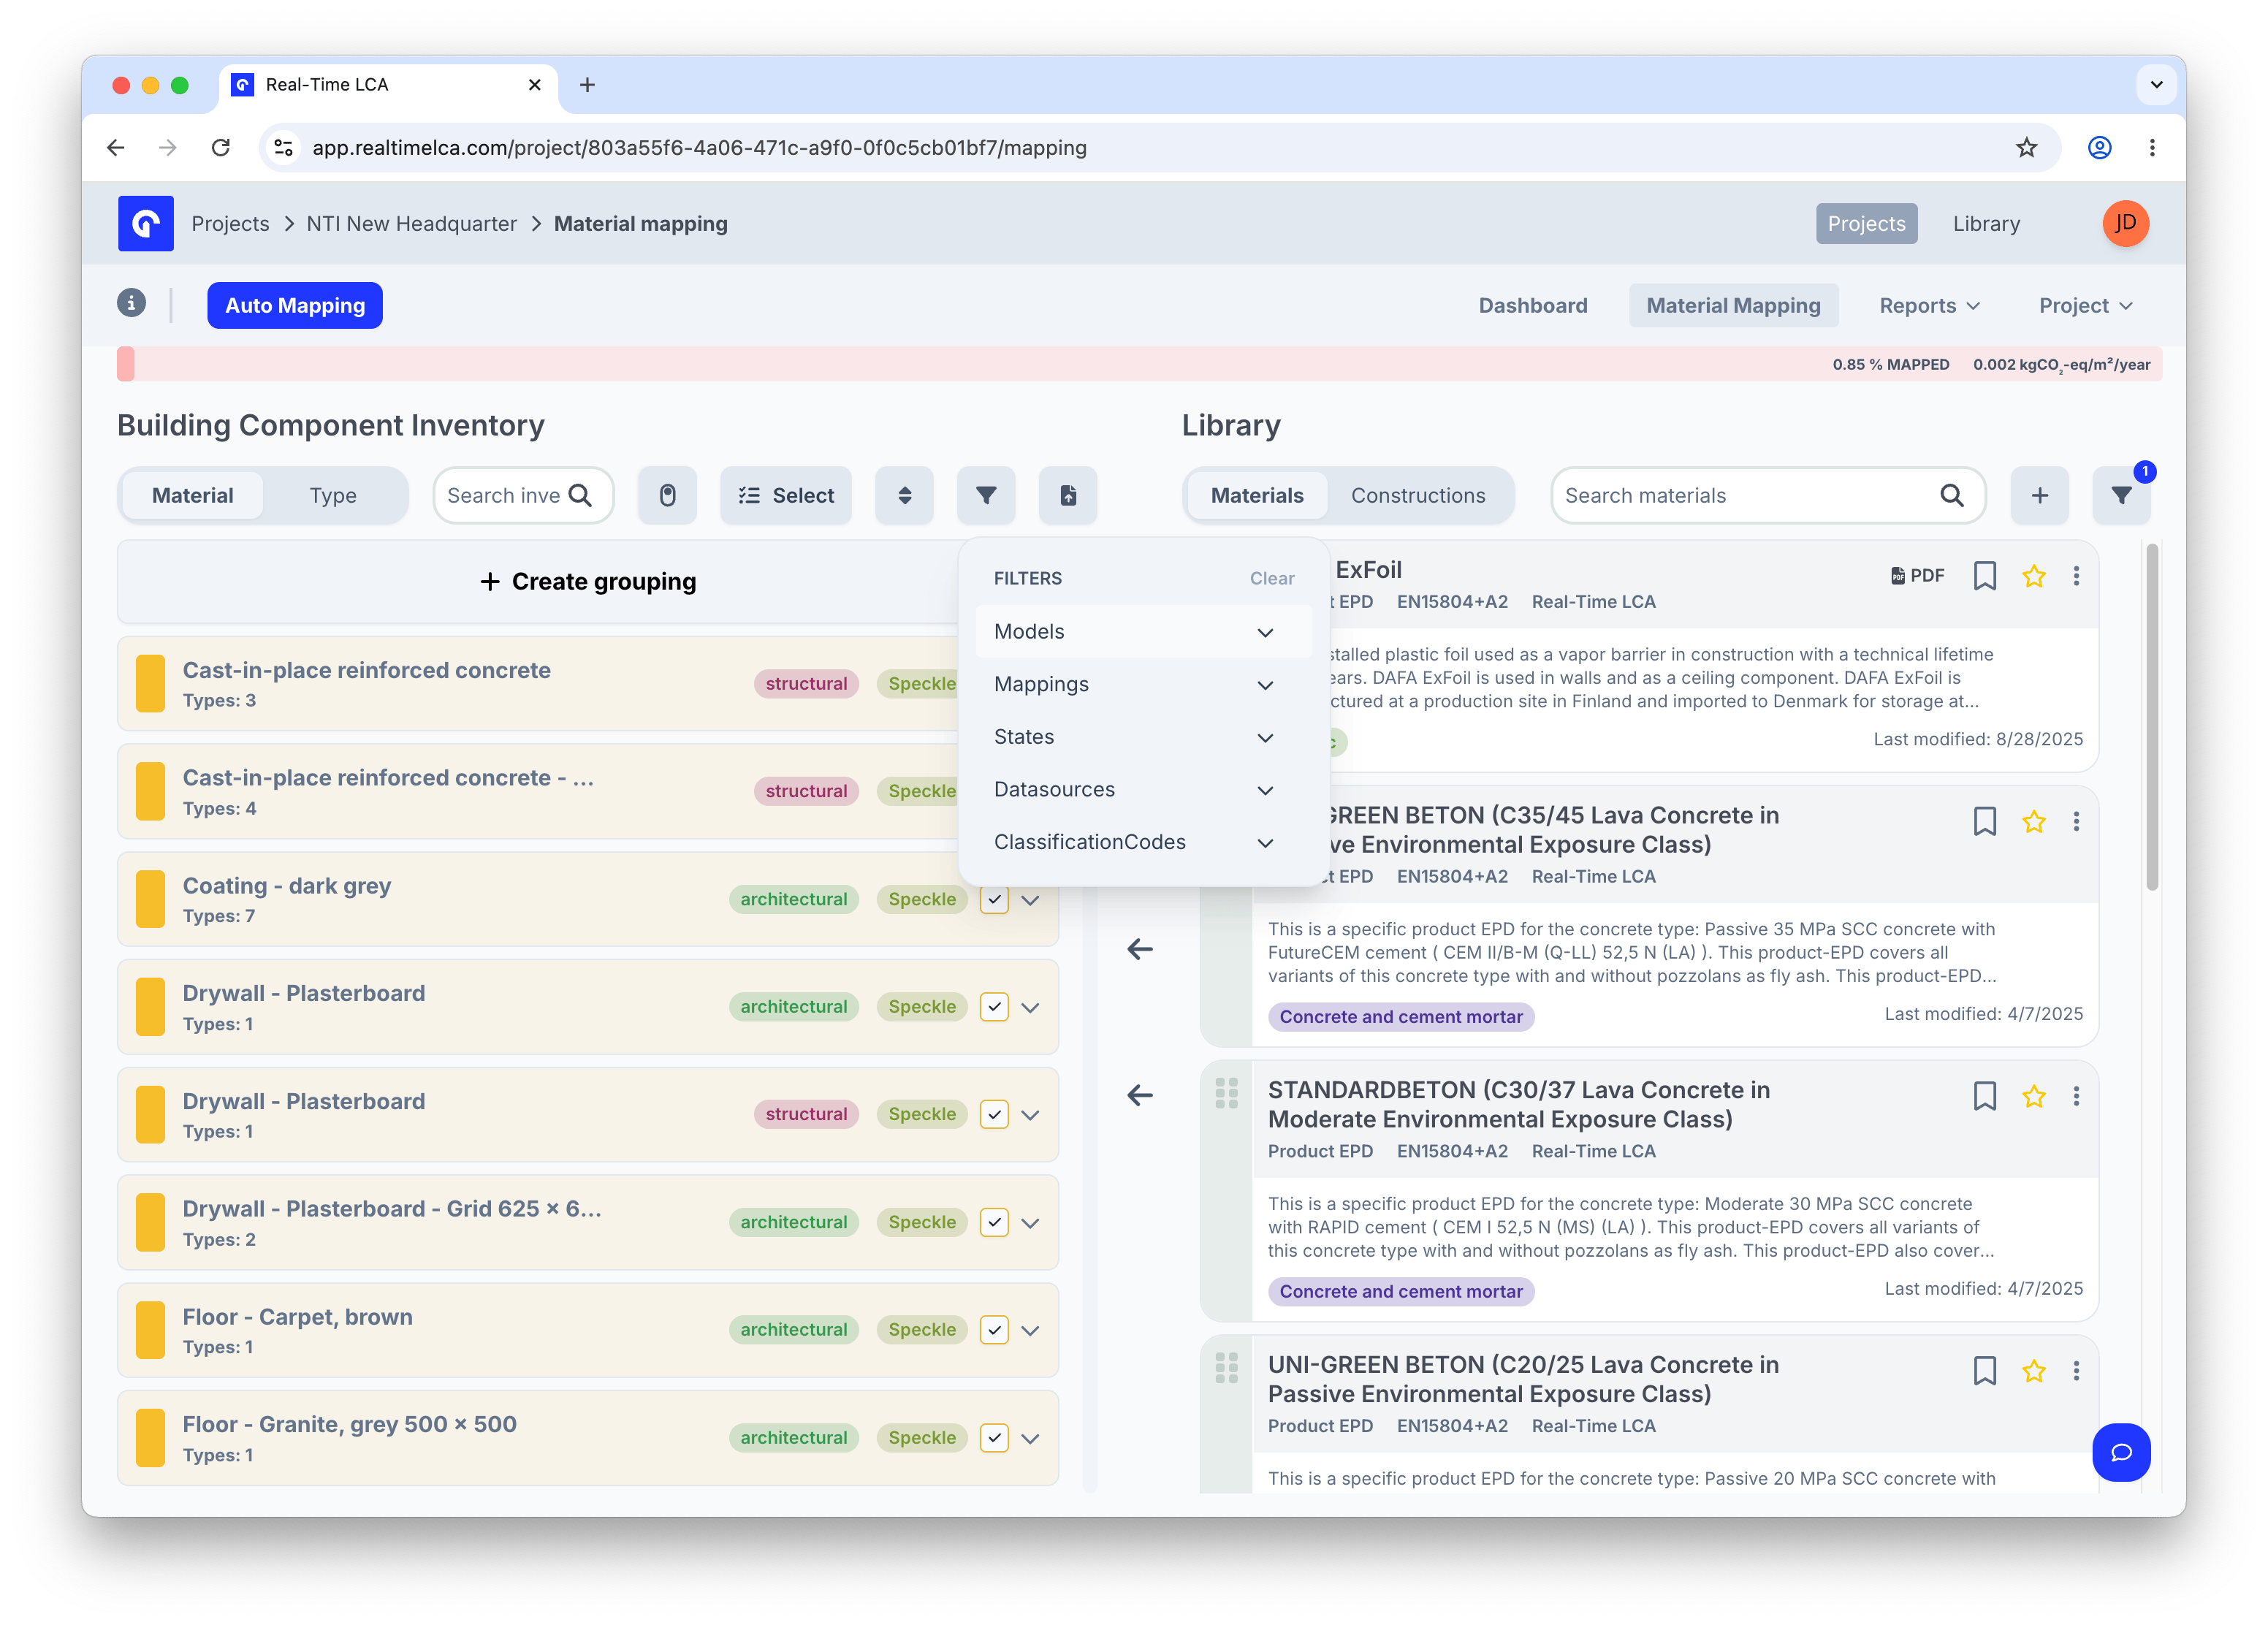
 ### Search, sort, and filter
The toolbar above the inventory has four ways to narrow the list:
* **Search inventory** — free-text search across item names.
* **Sort** — order the list by **Name** or **Amount**.
* **Filter** — combine filters across **Models**, **Mappings**, **States**, **DataSources**, and **ClassificationCodes**.
* **Select** — enter selection mode to act on multiple rows at once.
### Search, sort, and filter
The toolbar above the inventory has four ways to narrow the list:
* **Search inventory** — free-text search across item names.
* **Sort** — order the list by **Name** or **Amount**.
* **Filter** — combine filters across **Models**, **Mappings**, **States**, **DataSources**, and **ClassificationCodes**.
* **Select** — enter selection mode to act on multiple rows at once.

 ## Item properties
Click an item's name (or its expand caret) to open the **Item properties** modal. This is where you set the data the calculation needs — lifetime, classification, and the unit that the mapped material is measured in.
## Item properties
Click an item's name (or its expand caret) to open the **Item properties** modal. This is where you set the data the calculation needs — lifetime, classification, and the unit that the mapped material is measured in.
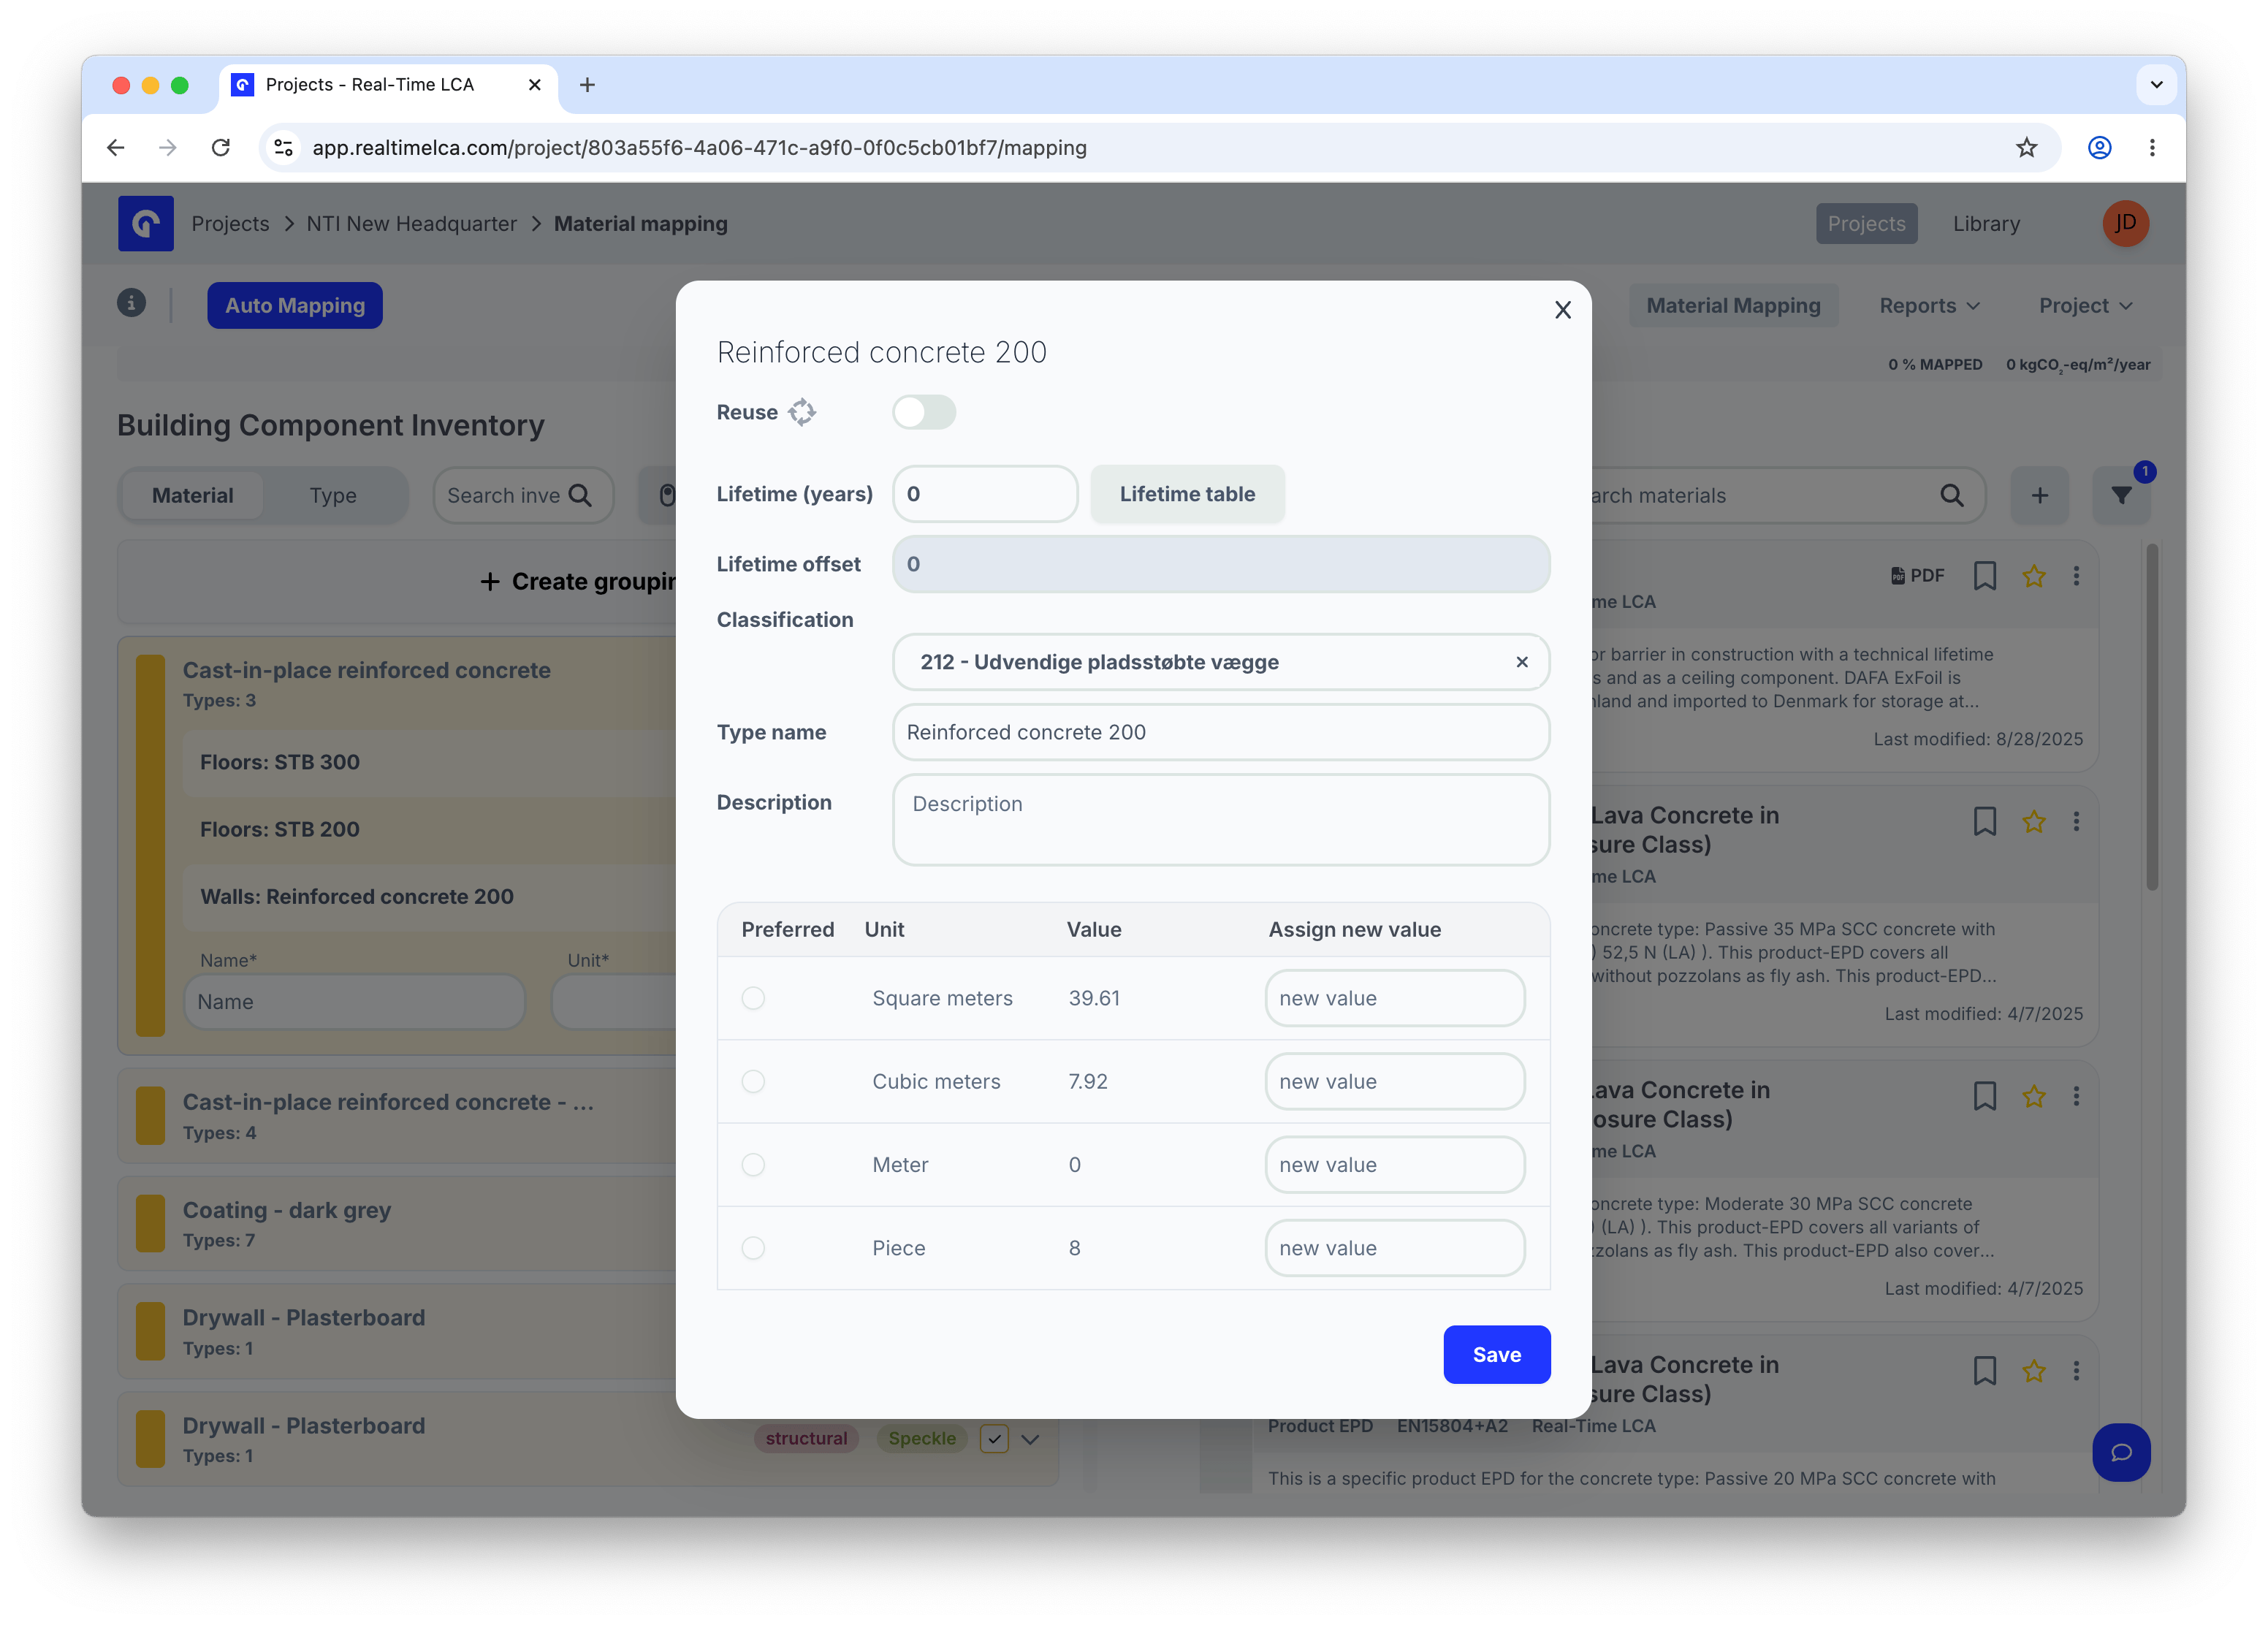 | Field | What it does |
| ----------------------------- | ------------------------------------------------------------------------------------------------------------------------------------------------------------------------------------------------------- |
| **Reuse** | Mark the item as a reused element. Reused materials are accounted for differently in the calculation. |
| **Lifetime (years)** | Service lifetime used in the B4 replacement calculation. Leave at 0 to use the default from the **Lifetime table**. |
| **Lifetime offset** | Shift the start of the item's lifetime relative to the project's reference study period. |
| **Classification** | The classification code (for example, the *BR18 Bygningsdelstabel* code) used to look up defaults and group results in reports. |
| **Type name / Material name** | Display name shown in the inventory. The field label depends on the active grouping — it reads *Type name* when the inventory is grouped by **Type**, and *Material name* when grouped by **Material**. |
| **Description** | Free text — visible only inside this modal. |
| **Preferred unit** | The unit the mapped material's impact is multiplied by. Pick the row that matches how the item was quantified. |
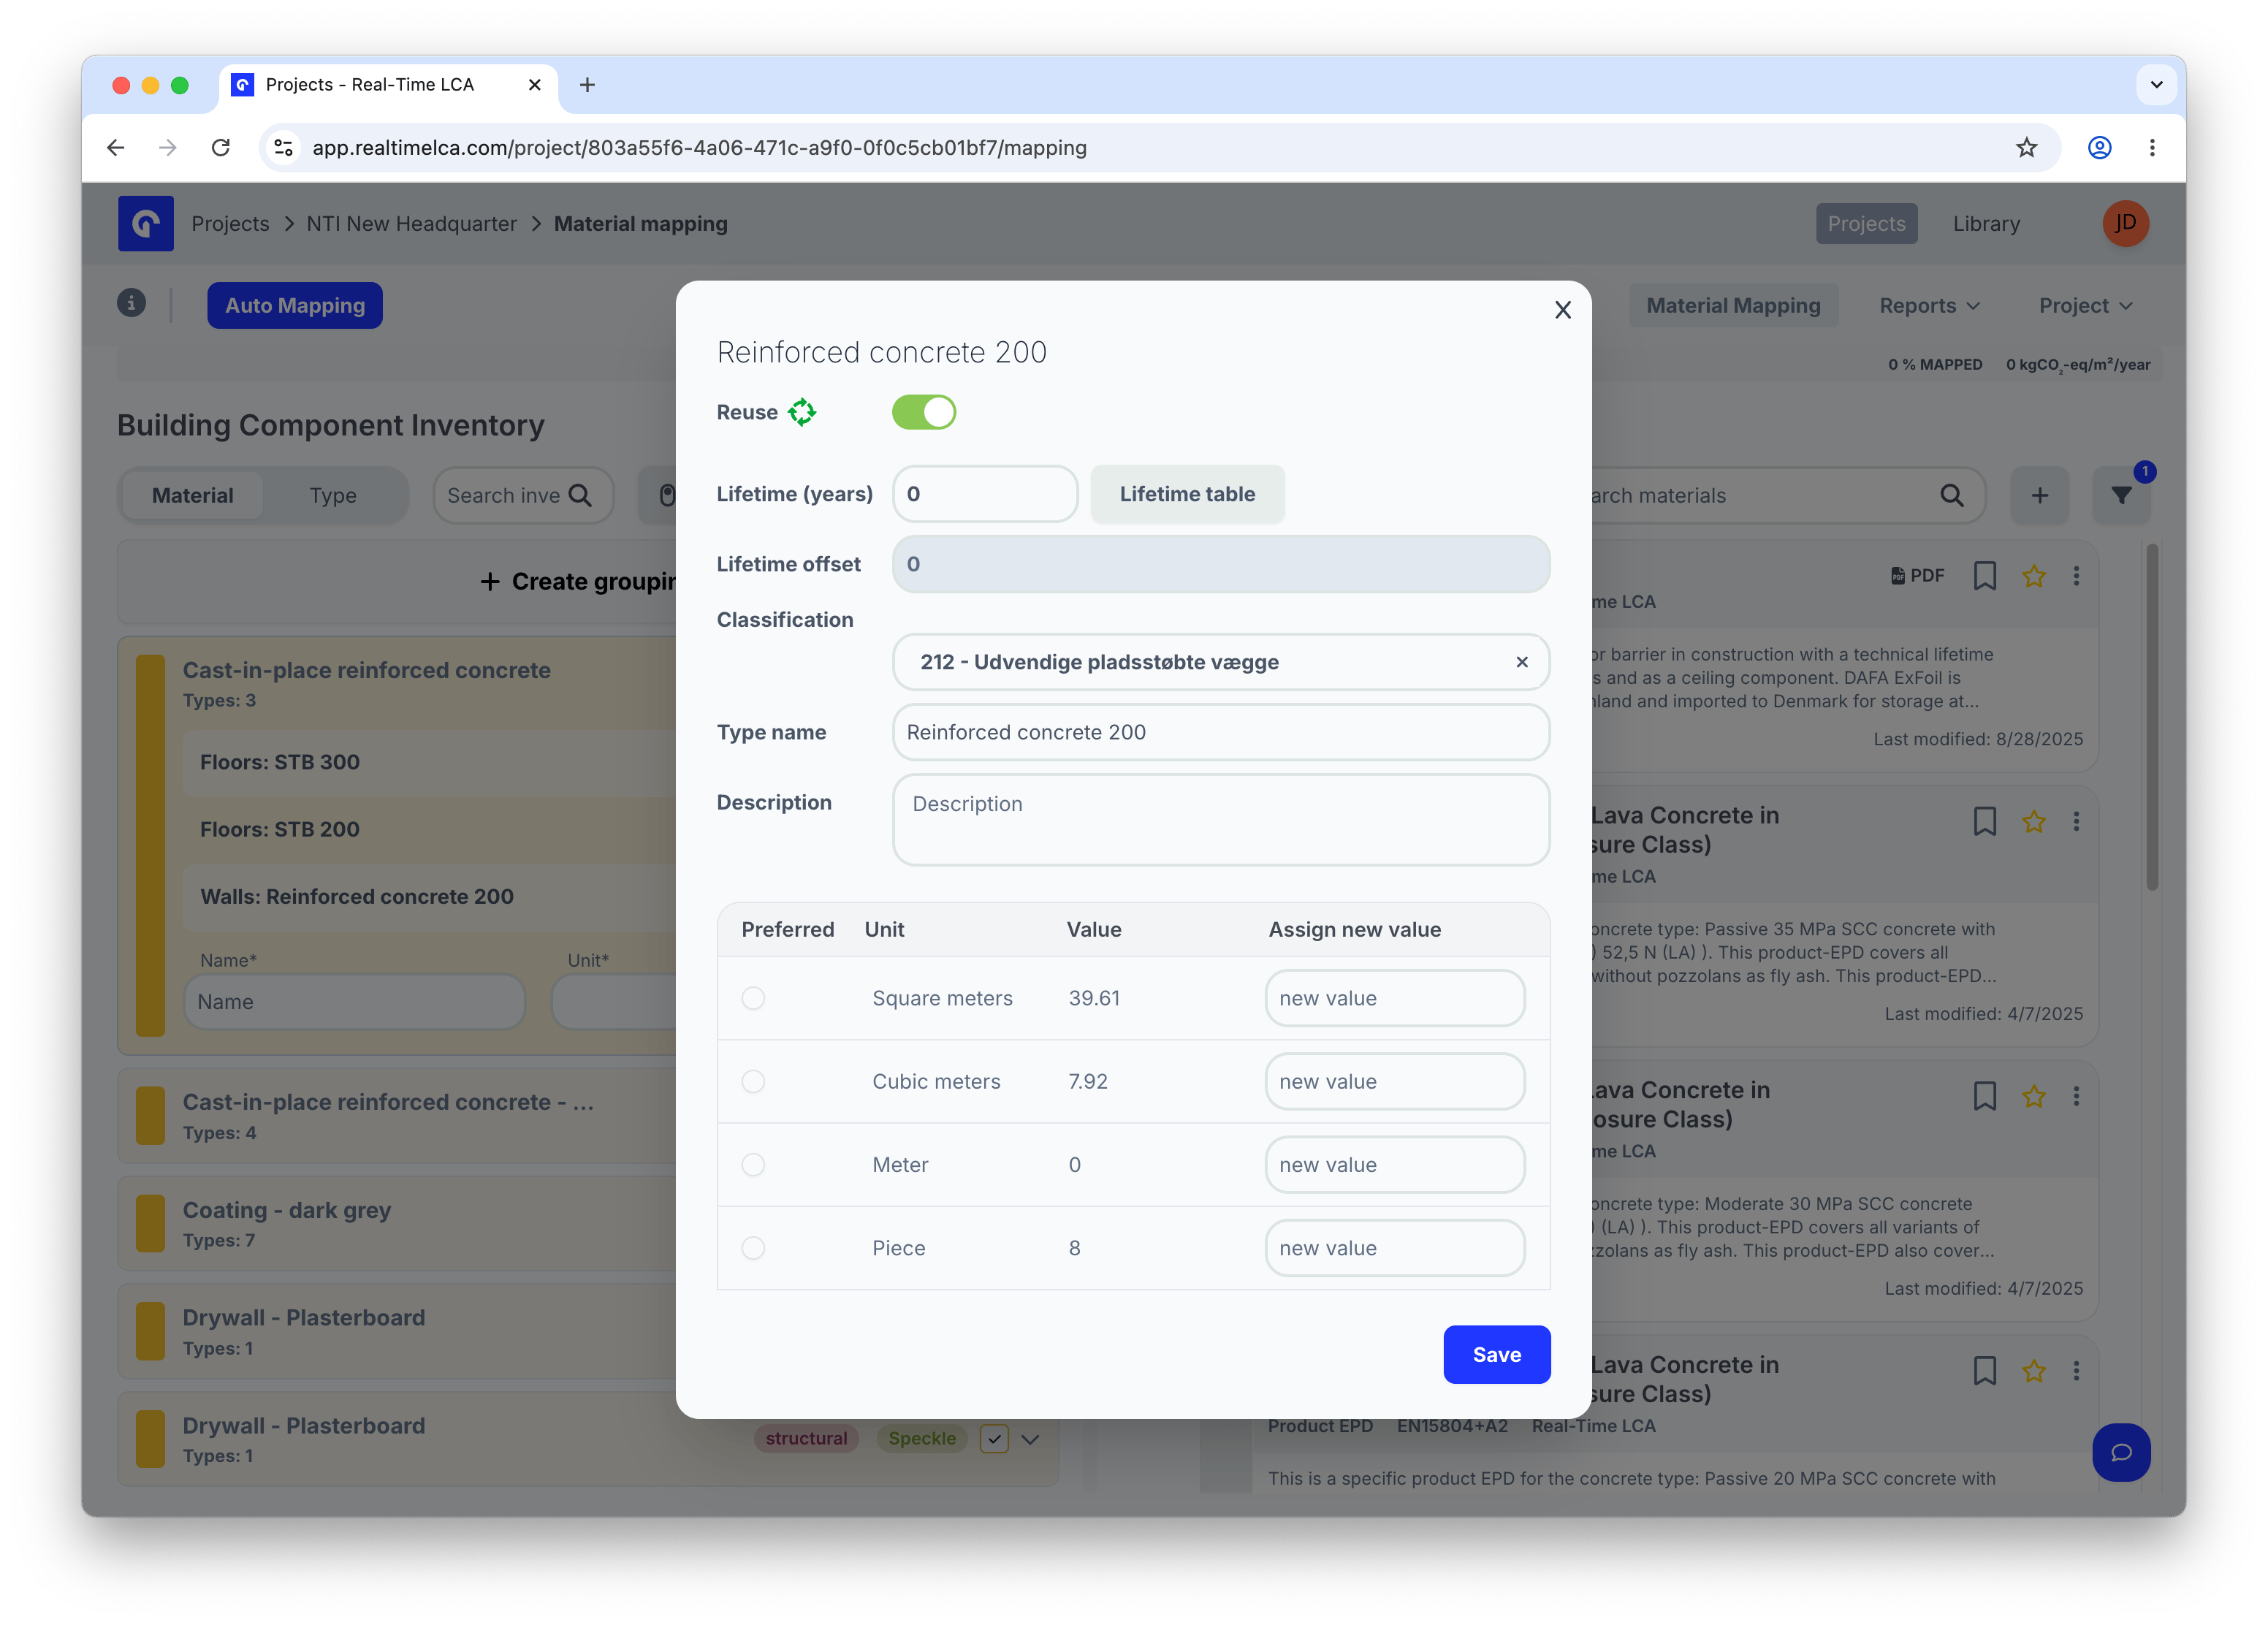
### Mark an item as reused
Flip the **Reuse** toggle on for components that are being kept from an existing building or reused from elsewhere. The item's color in the inventory changes so reused items are easy to spot.
| Field | What it does |
| ----------------------------- | ------------------------------------------------------------------------------------------------------------------------------------------------------------------------------------------------------- |
| **Reuse** | Mark the item as a reused element. Reused materials are accounted for differently in the calculation. |
| **Lifetime (years)** | Service lifetime used in the B4 replacement calculation. Leave at 0 to use the default from the **Lifetime table**. |
| **Lifetime offset** | Shift the start of the item's lifetime relative to the project's reference study period. |
| **Classification** | The classification code (for example, the *BR18 Bygningsdelstabel* code) used to look up defaults and group results in reports. |
| **Type name / Material name** | Display name shown in the inventory. The field label depends on the active grouping — it reads *Type name* when the inventory is grouped by **Type**, and *Material name* when grouped by **Material**. |
| **Description** | Free text — visible only inside this modal. |
| **Preferred unit** | The unit the mapped material's impact is multiplied by. Pick the row that matches how the item was quantified. |
### Mark an item as reused
Flip the **Reuse** toggle on for components that are being kept from an existing building or reused from elsewhere. The item's color in the inventory changes so reused items are easy to spot.
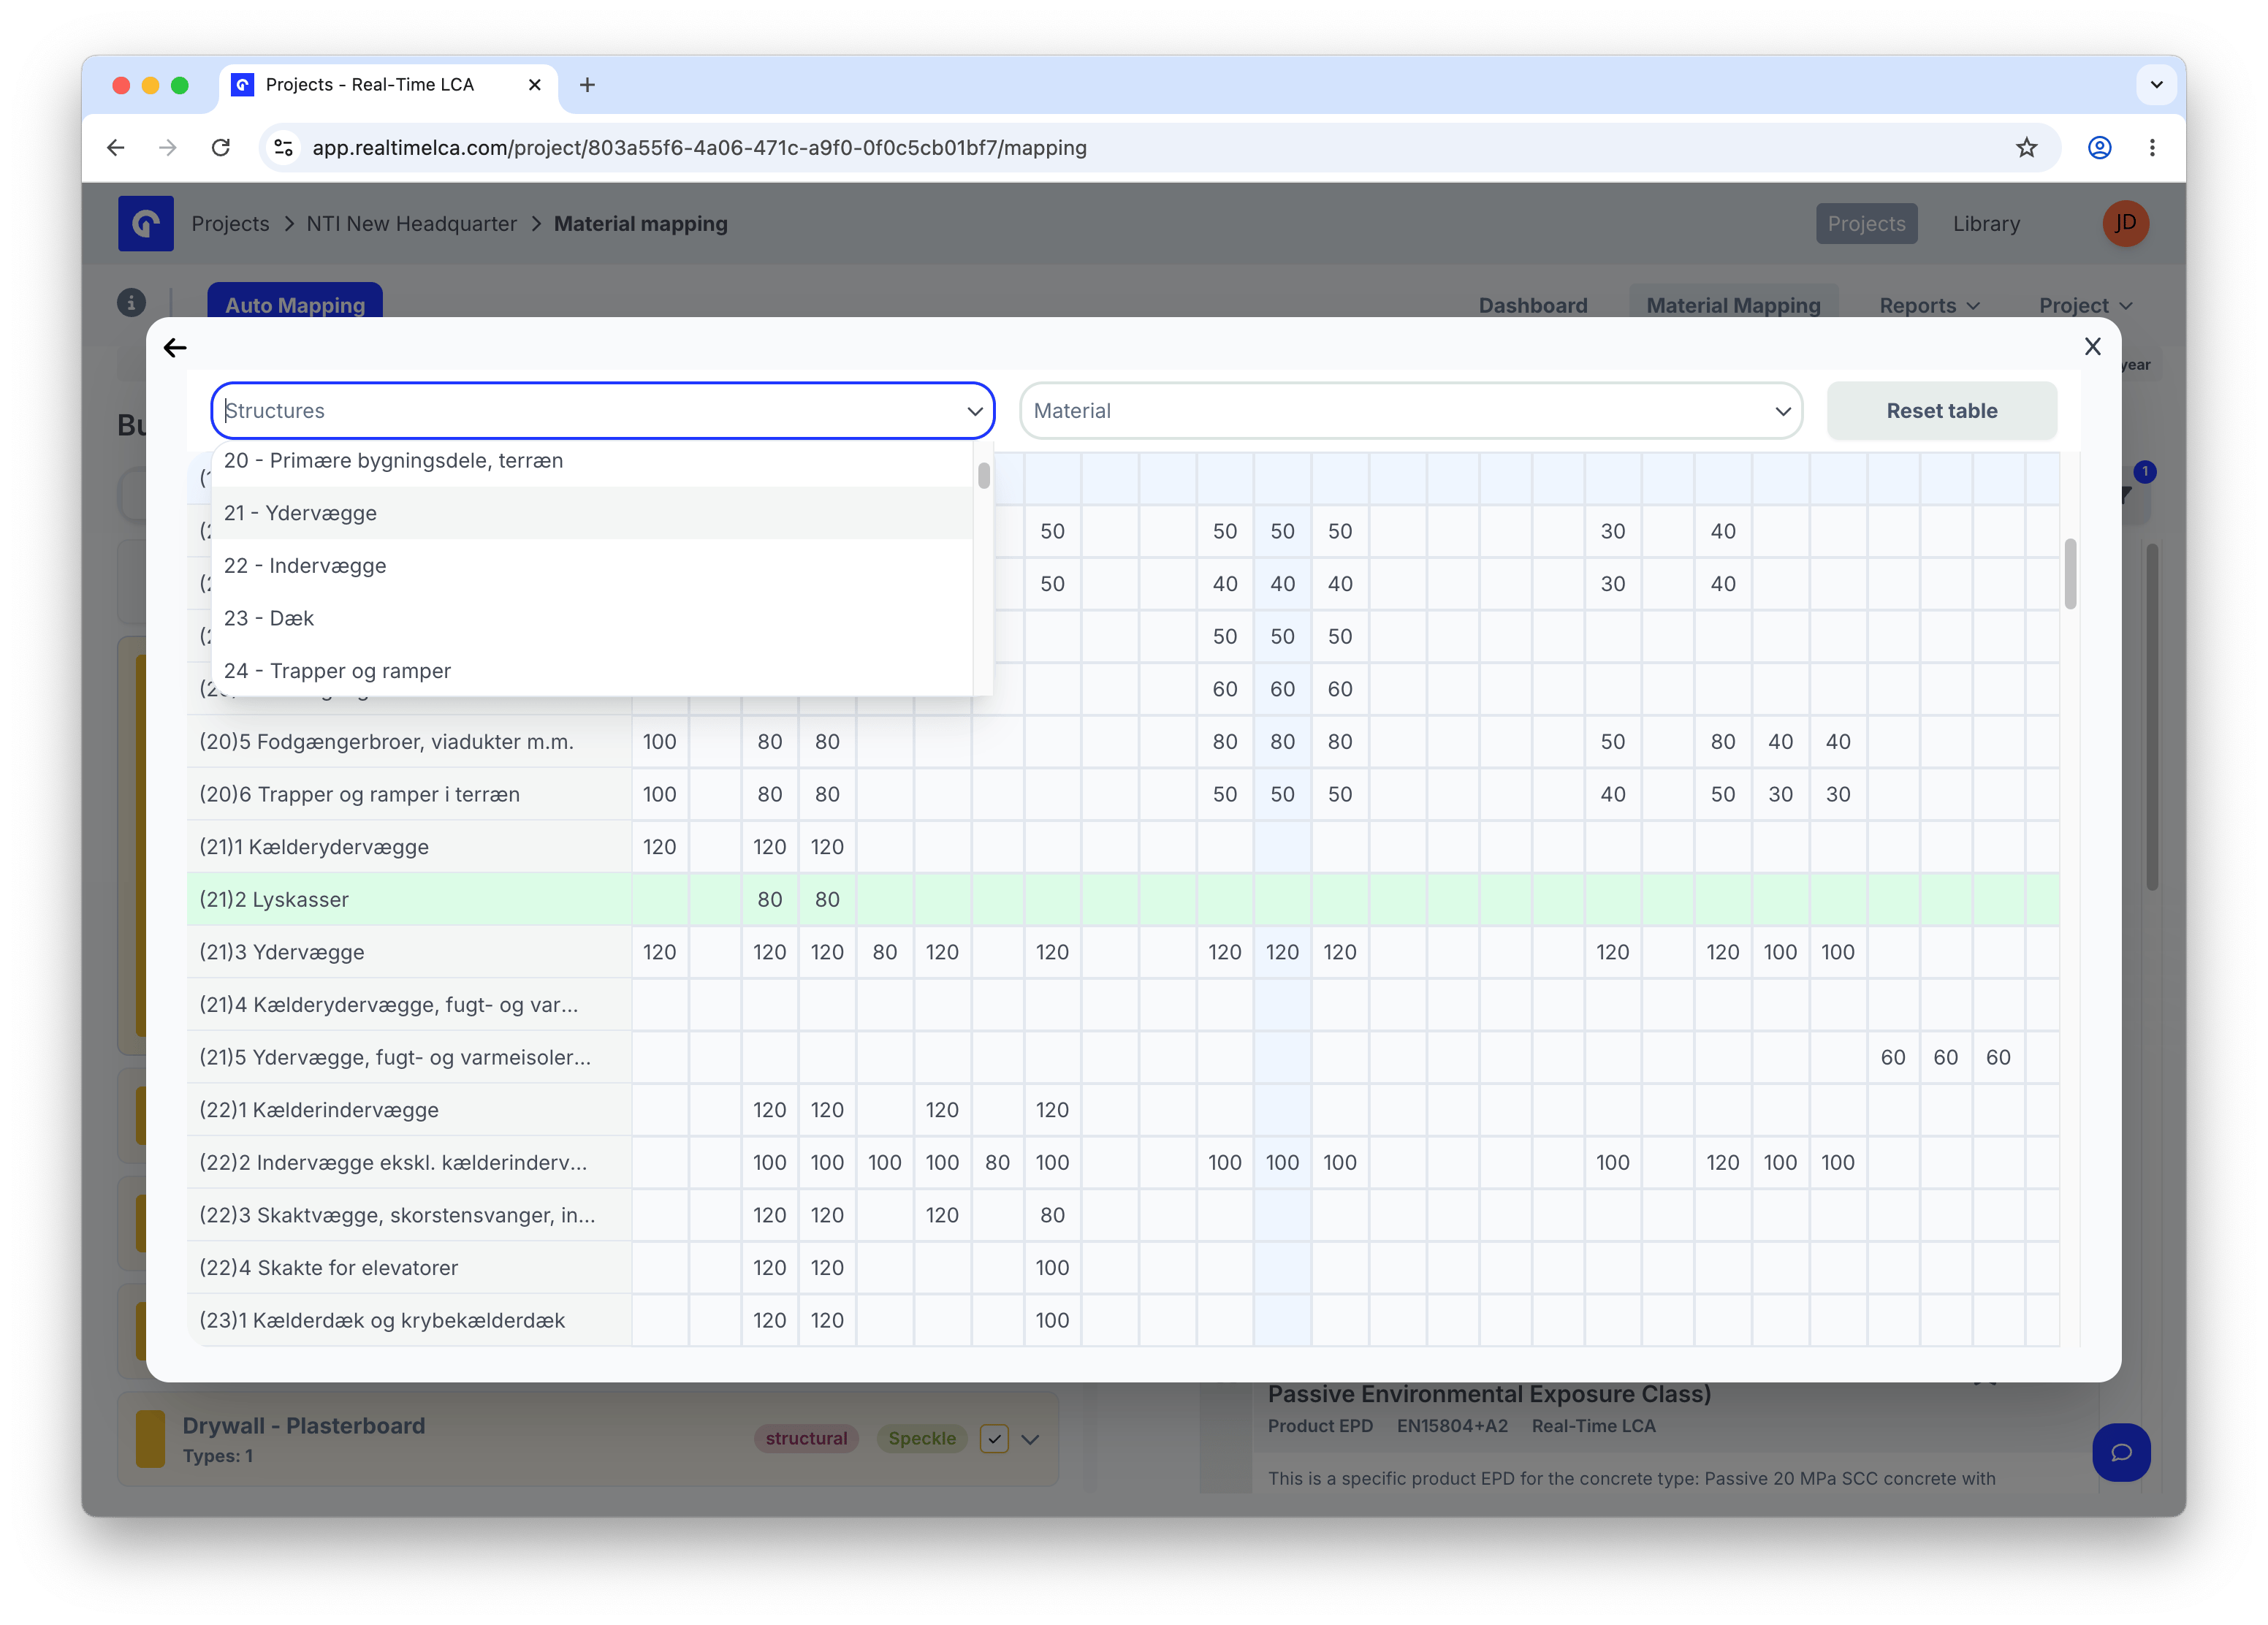
 ### Lifetime table
Click **Lifetime table** next to the lifetime field to open the default service lifetime reference for the active classification system. Pick a **Structure** group and a **Material** to read the default lifetime for that combination, then close the table to apply it.
### Lifetime table
Click **Lifetime table** next to the lifetime field to open the default service lifetime reference for the active classification system. Pick a **Structure** group and a **Material** to read the default lifetime for that combination, then close the table to apply it.
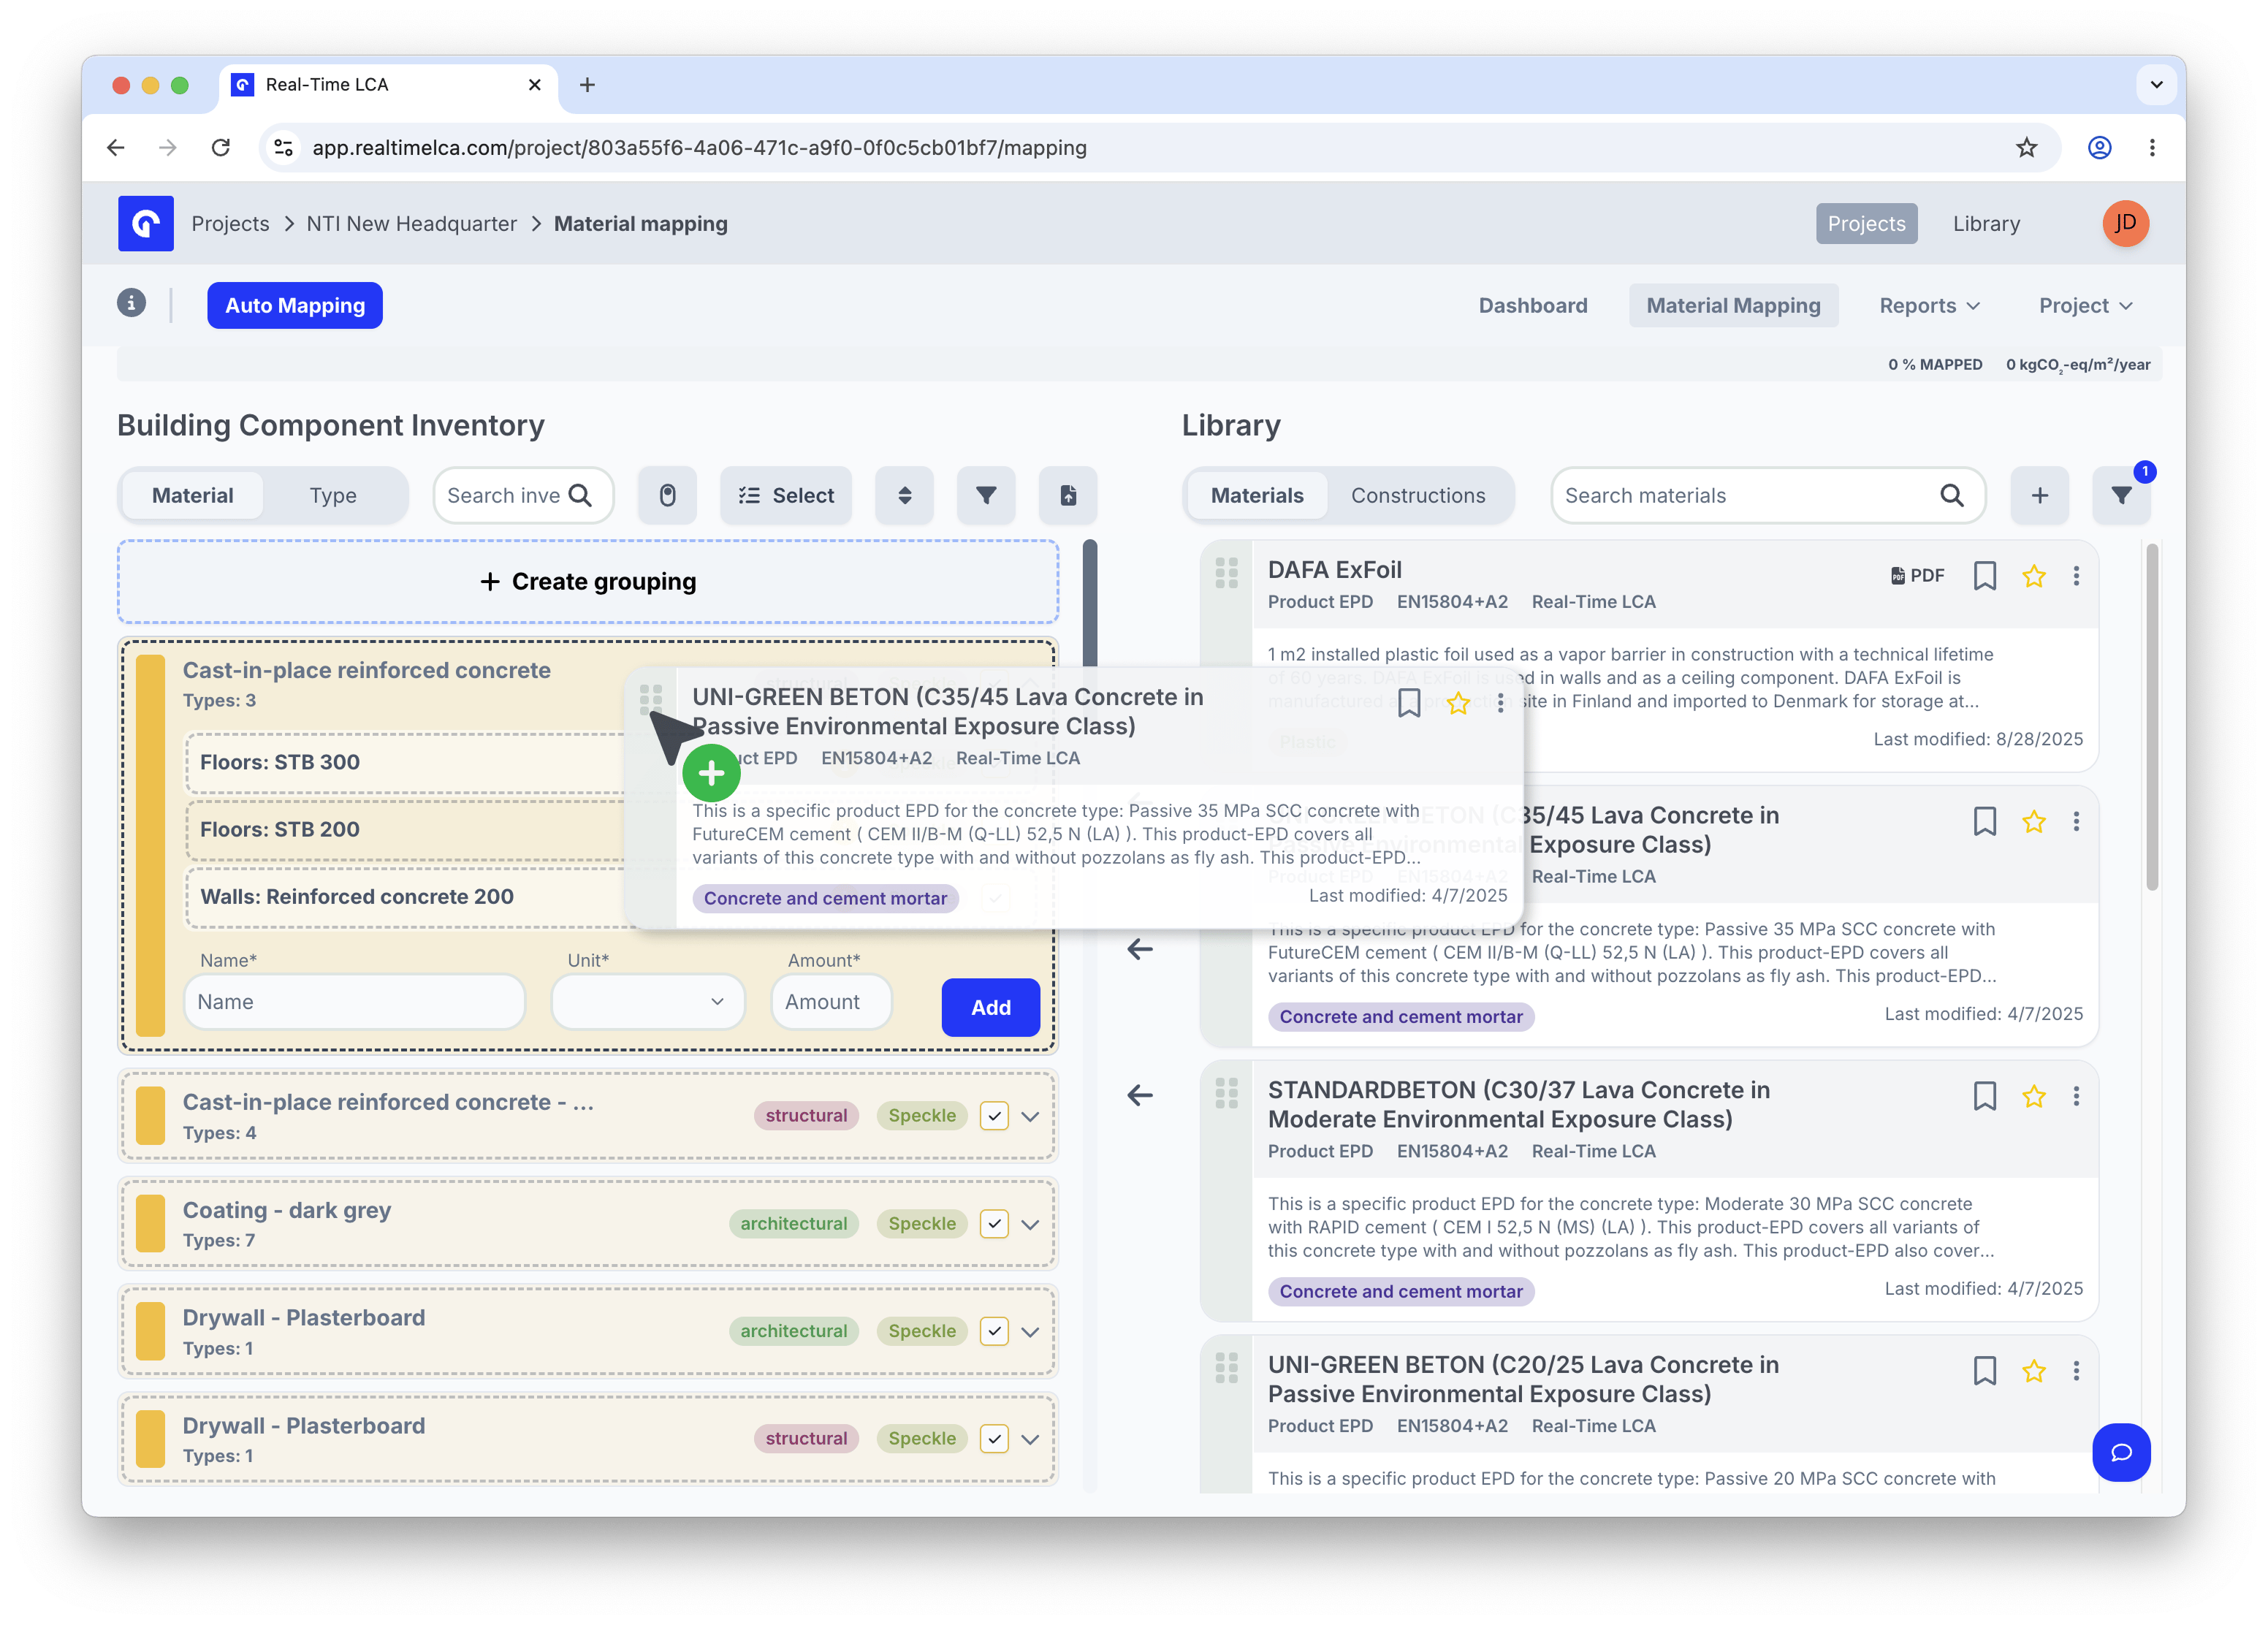
 ## Mapping a material
To map an item, drag a card from the **Library** panel onto the inventory. You can drop either onto a single type or onto a parent group — the target highlights green while you hover.
### Map a single type
Drop the library card directly on the type row to map only that one.
## Mapping a material
To map an item, drag a card from the **Library** panel onto the inventory. You can drop either onto a single type or onto a parent group — the target highlights green while you hover.
### Map a single type
Drop the library card directly on the type row to map only that one.
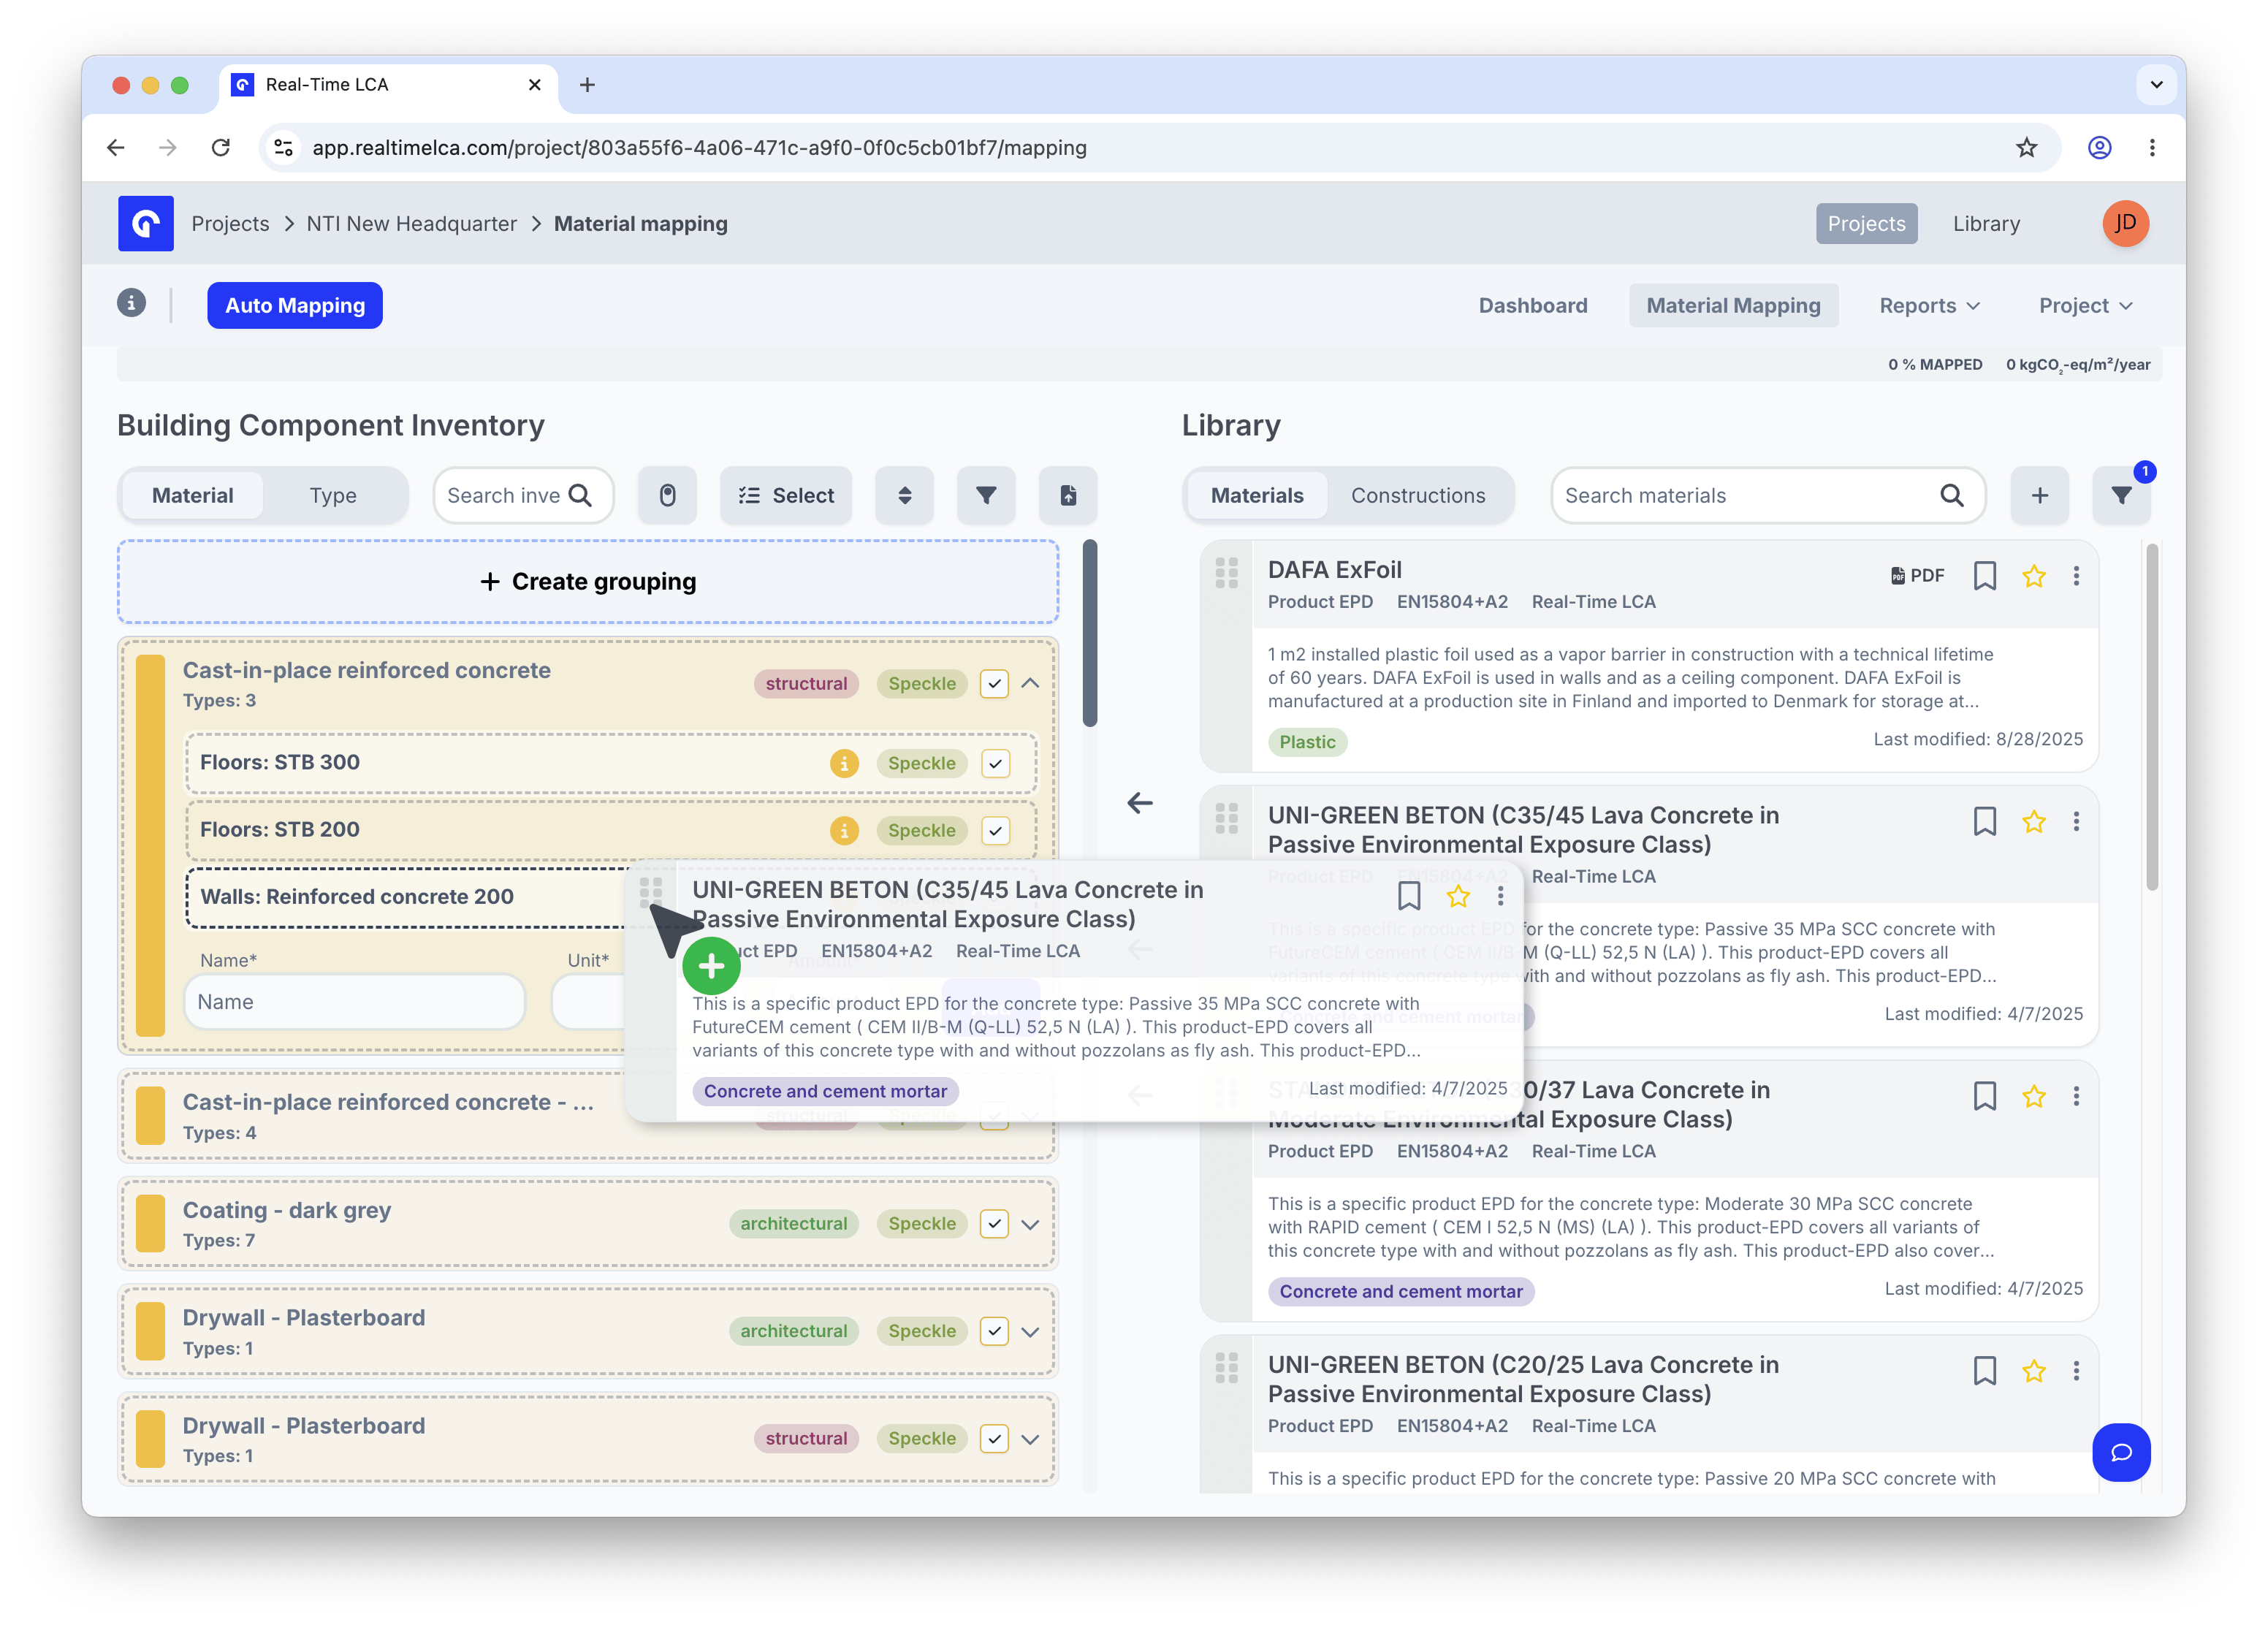 ### Map all types in a group
Drop the card on the parent row to apply the same material to every type inside the group at once. This is the fastest way to map repetitive items like *all cast-in-place concrete floors*.
### Map all types in a group
Drop the card on the parent row to apply the same material to every type inside the group at once. This is the fastest way to map repetitive items like *all cast-in-place concrete floors*.
 ### Fill in any missing properties
If the item is still missing required properties when you drop a material on it — most commonly the **Lifetime** — Real-Time LCA blocks the mapping and opens a **Set missing properties to complete mapping** modal that lists exactly what is missing.
### Fill in any missing properties
If the item is still missing required properties when you drop a material on it — most commonly the **Lifetime** — Real-Time LCA blocks the mapping and opens a **Set missing properties to complete mapping** modal that lists exactly what is missing.
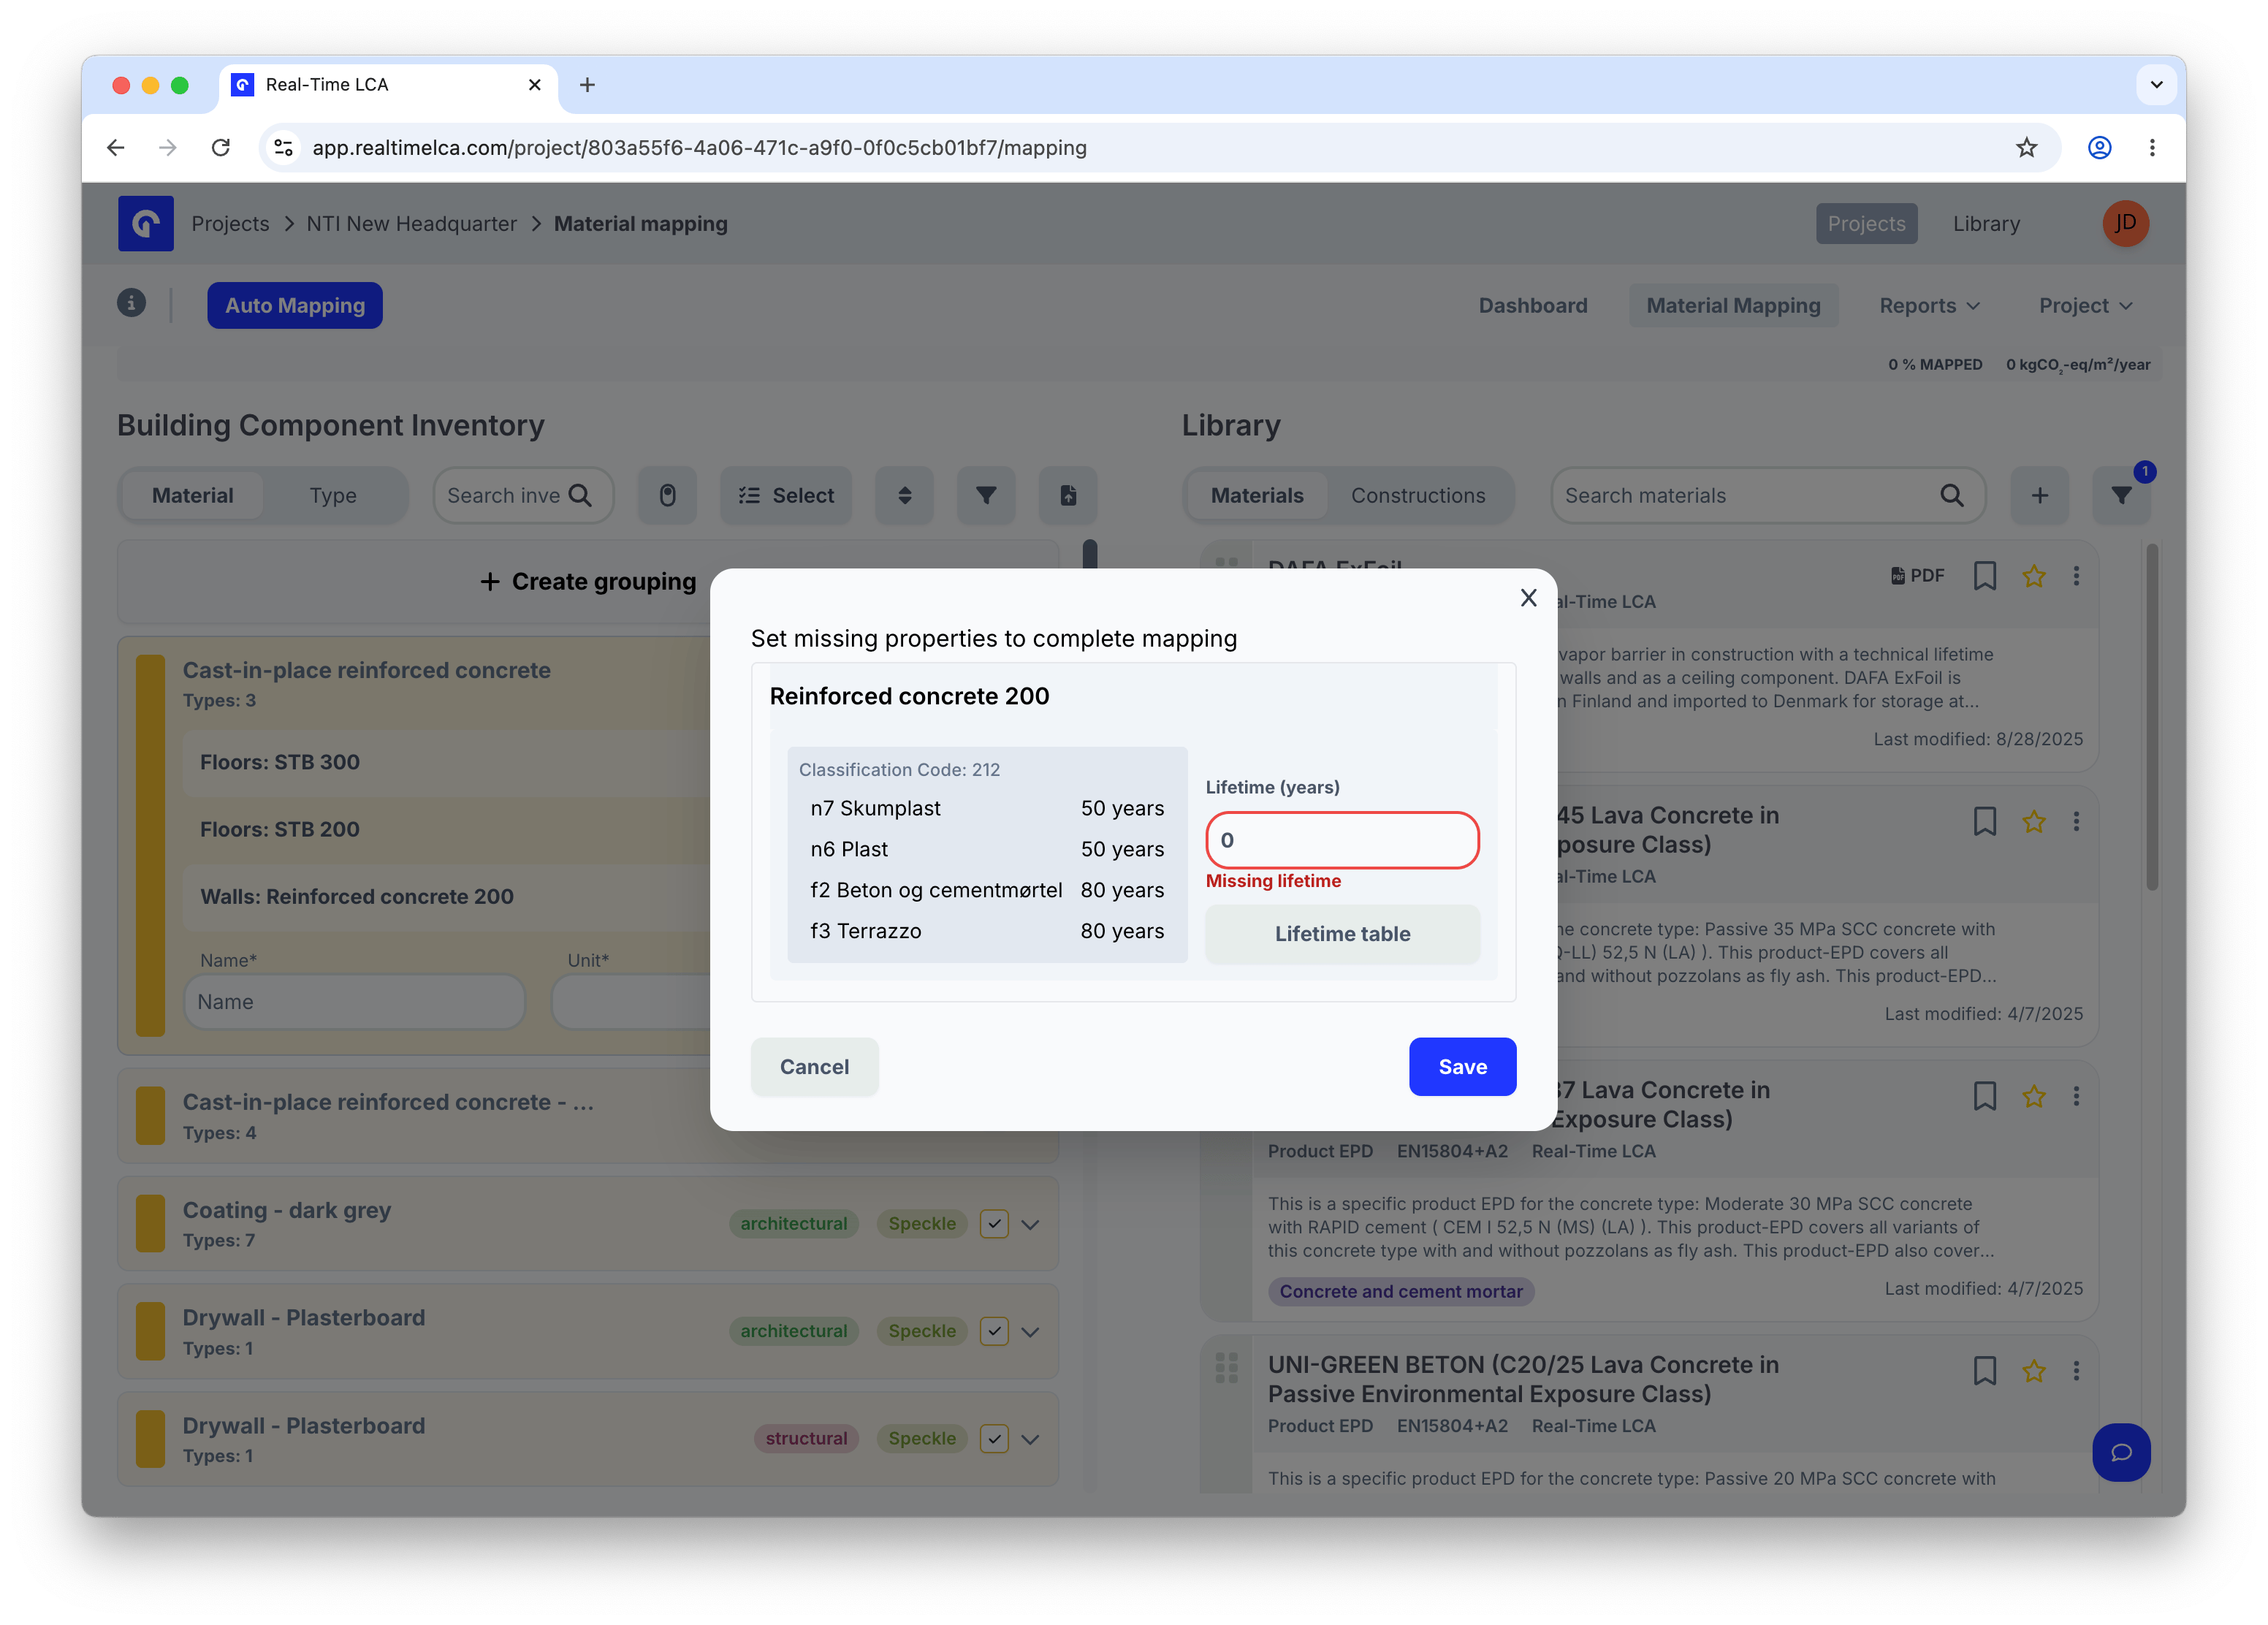 Fill in the highlighted fields and click **Save** to finish the mapping. If you cancel, the drop is discarded and the item stays unmapped.
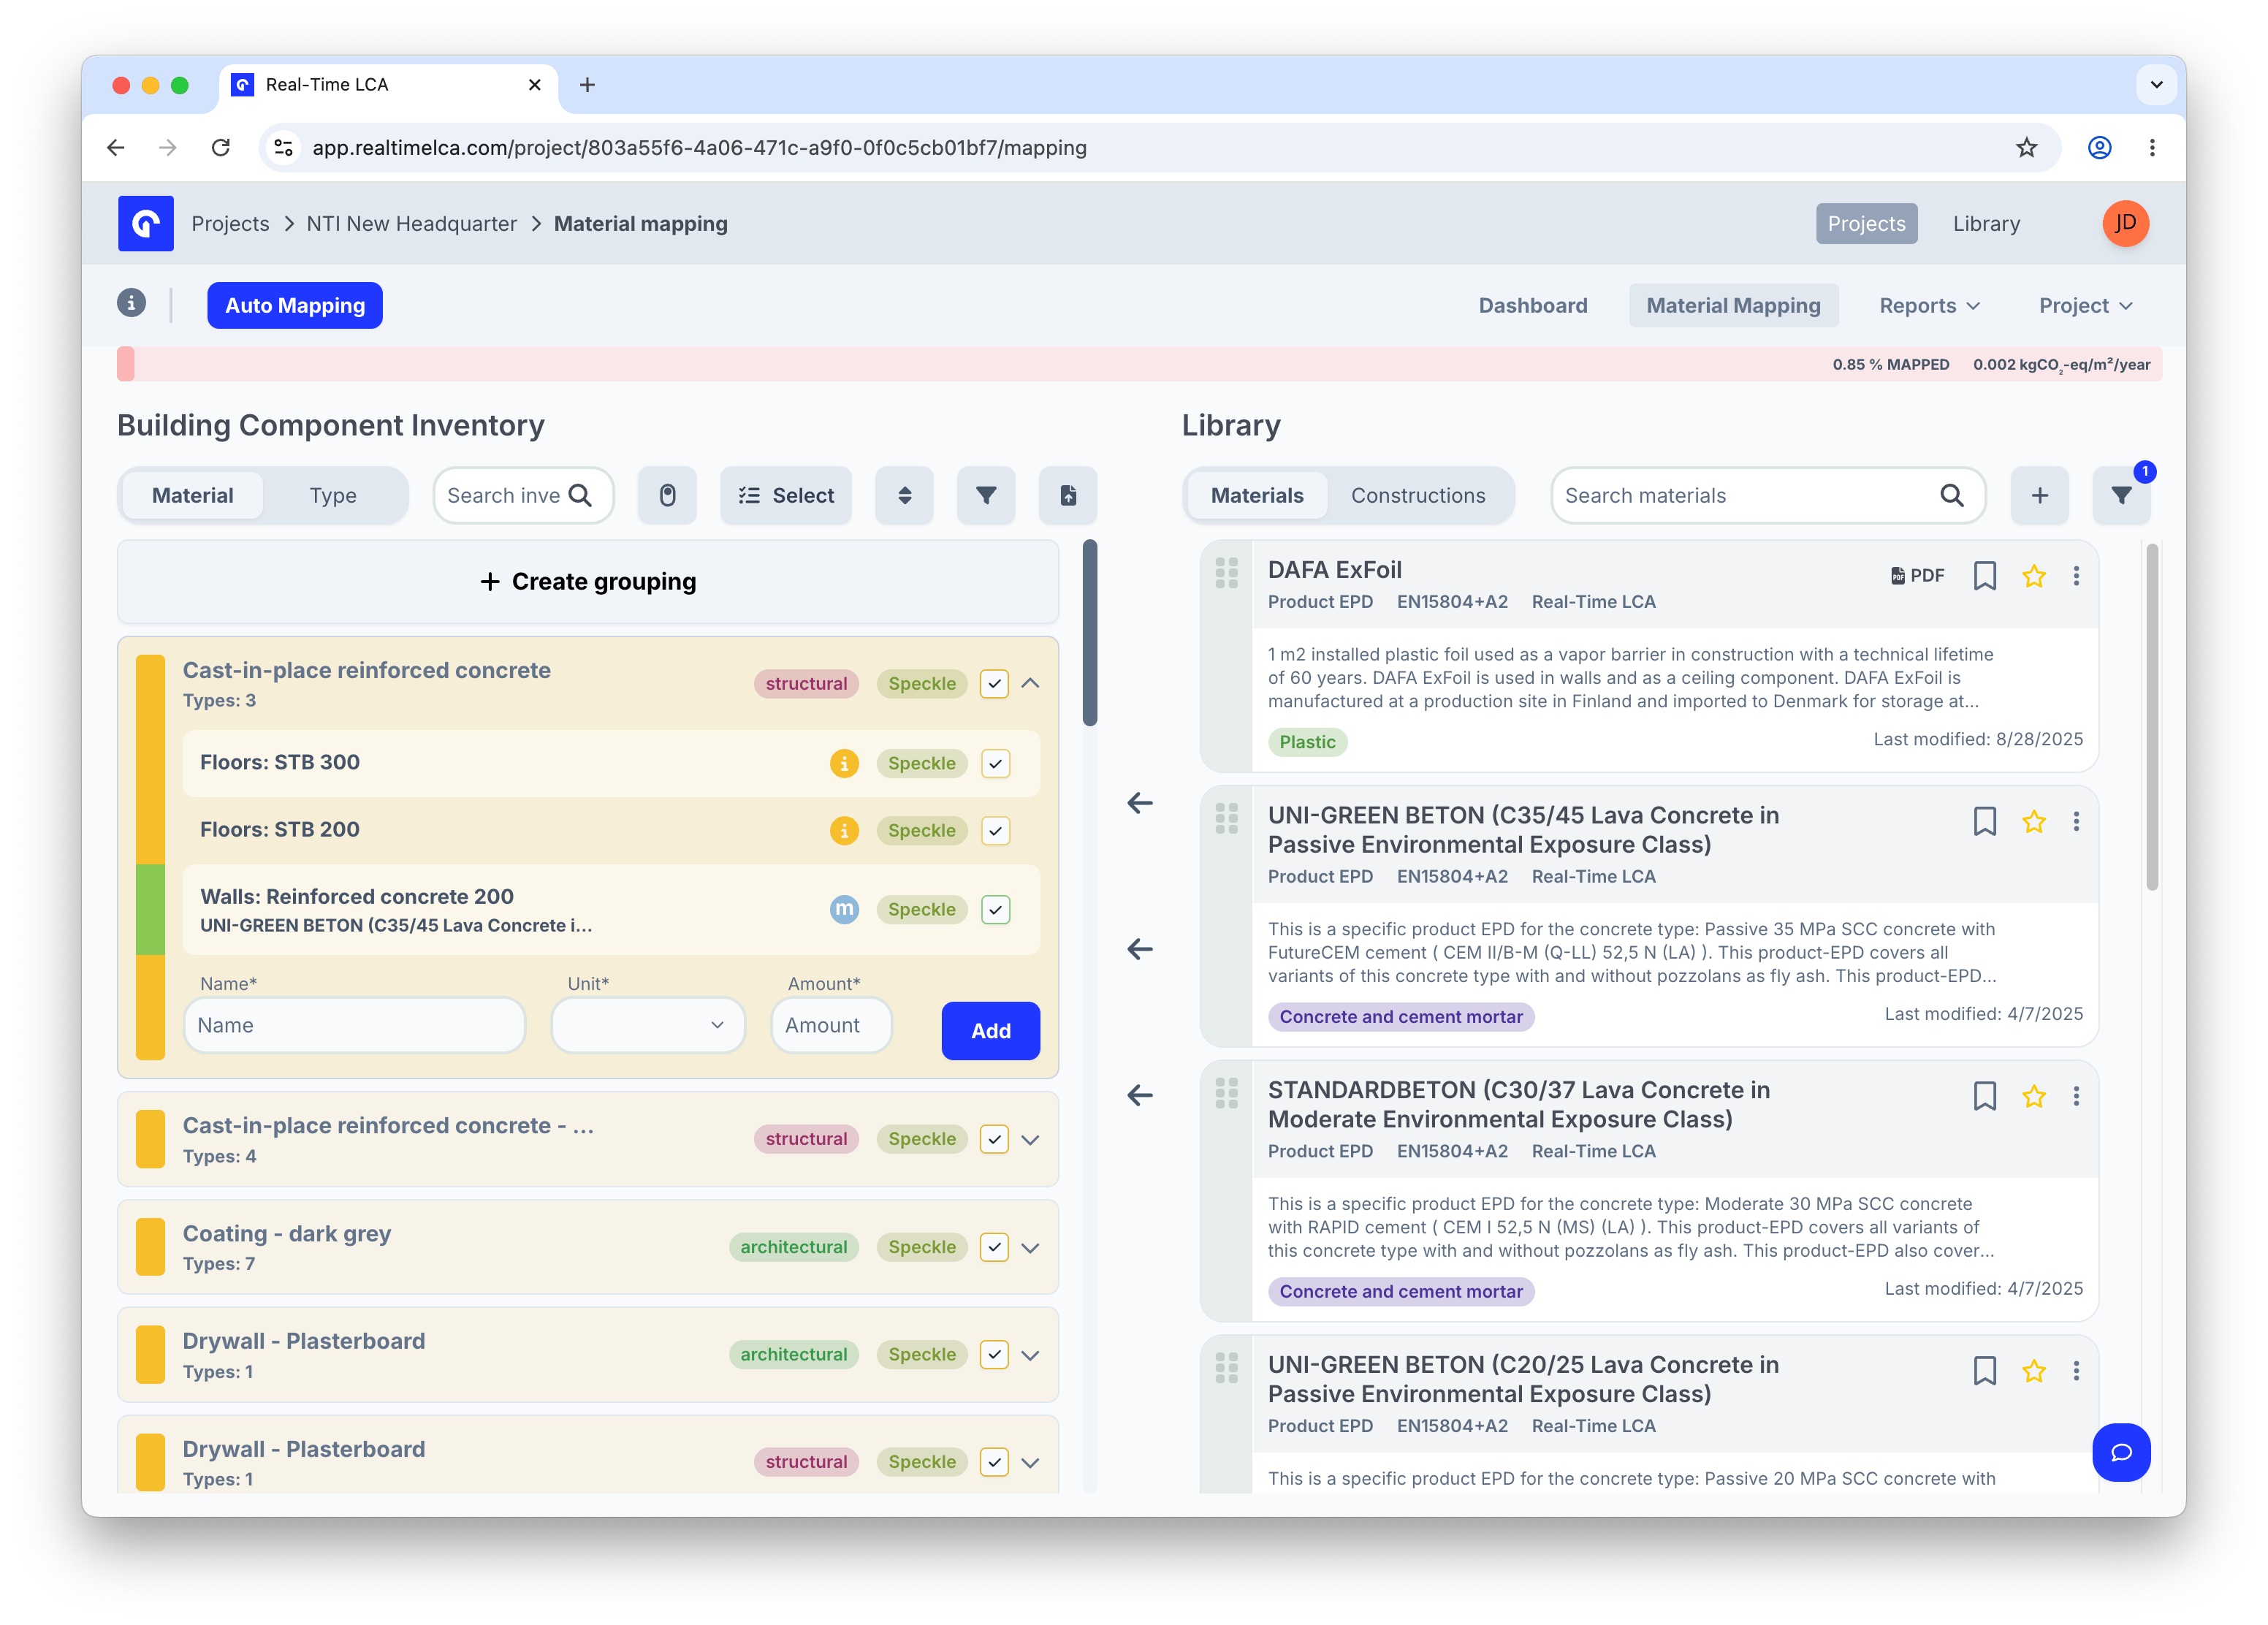
### Linked state
Once mapped, the EPD name appears underneath the item and the row turns green. The unmapped chip on the parent group drops accordingly.
Fill in the highlighted fields and click **Save** to finish the mapping. If you cancel, the drop is discarded and the item stays unmapped.
### Linked state
Once mapped, the EPD name appears underneath the item and the row turns green. The unmapped chip on the parent group drops accordingly.
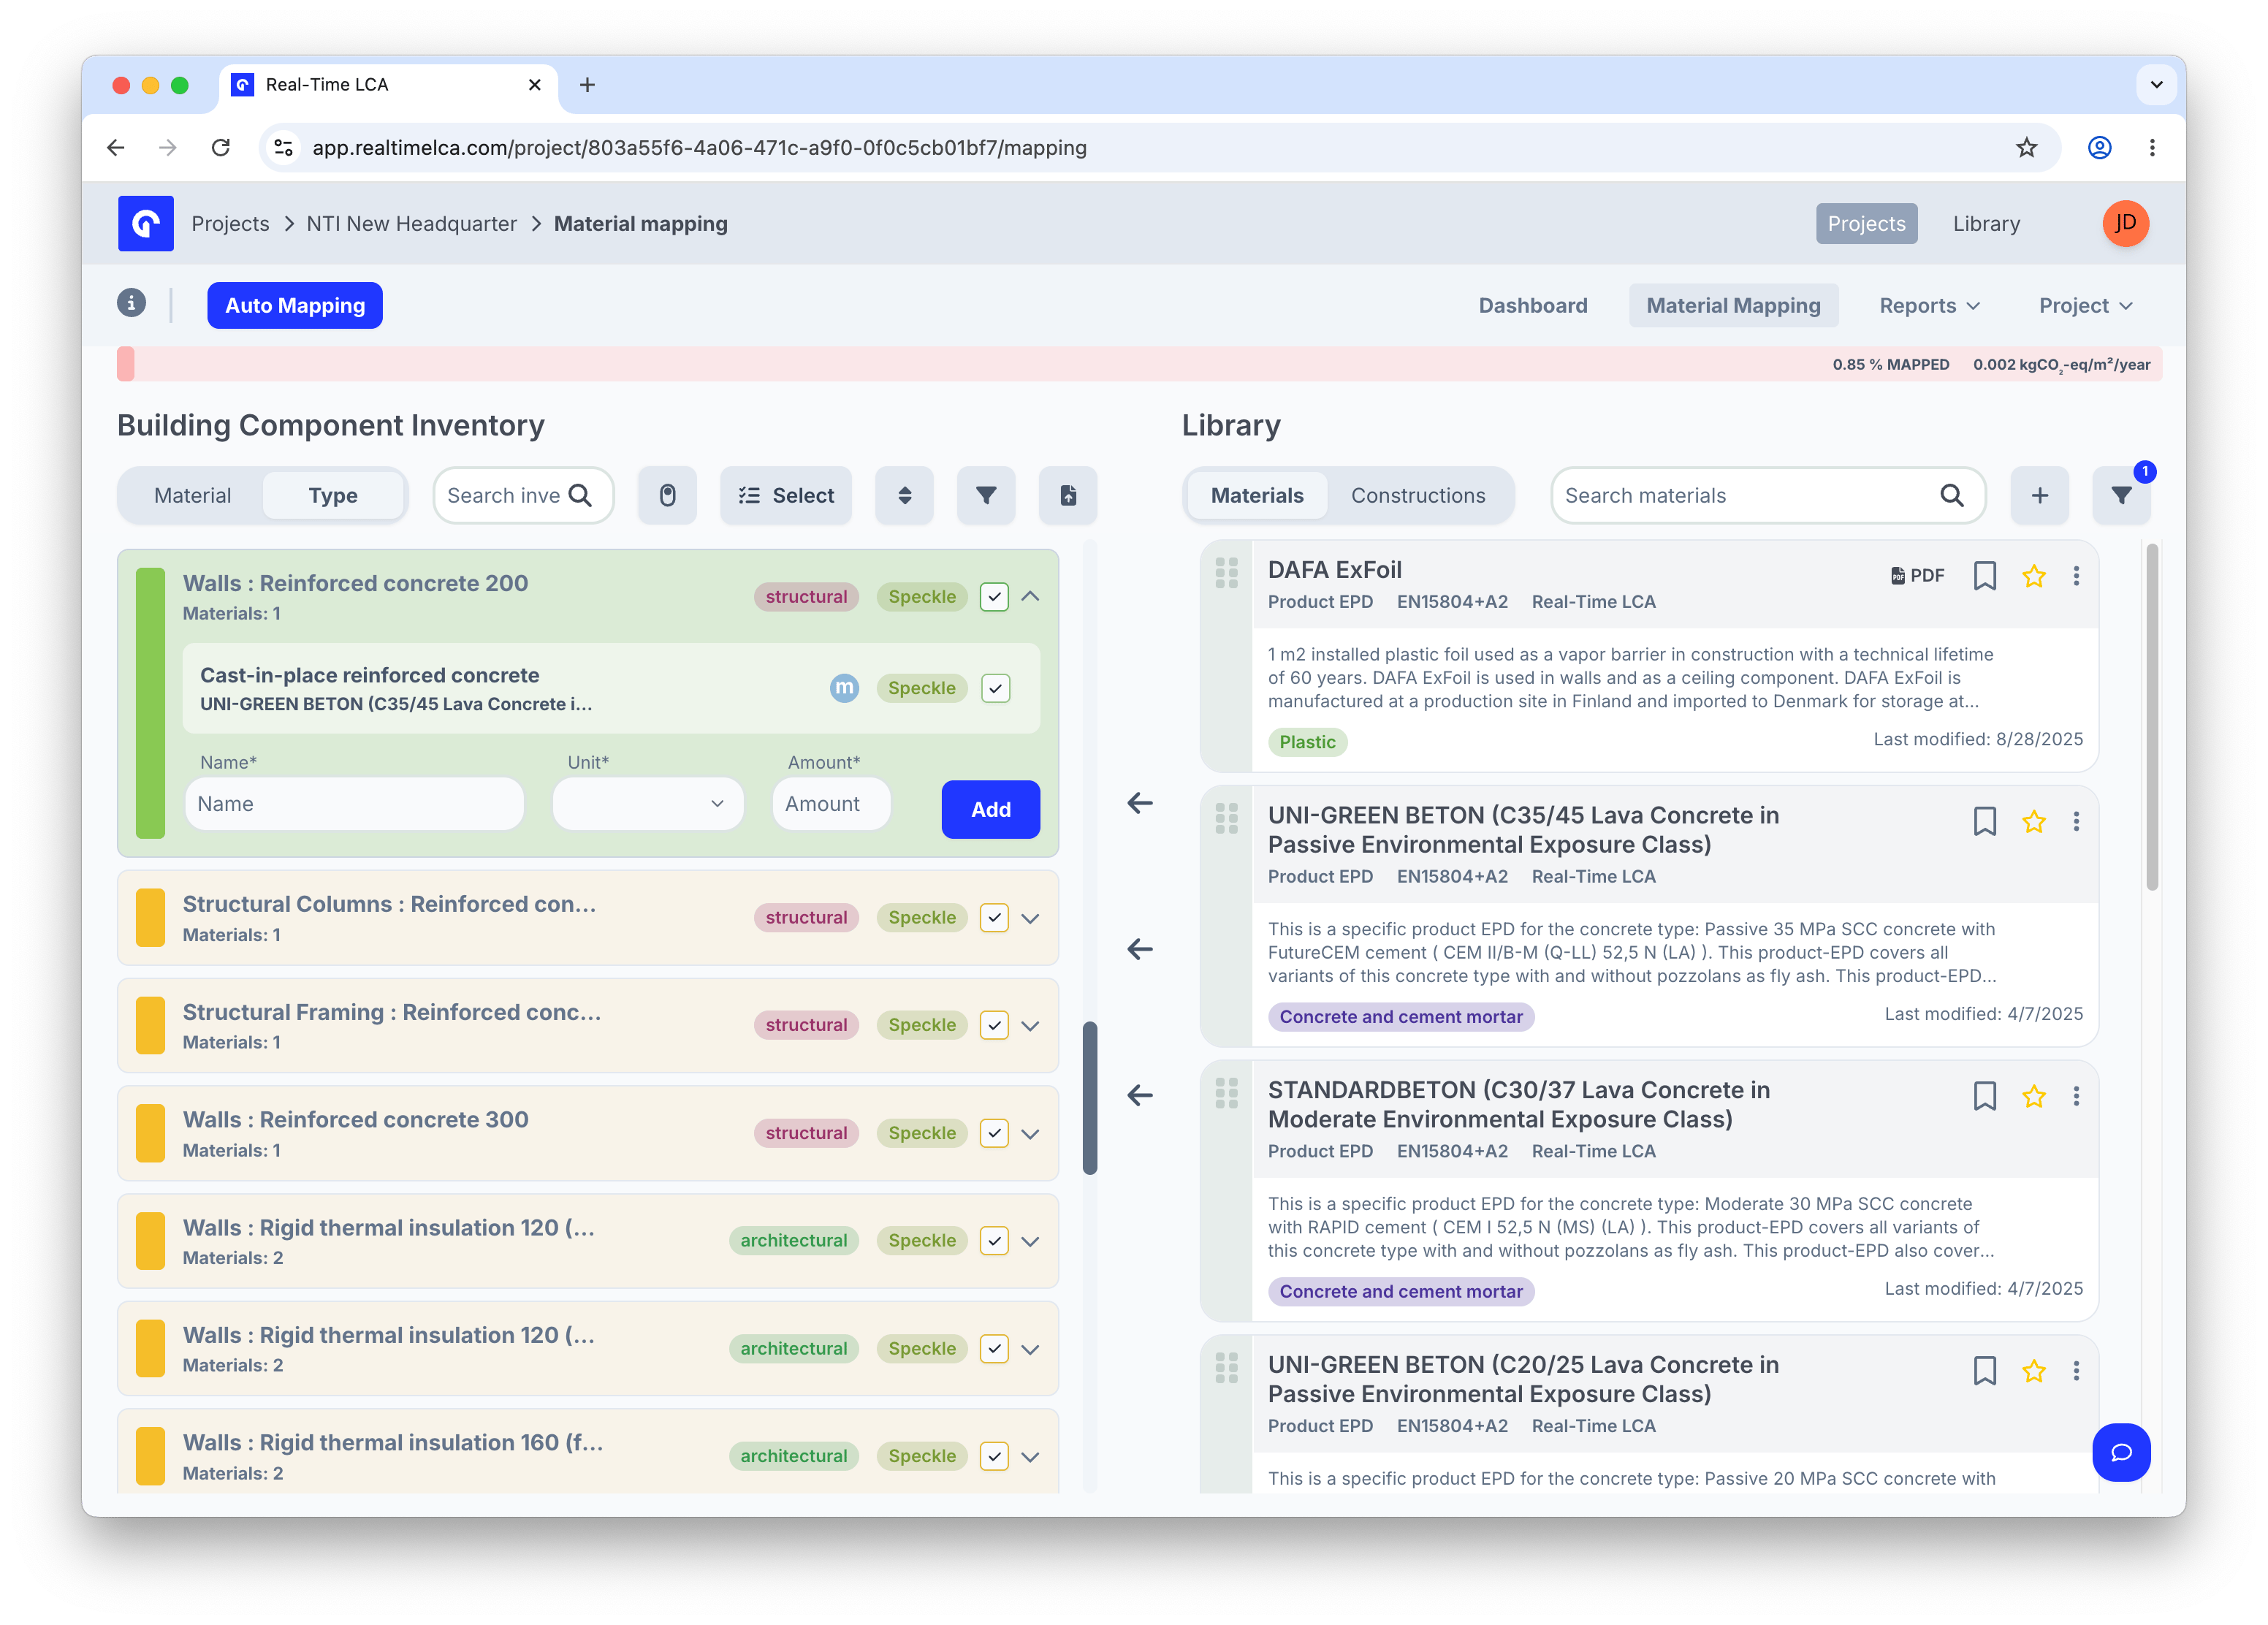
 The same mapping looks like this when the inventory is grouped by **Type** instead of by **Material** — the EPD name still sits underneath the item, just under a different parent.
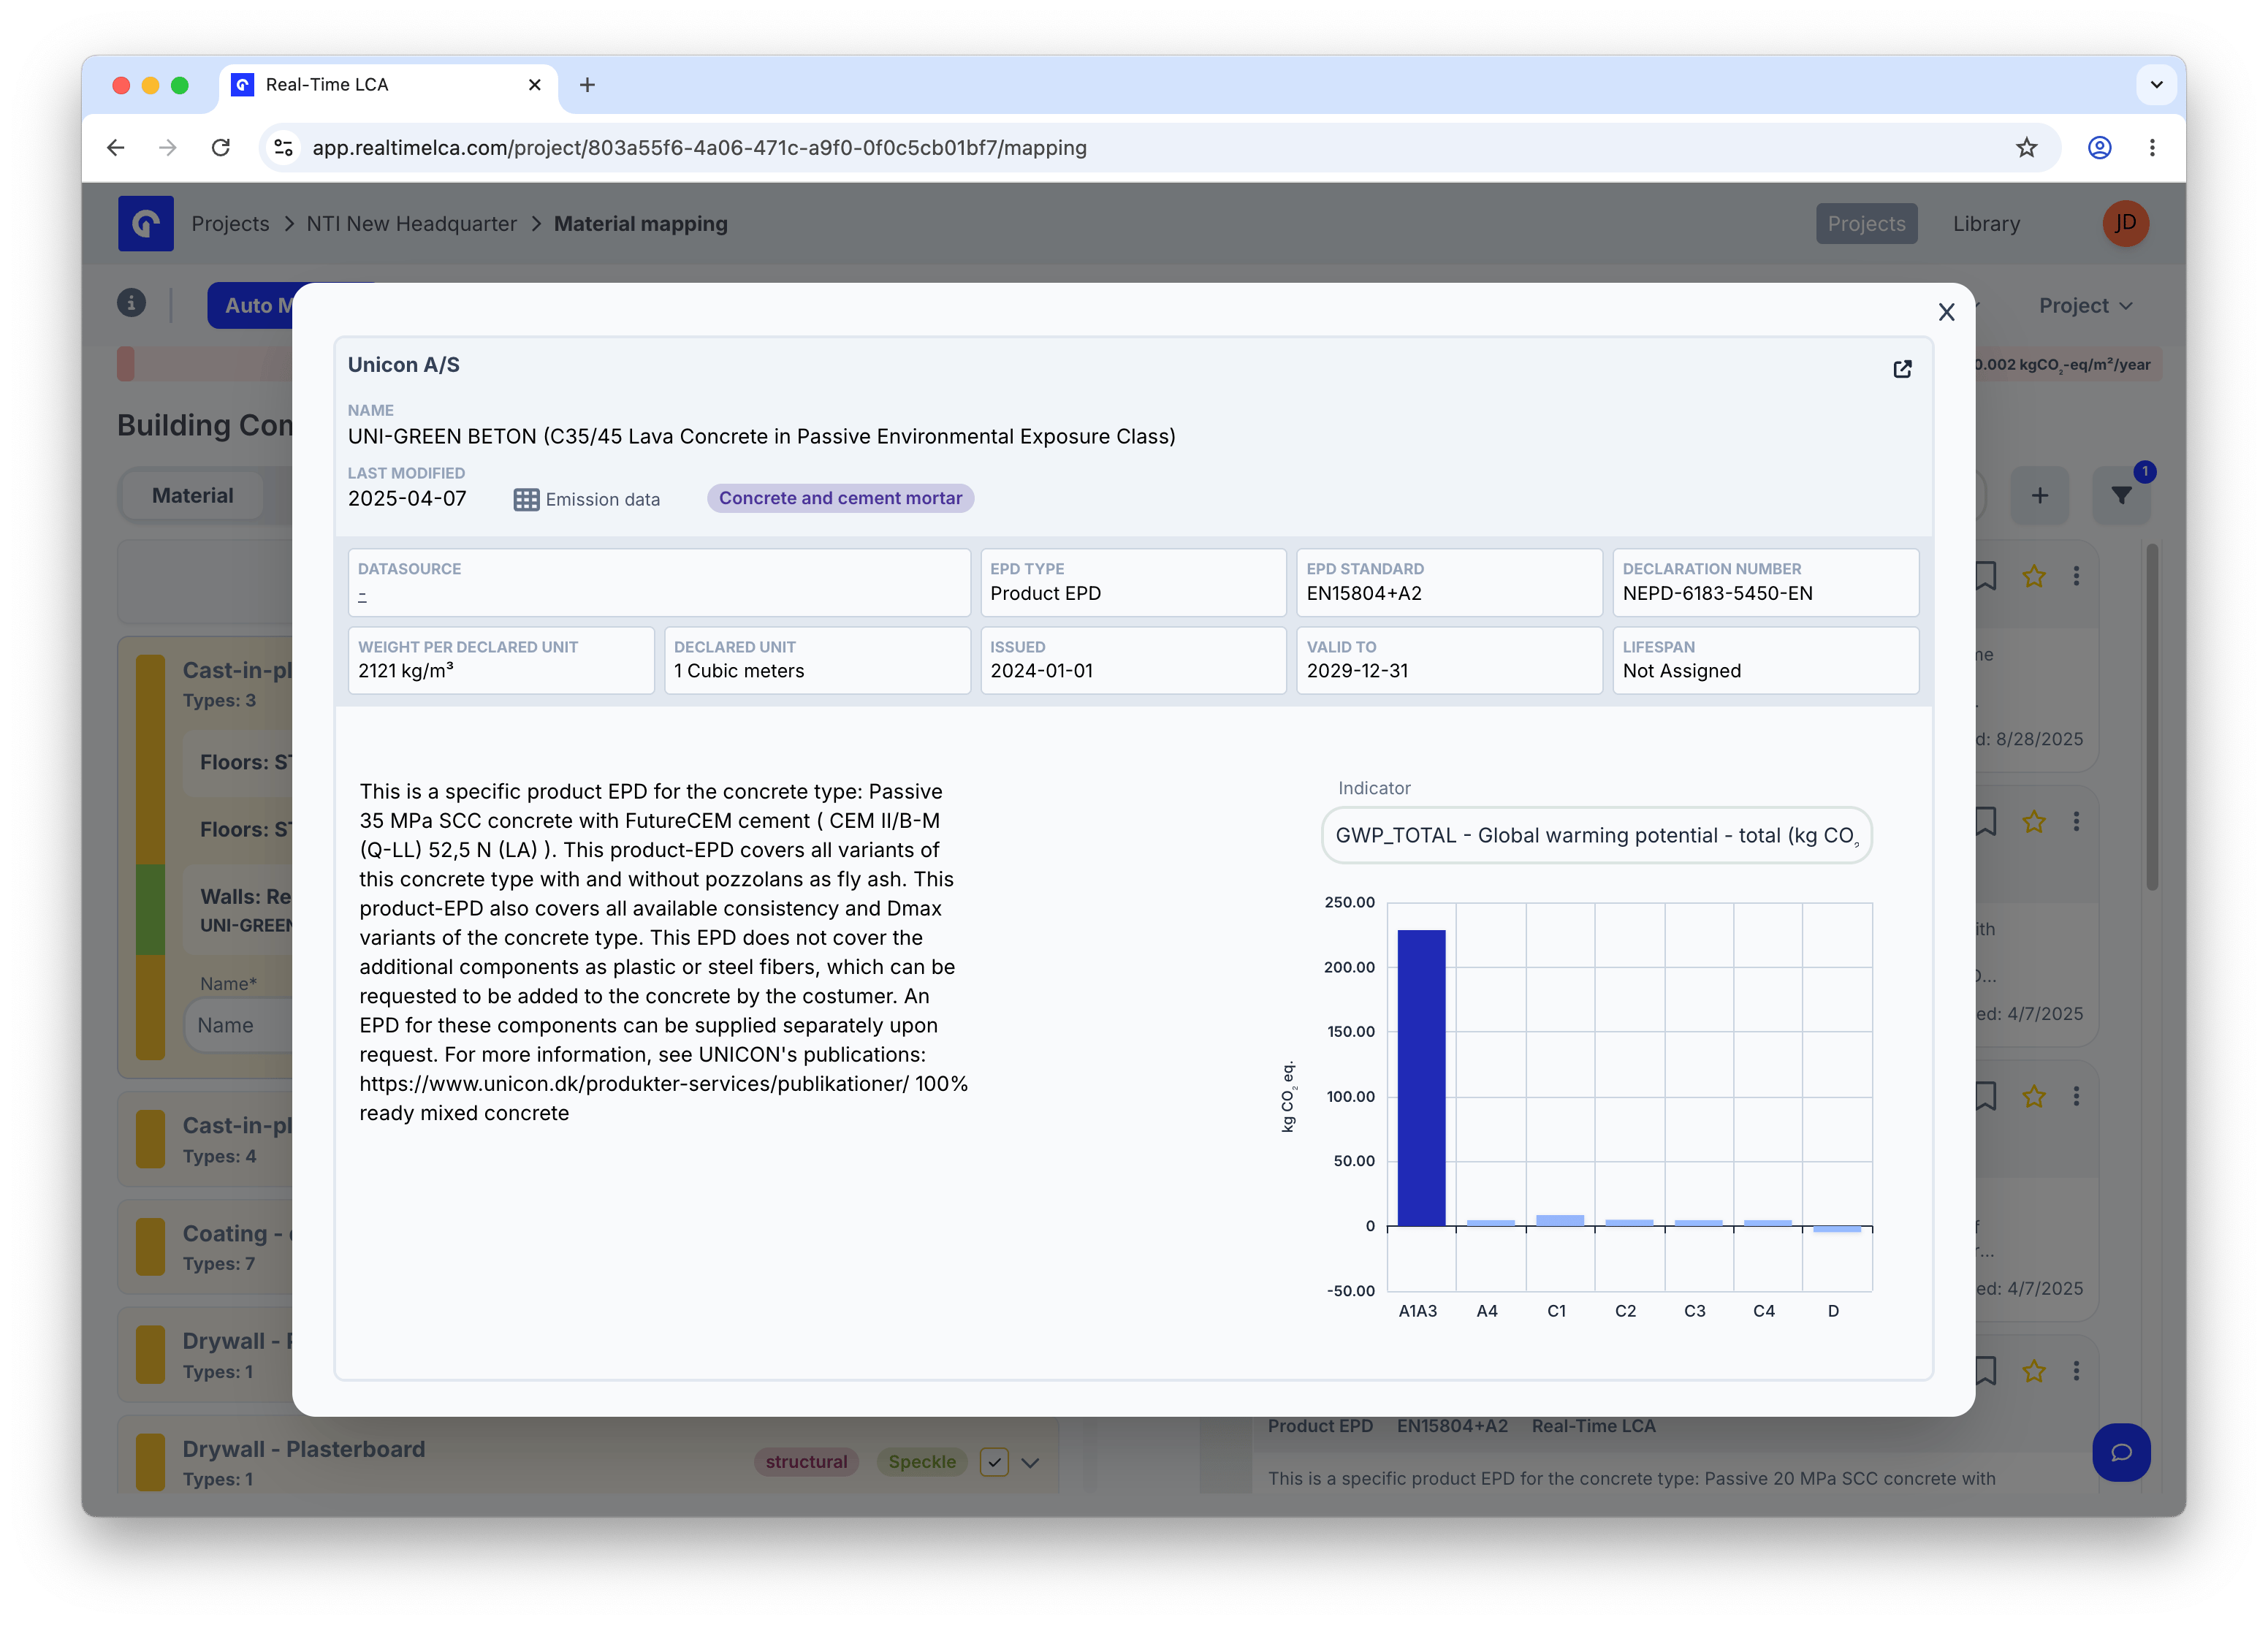
 ### Inspect an EPD
Click an EPD card in the Library (or the linked EPD name on a mapped item) to open the full **EPD details** modal — declaration data, validity, indicator values, and the per-stage GWP chart.
### Inspect an EPD
Click an EPD card in the Library (or the linked EPD name on a mapped item) to open the full **EPD details** modal — declaration data, validity, indicator values, and the per-stage GWP chart.
 ### Hotspot chart on mapped items
Open the **Item properties** for a mapped item and the modal expands to show a **GWP Hotspot** chart on the right — the life-cycle stages where this specific item's emissions concentrate. Use it to spot whether A1–A3 (production), B4 (replacement), or C/D dominates, and to compare alternatives before committing.
### Hotspot chart on mapped items
Open the **Item properties** for a mapped item and the modal expands to show a **GWP Hotspot** chart on the right — the life-cycle stages where this specific item's emissions concentrate. Use it to spot whether A1–A3 (production), B4 (replacement), or C/D dominates, and to compare alternatives before committing.
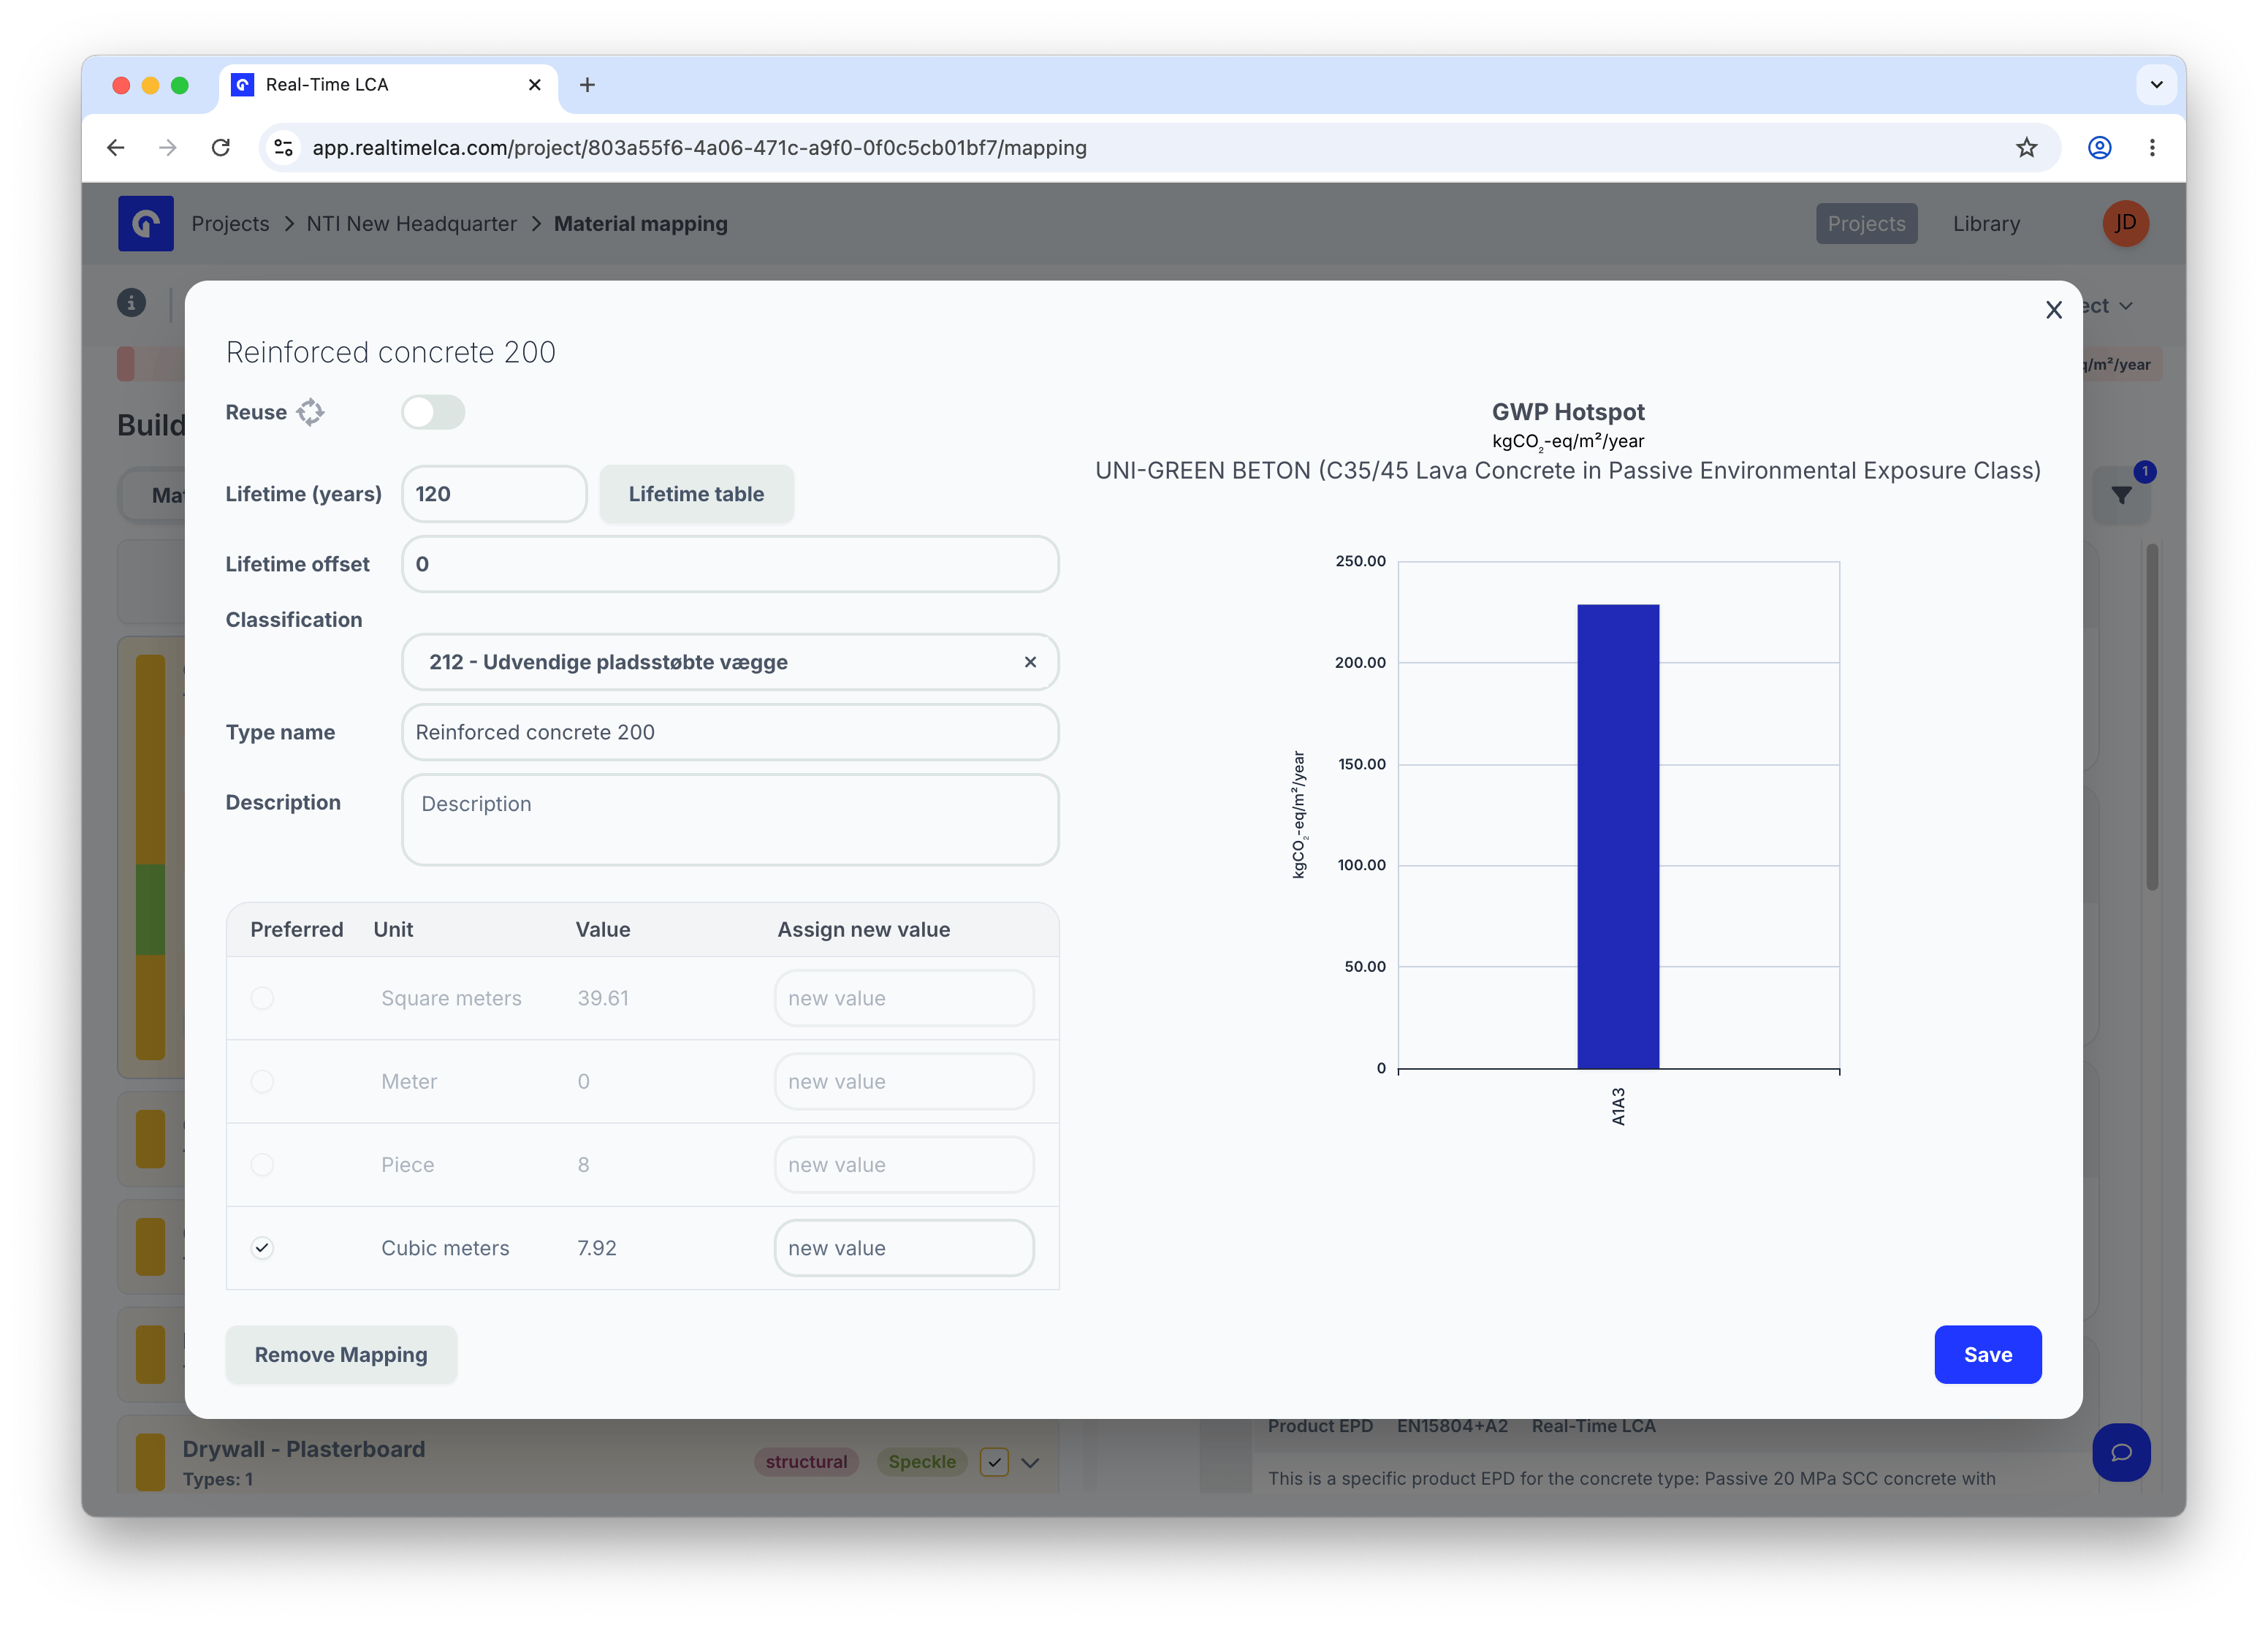 The same modal exposes a **Remove Mapping** button in the bottom-left — use it to clear the link and re-map the item to something else.
### Include or exclude an item from the calculation
The checkmark control on the right of each inventory row toggles whether the item counts in the running total. A green check means *included*; clearing it excludes the item without removing its mapping. Handy for what-if comparisons or for setting aside elements that are out of scope.
The same modal exposes a **Remove Mapping** button in the bottom-left — use it to clear the link and re-map the item to something else.
### Include or exclude an item from the calculation
The checkmark control on the right of each inventory row toggles whether the item counts in the running total. A green check means *included*; clearing it excludes the item without removing its mapping. Handy for what-if comparisons or for setting aside elements that are out of scope.
 ## Auto mapping
When a project has many similar elements — or when you already have a comparable project mapped — **Auto Mapping** can do most of the work for you. It scans the inventory and proposes mappings based on prior data, which you then review and accept or reject as a whole.
Click **Auto Mapping** in the top-left of the page to open the dialog.
### Choose a method
Auto mapping offers three methods. Pick the one that fits your data.
## Auto mapping
When a project has many similar elements — or when you already have a comparable project mapped — **Auto Mapping** can do most of the work for you. It scans the inventory and proposes mappings based on prior data, which you then review and accept or reject as a whole.
Click **Auto Mapping** in the top-left of the page to open the dialog.
### Choose a method
Auto mapping offers three methods. Pick the one that fits your data.
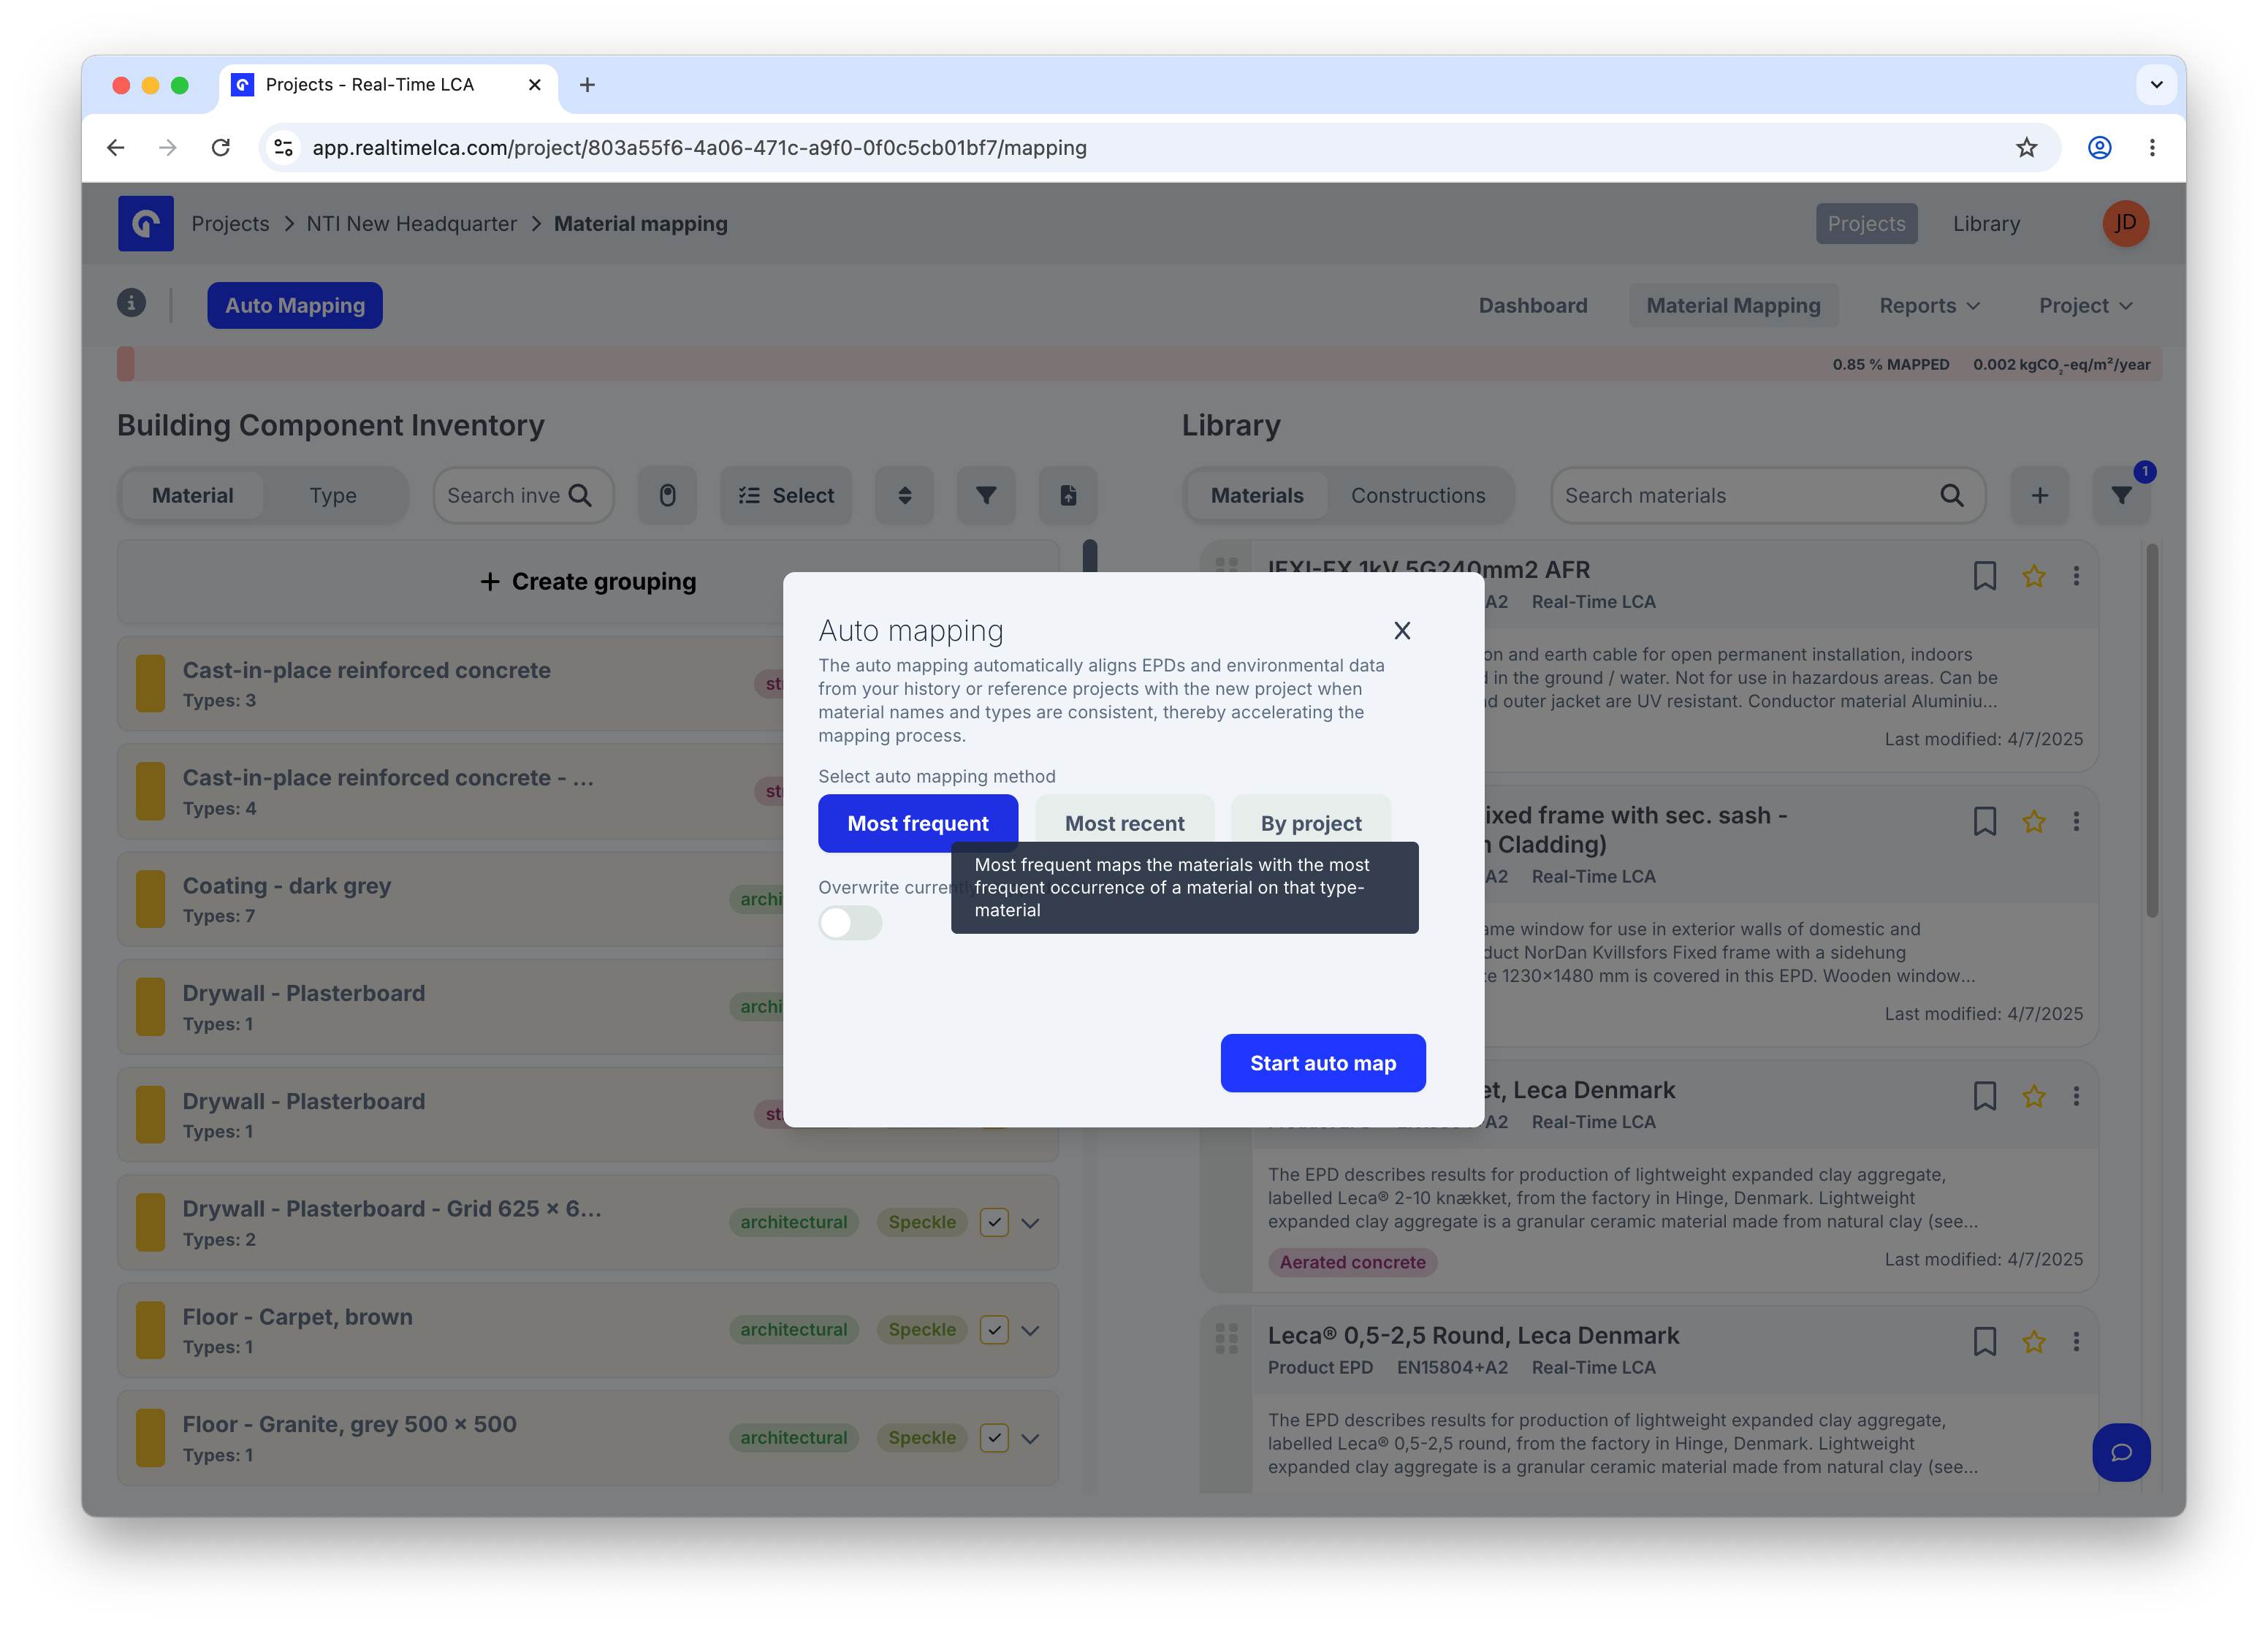
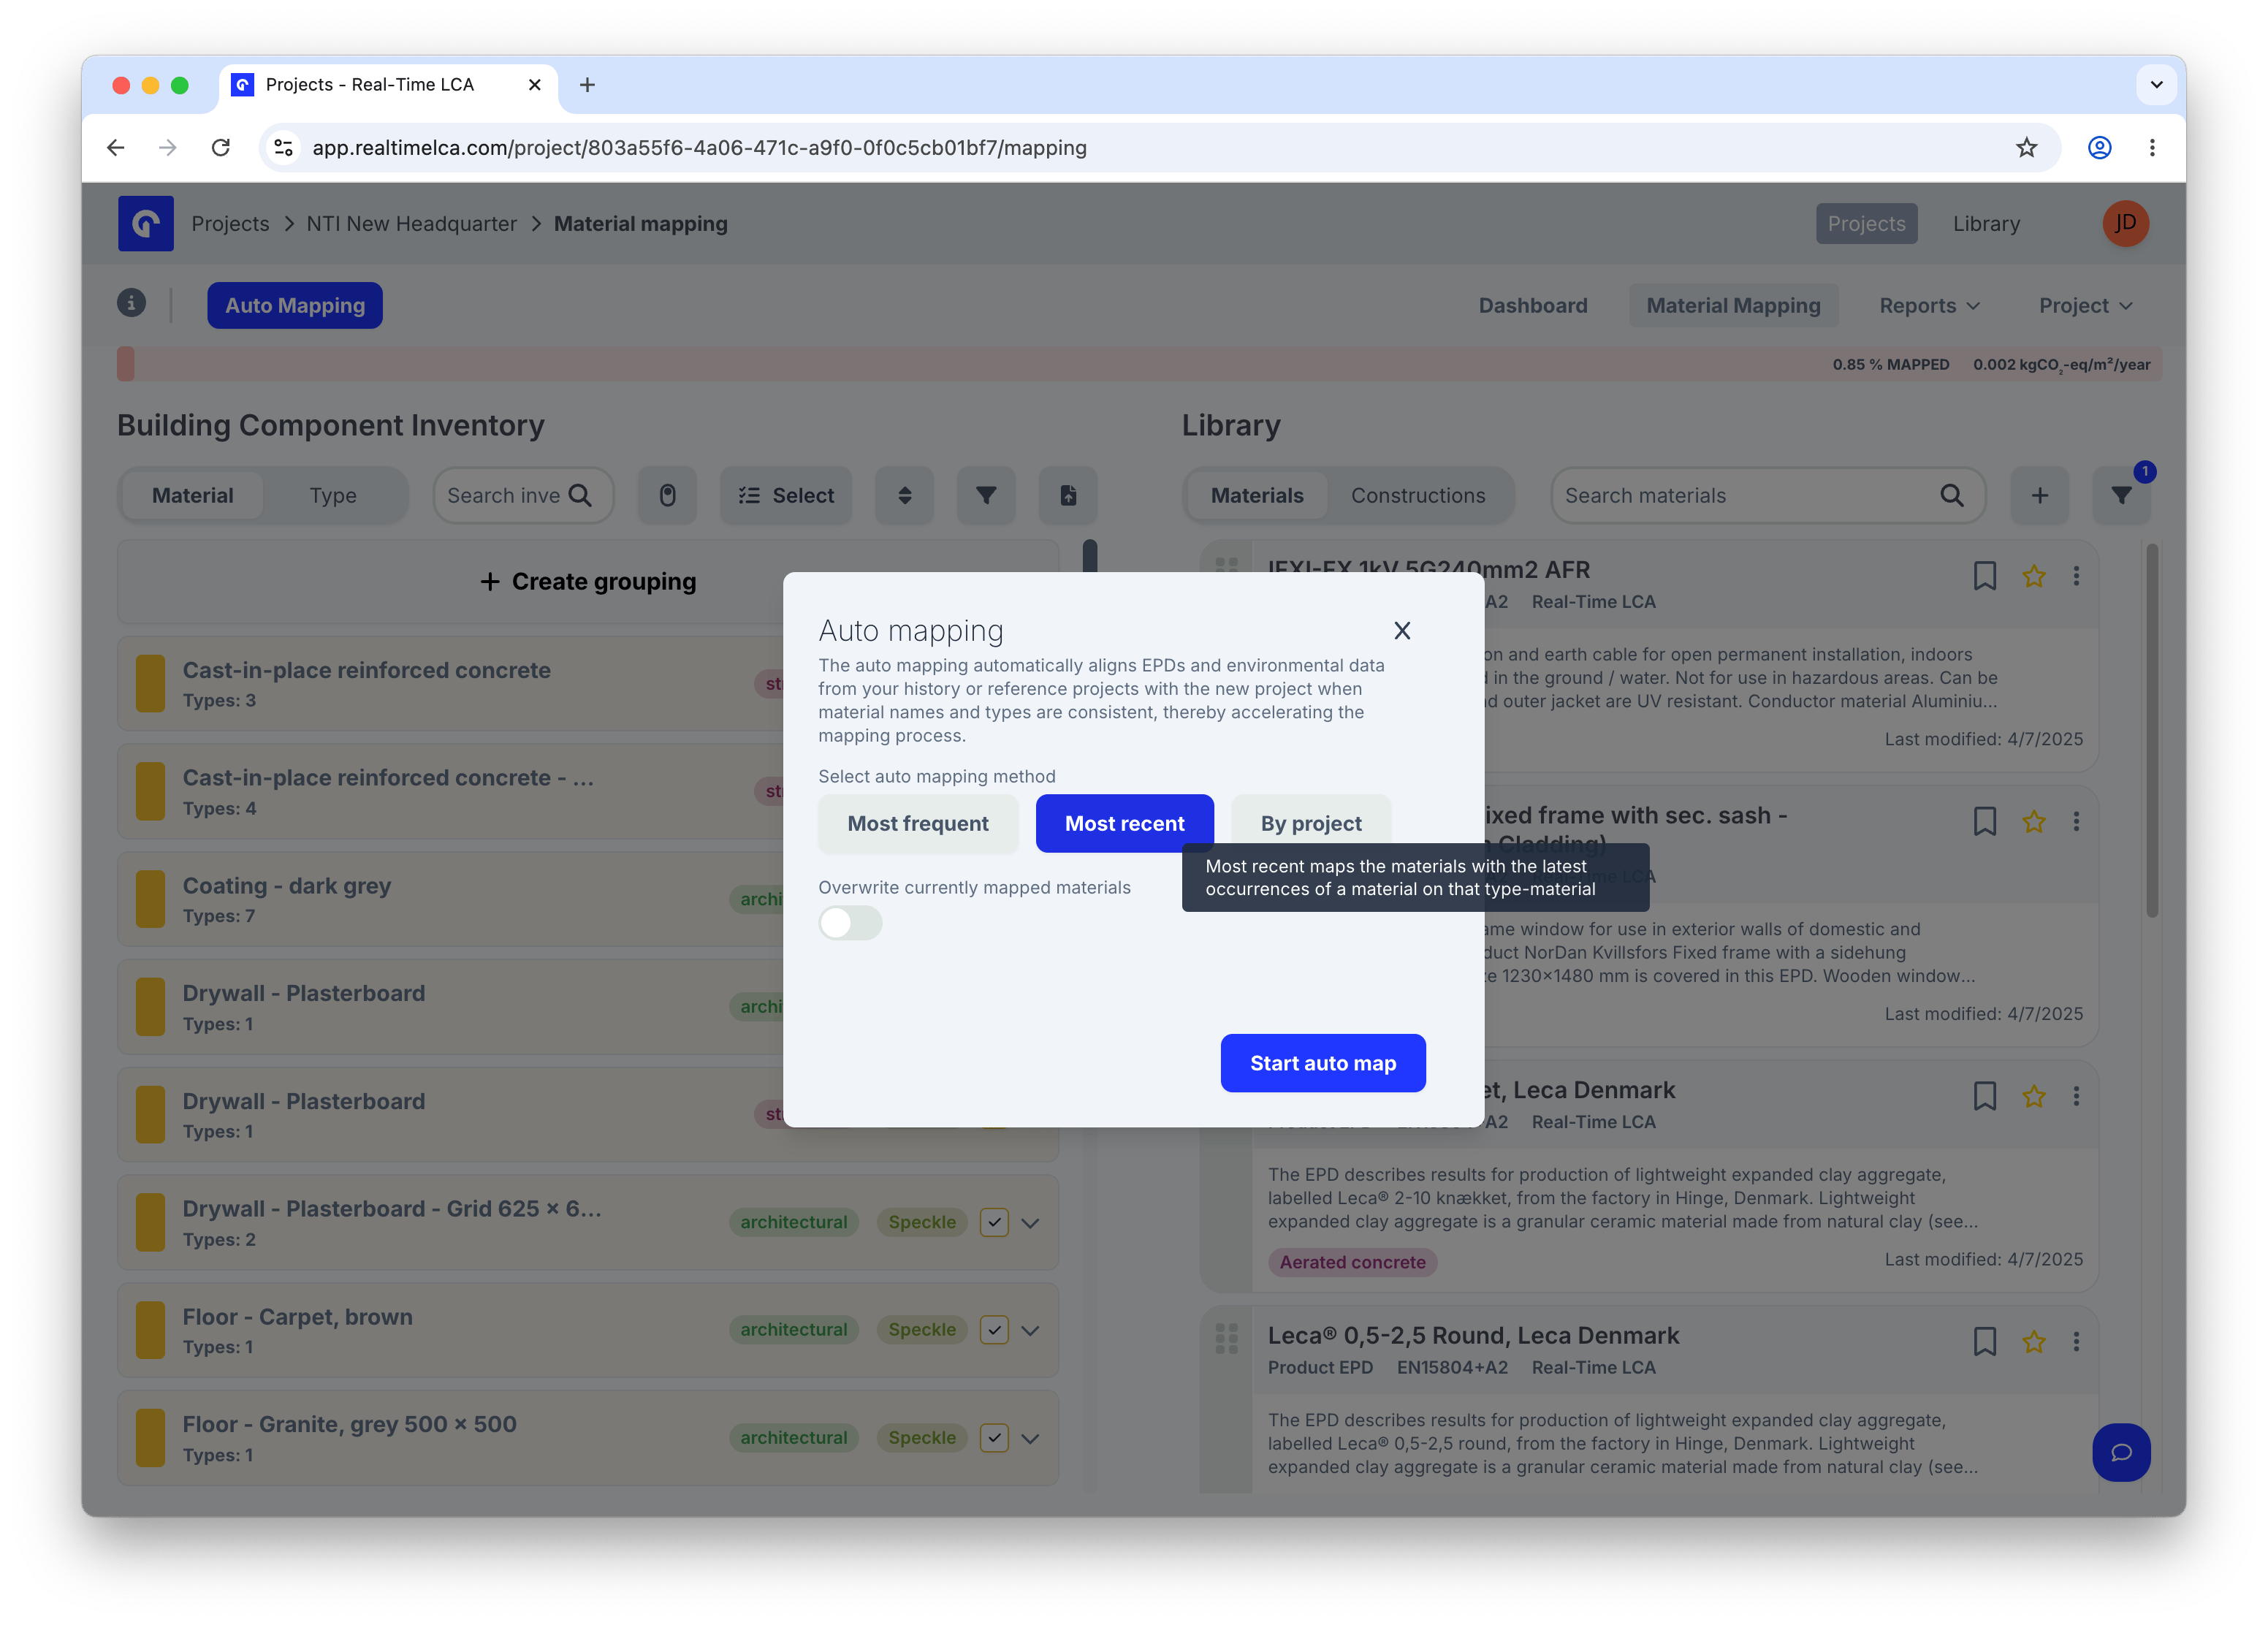
 | Method | Use it when |
| ----------------- | --------------------------------------------------------------------------------------------------------------------------------- |
| **Most frequent** | You want the safest pick across your workspace — the EPD that has been chosen most often for each type-material pair. |
| **Most recent** | Your team's defaults change over time and you want to follow the newest decisions. |
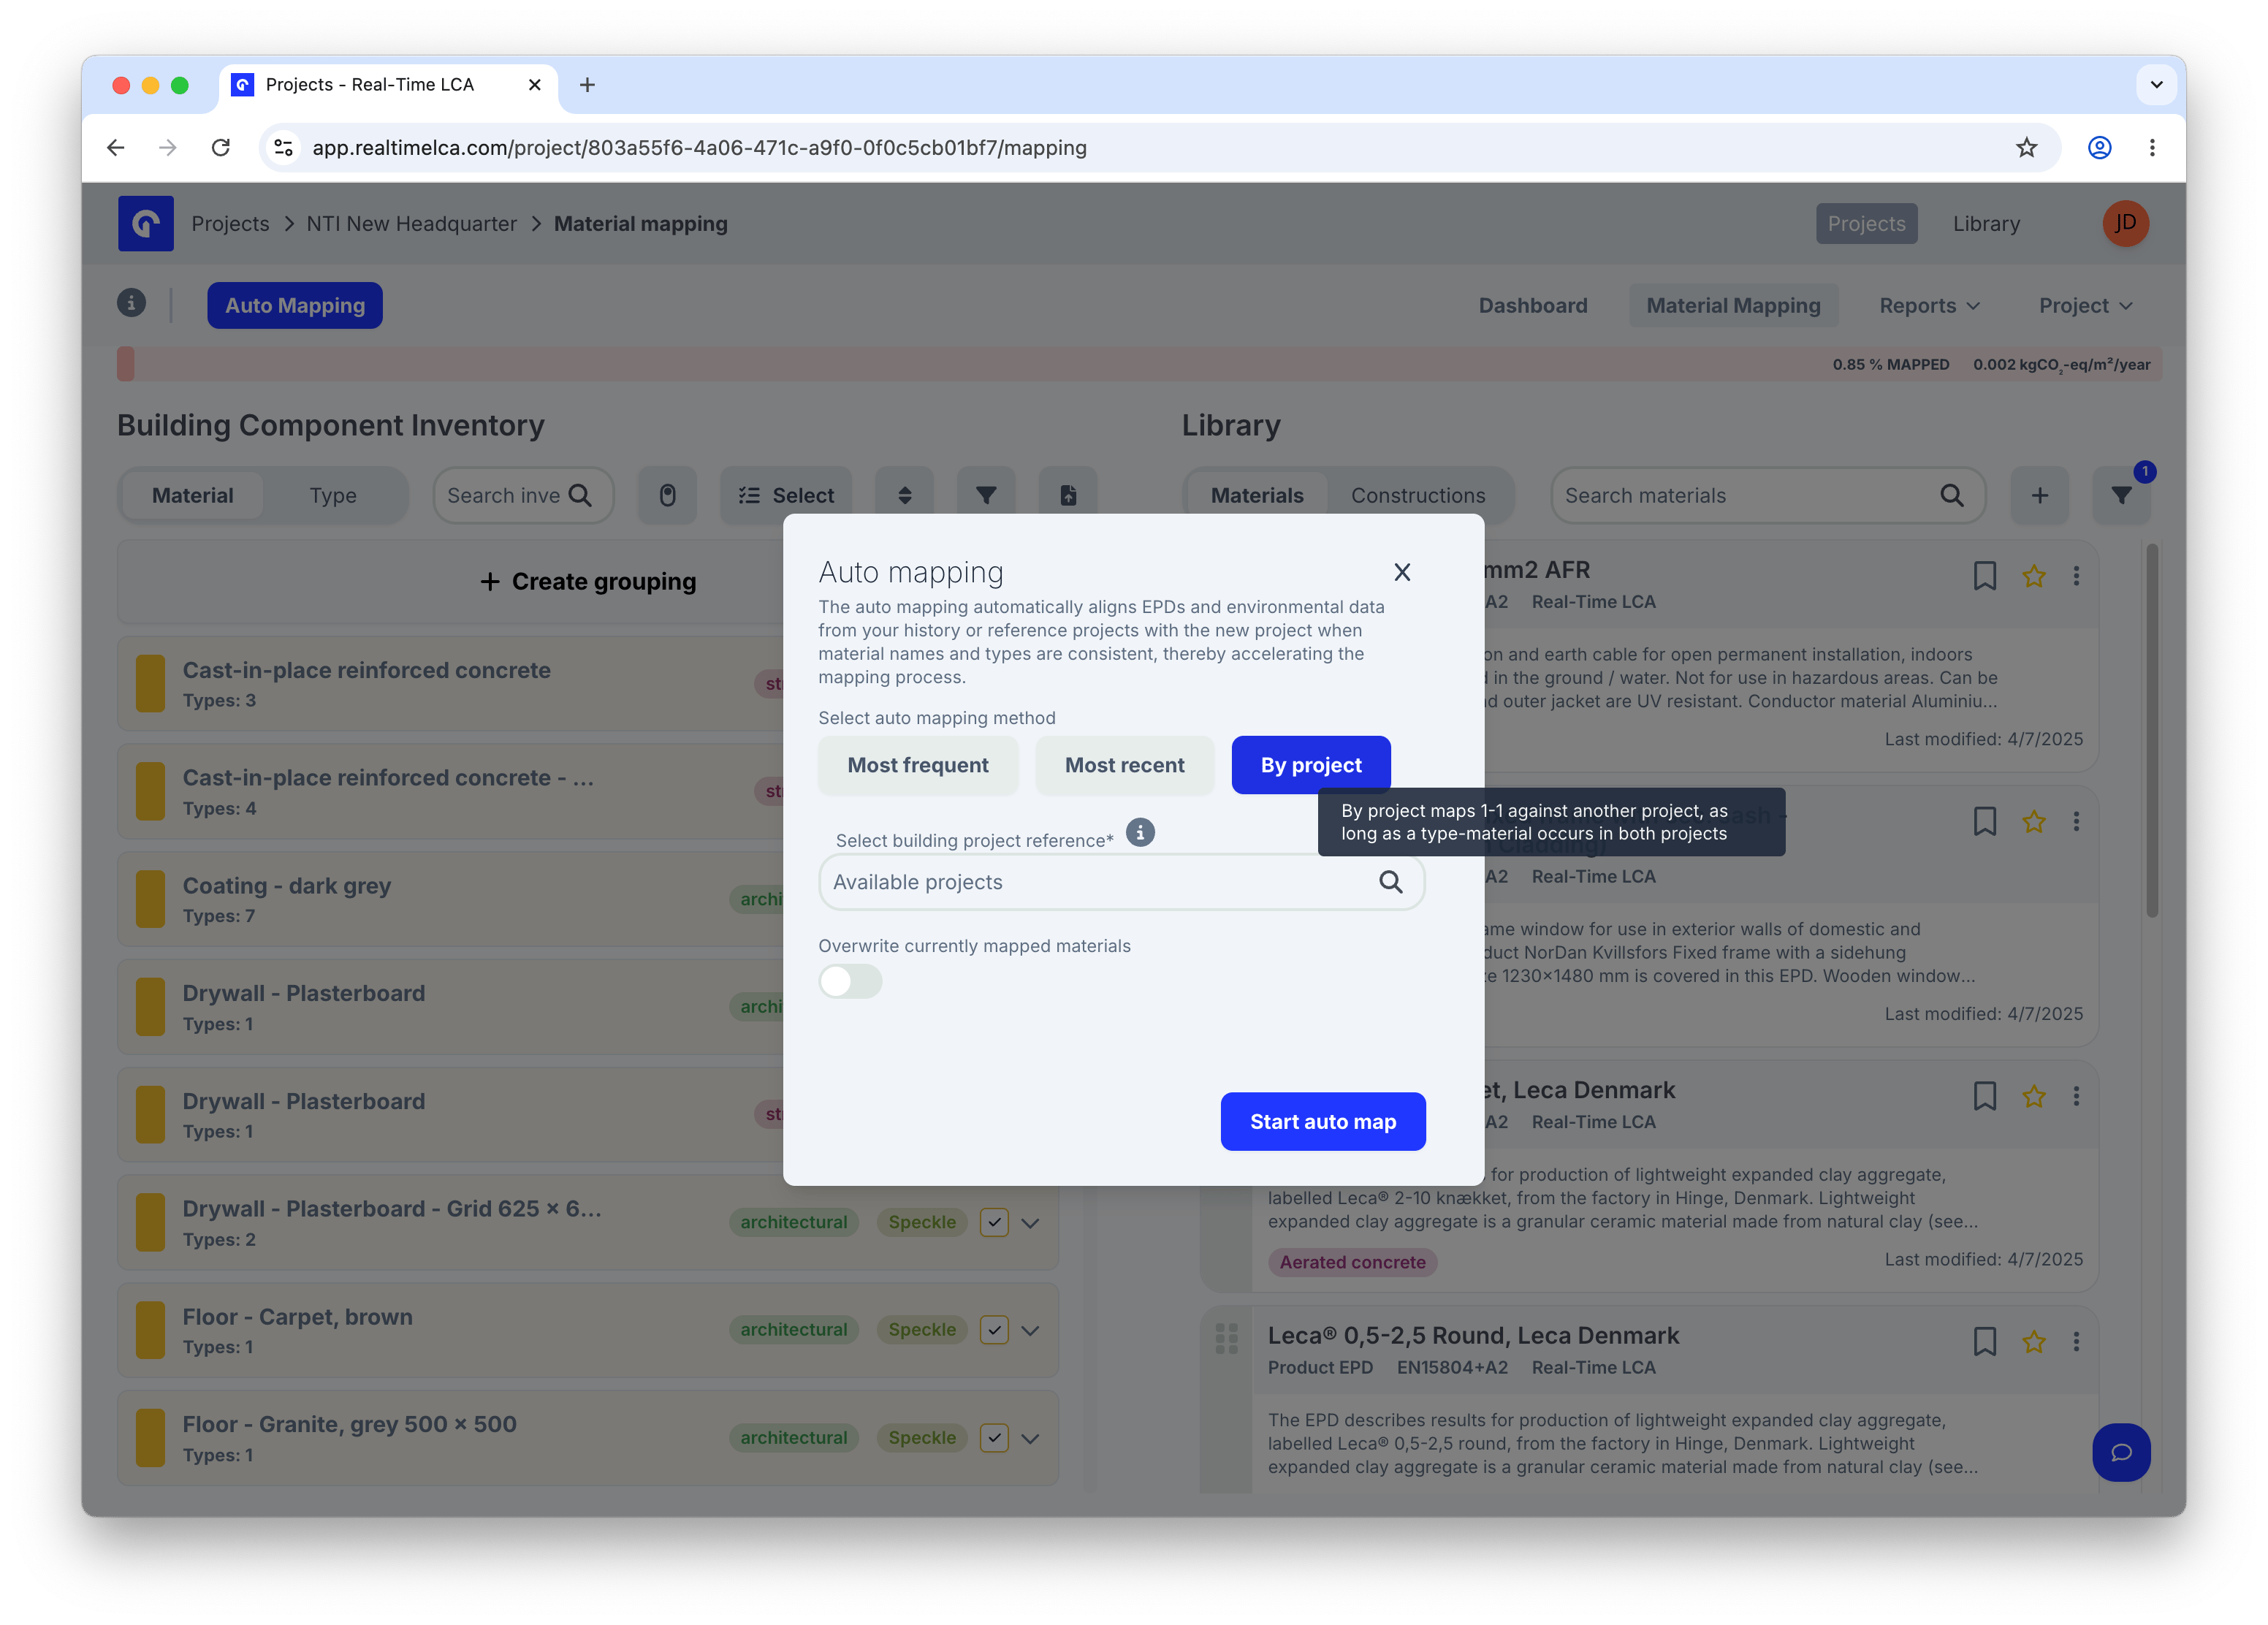
| **By project** | You already have a similar project mapped and want this one to mirror it (variant comparisons, phased buildings, building twins). |
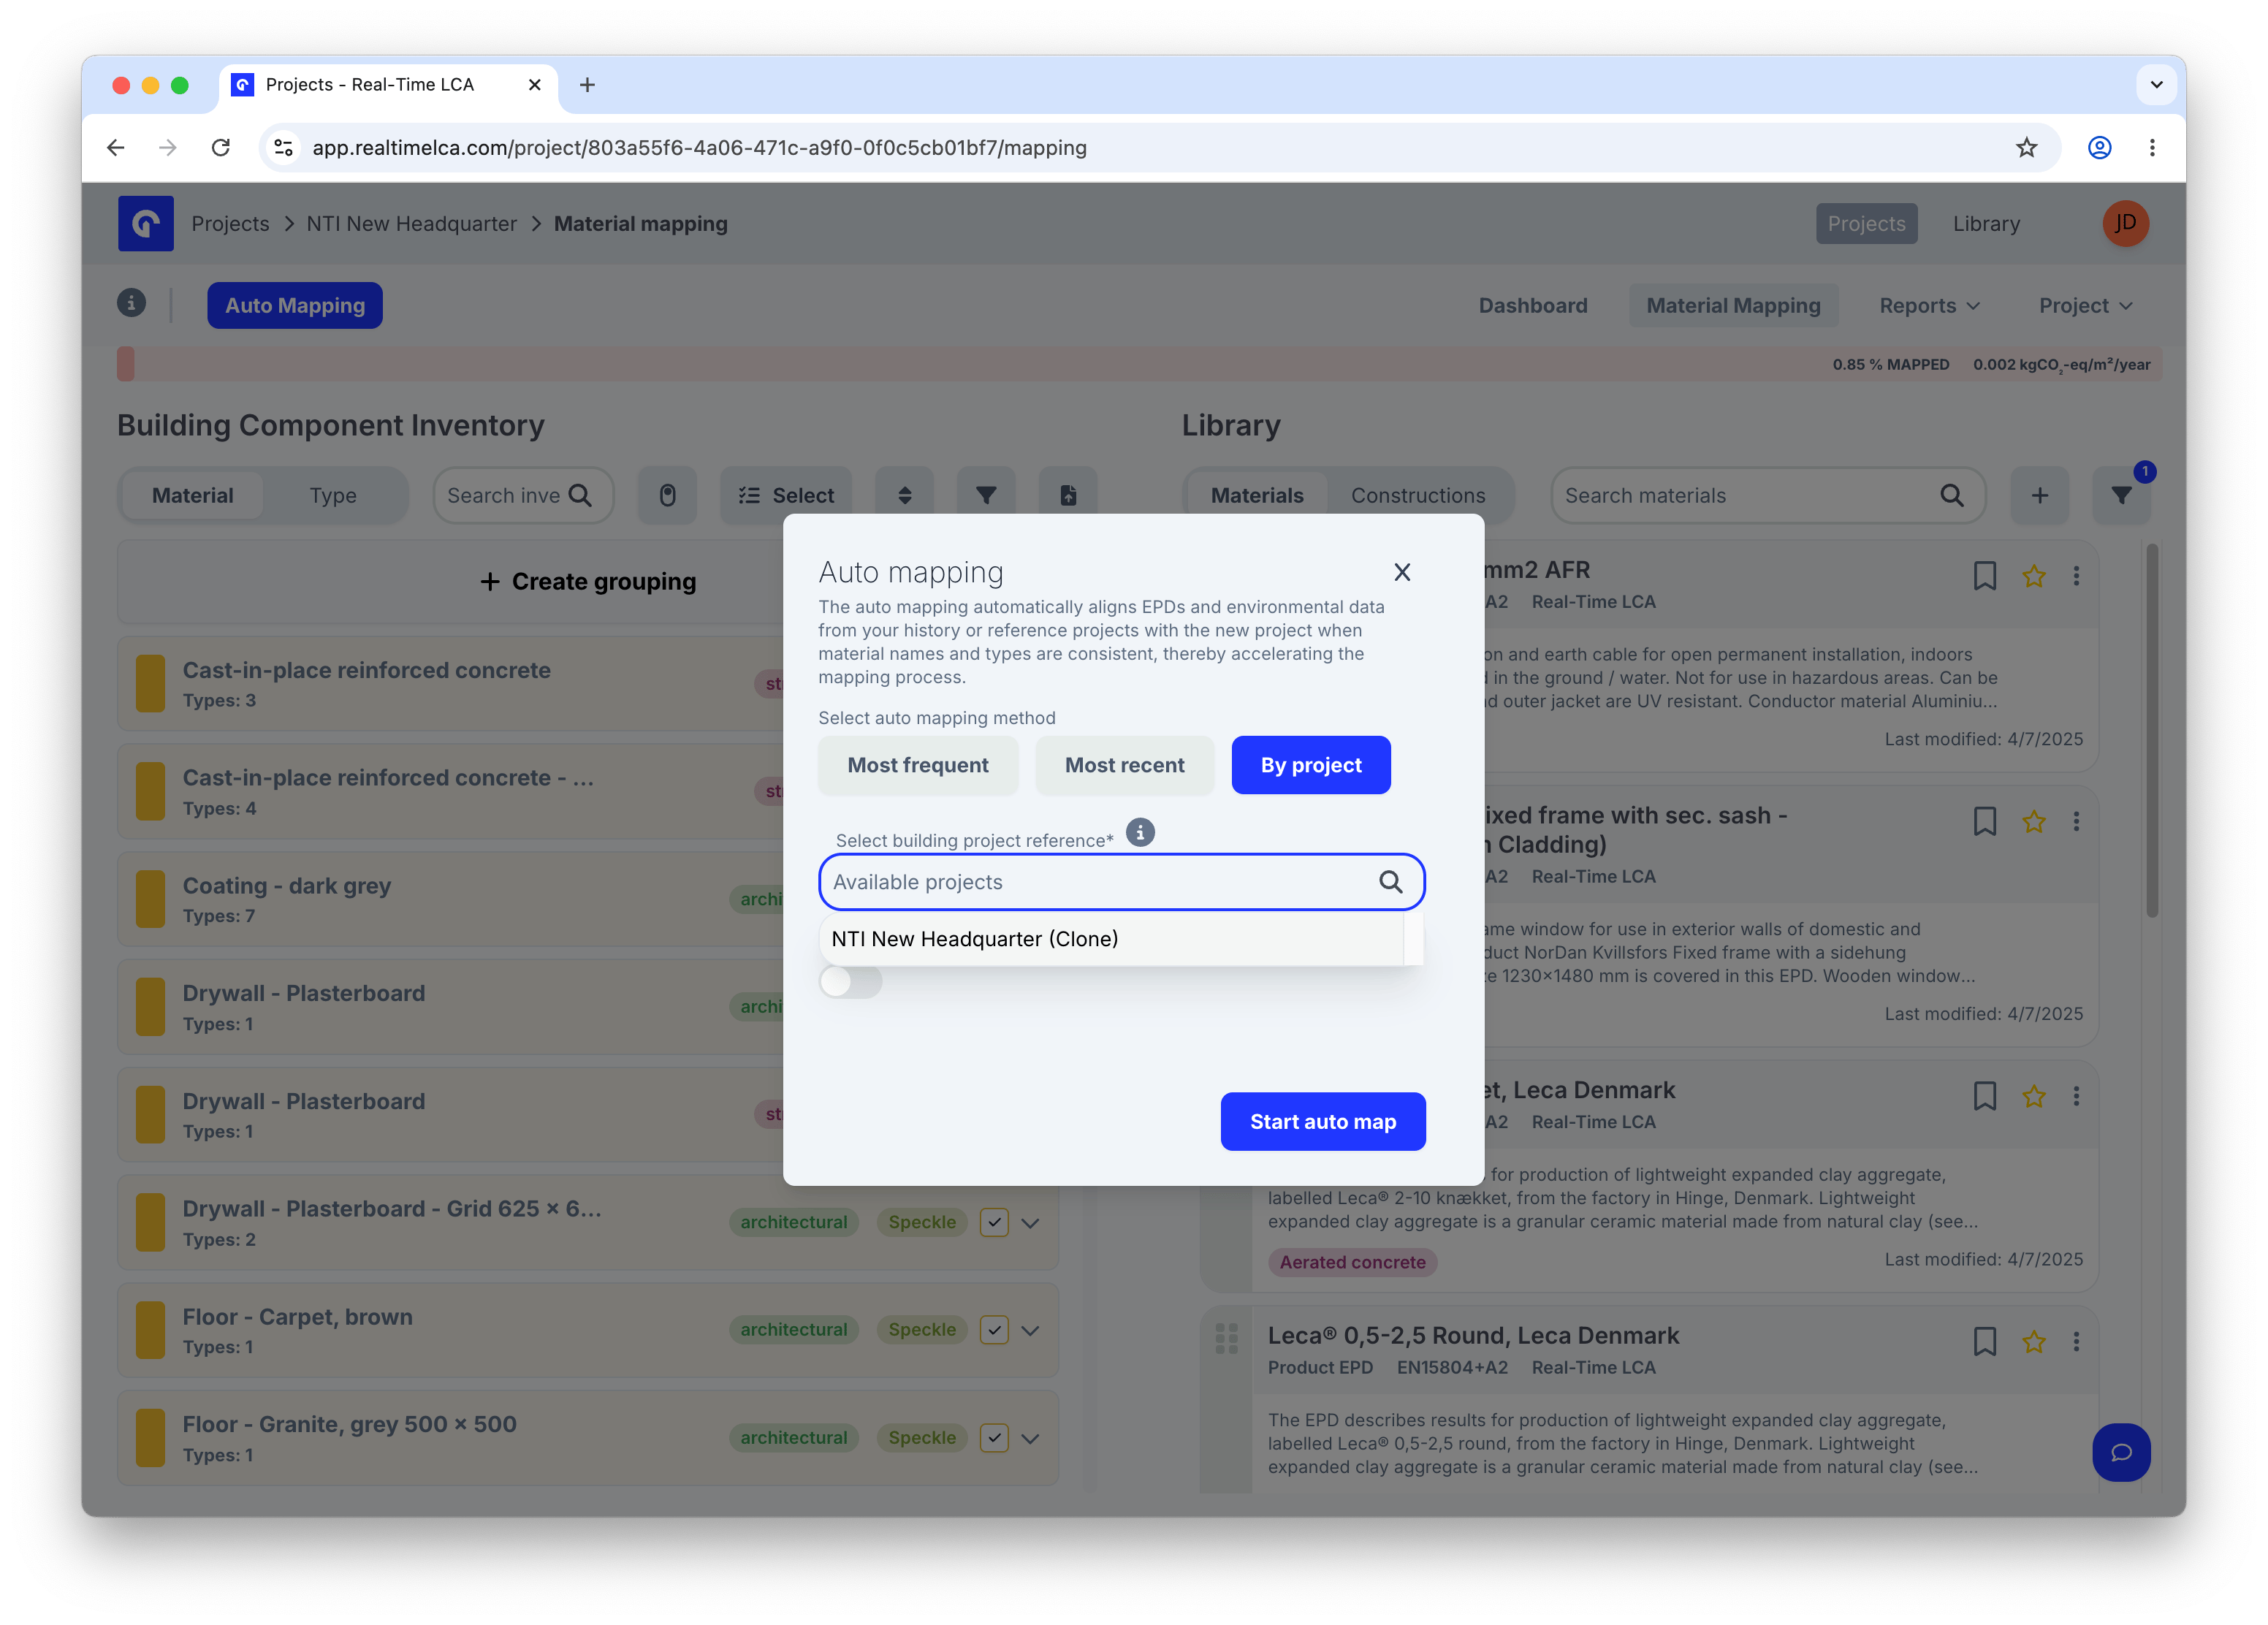
### Select a reference project
When **By project** is selected, choose the source in **Select building project reference**. Only projects you have access to appear in the dropdown.
| Method | Use it when |
| ----------------- | --------------------------------------------------------------------------------------------------------------------------------- |
| **Most frequent** | You want the safest pick across your workspace — the EPD that has been chosen most often for each type-material pair. |
| **Most recent** | Your team's defaults change over time and you want to follow the newest decisions. |
| **By project** | You already have a similar project mapped and want this one to mirror it (variant comparisons, phased buildings, building twins). |
### Select a reference project
When **By project** is selected, choose the source in **Select building project reference**. Only projects you have access to appear in the dropdown.
 ### Overwrite existing mappings
By default auto mapping only fills in **unmapped** items so your existing work is safe. Flip **Overwrite currently mapped materials** if you want the reference project to replace what is already there.
### Overwrite existing mappings
By default auto mapping only fills in **unmapped** items so your existing work is safe. Flip **Overwrite currently mapped materials** if you want the reference project to replace what is already there.
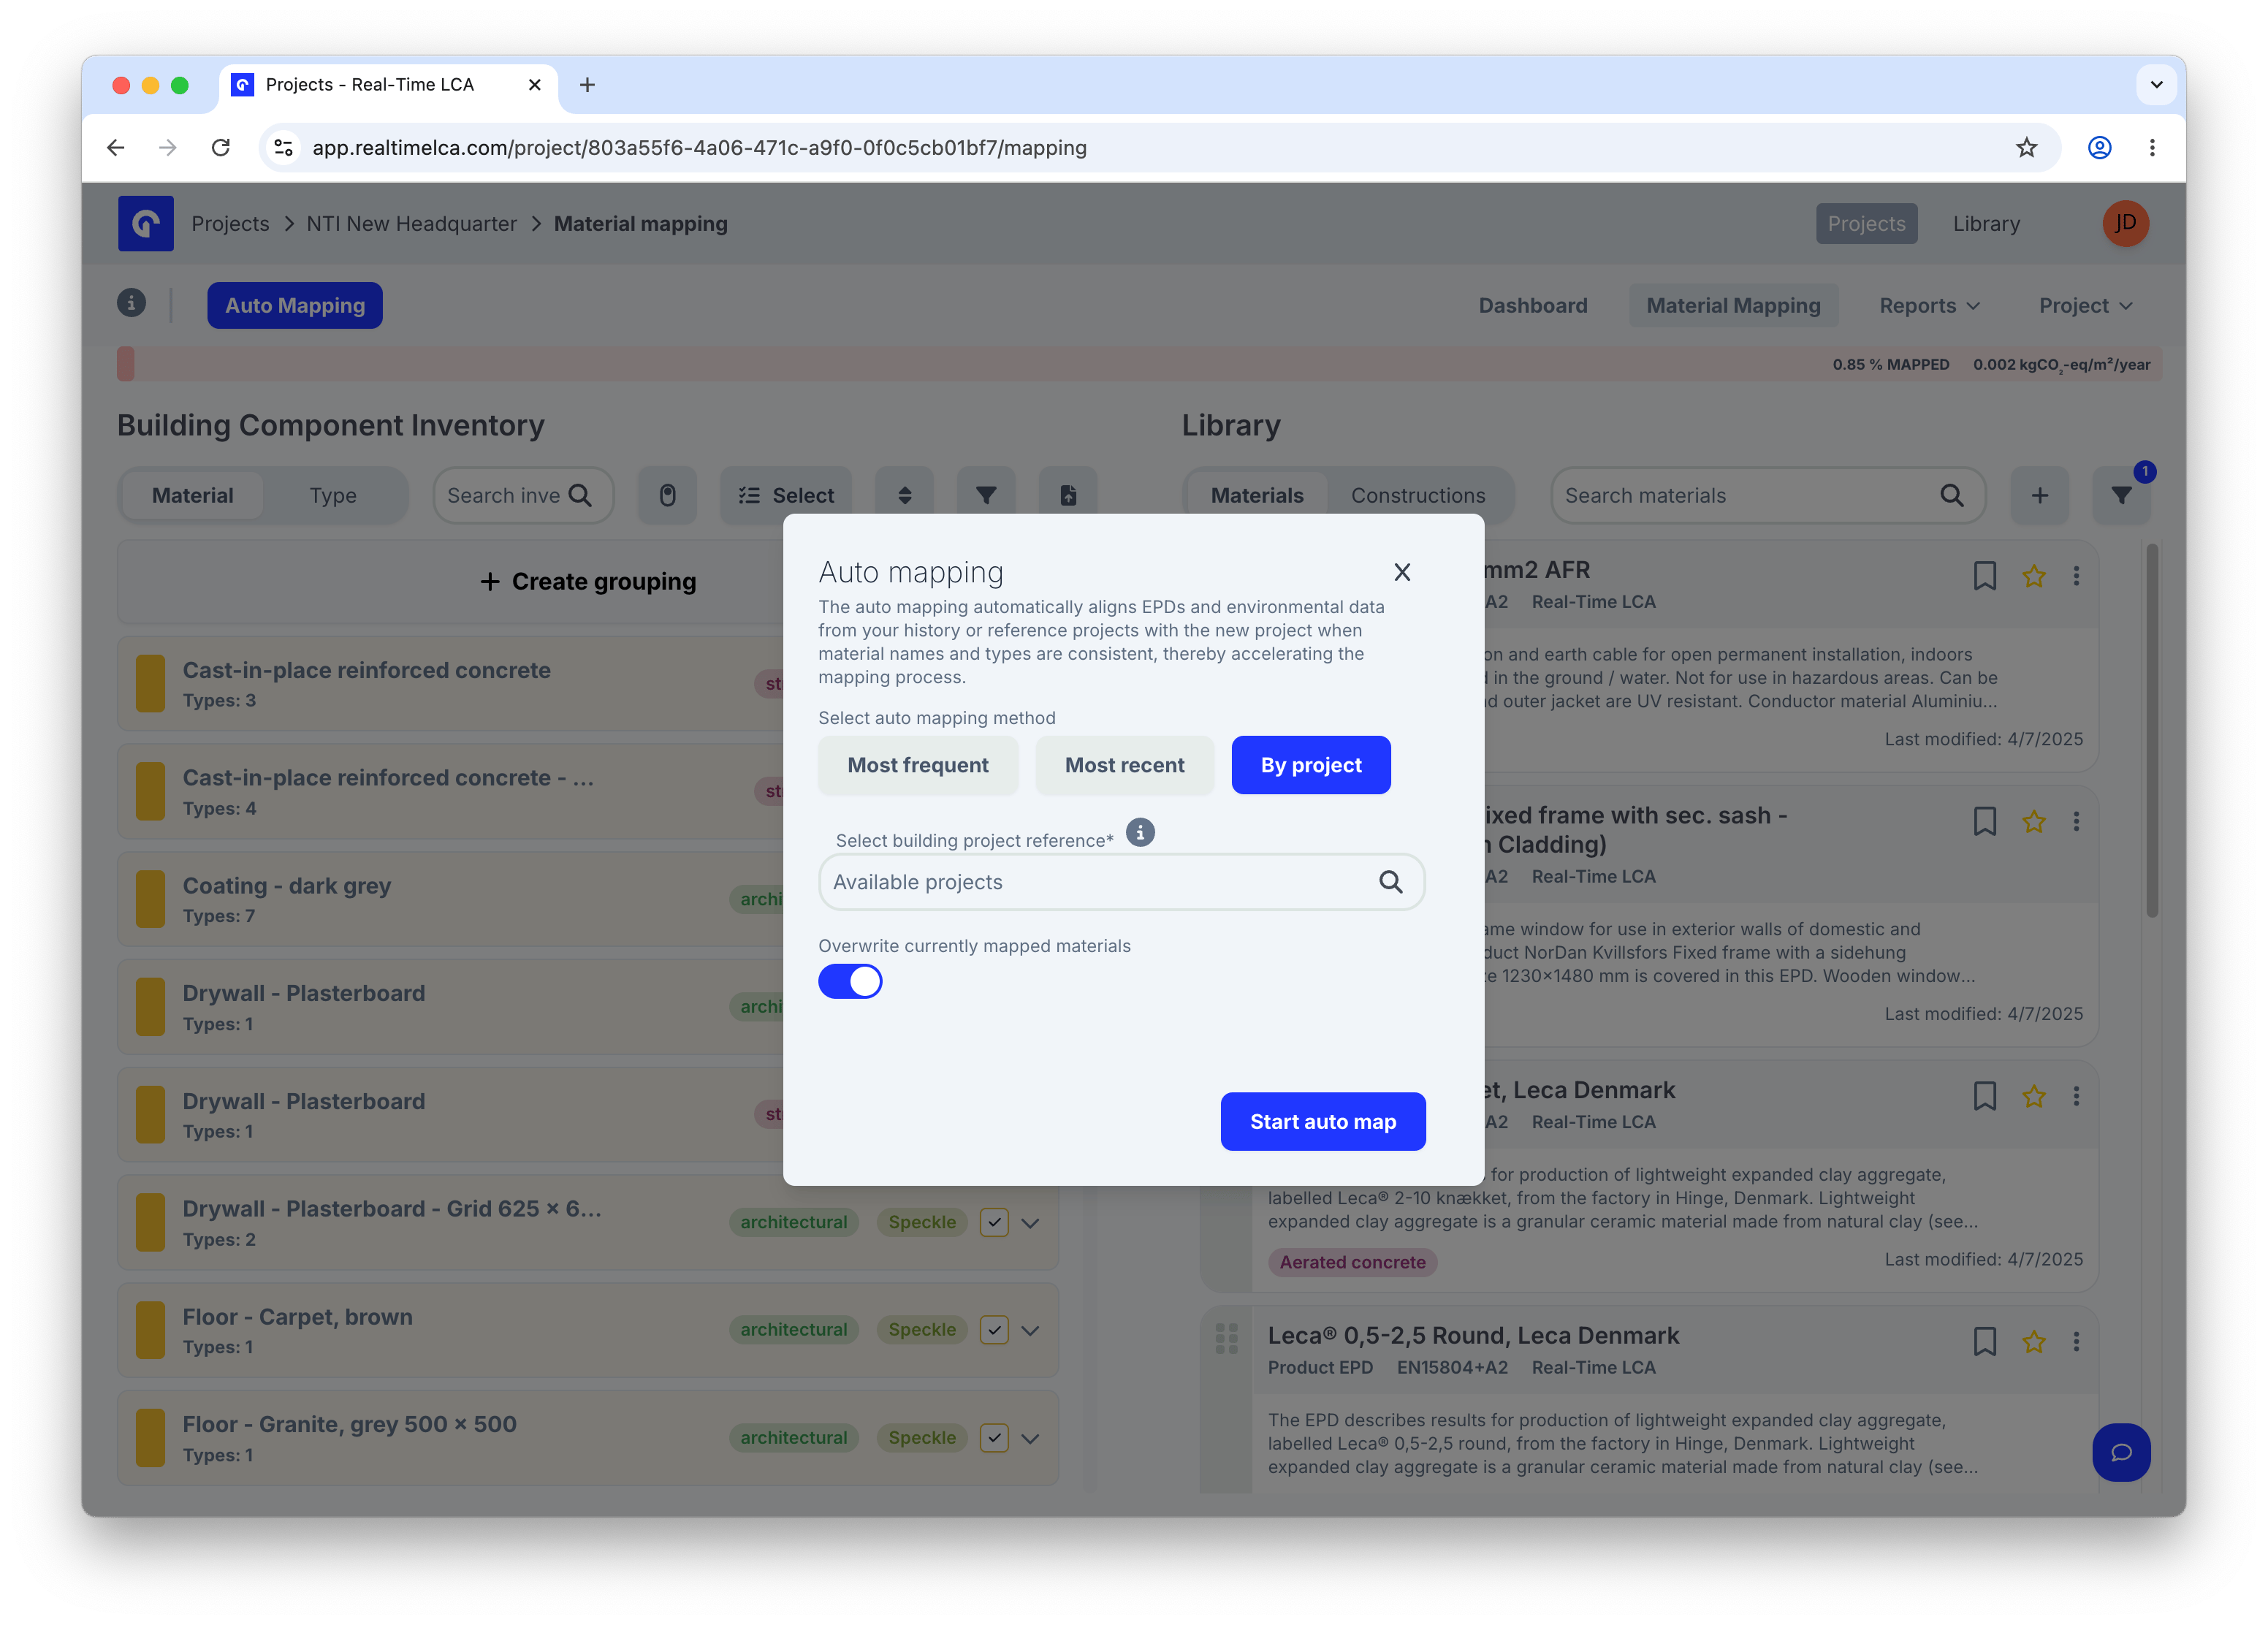 Overwrite also carries the [include / exclude state](#include-or-exclude-an-item-from-the-calculation) from the reference project. Items excluded from the calculation in the reference will be excluded here too — useful when you want a sibling project to mirror the original scope exactly, not just the materials.
### Review the preview
After clicking **Start auto map** the dialog closes and you return to the mapping page in a preview state — auto-mapped rows are marked with an **Auto Mapped** badge and a banner at the top reminds you that nothing has been committed yet.
Overwrite also carries the [include / exclude state](#include-or-exclude-an-item-from-the-calculation) from the reference project. Items excluded from the calculation in the reference will be excluded here too — useful when you want a sibling project to mirror the original scope exactly, not just the materials.
### Review the preview
After clicking **Start auto map** the dialog closes and you return to the mapping page in a preview state — auto-mapped rows are marked with an **Auto Mapped** badge and a banner at the top reminds you that nothing has been committed yet.
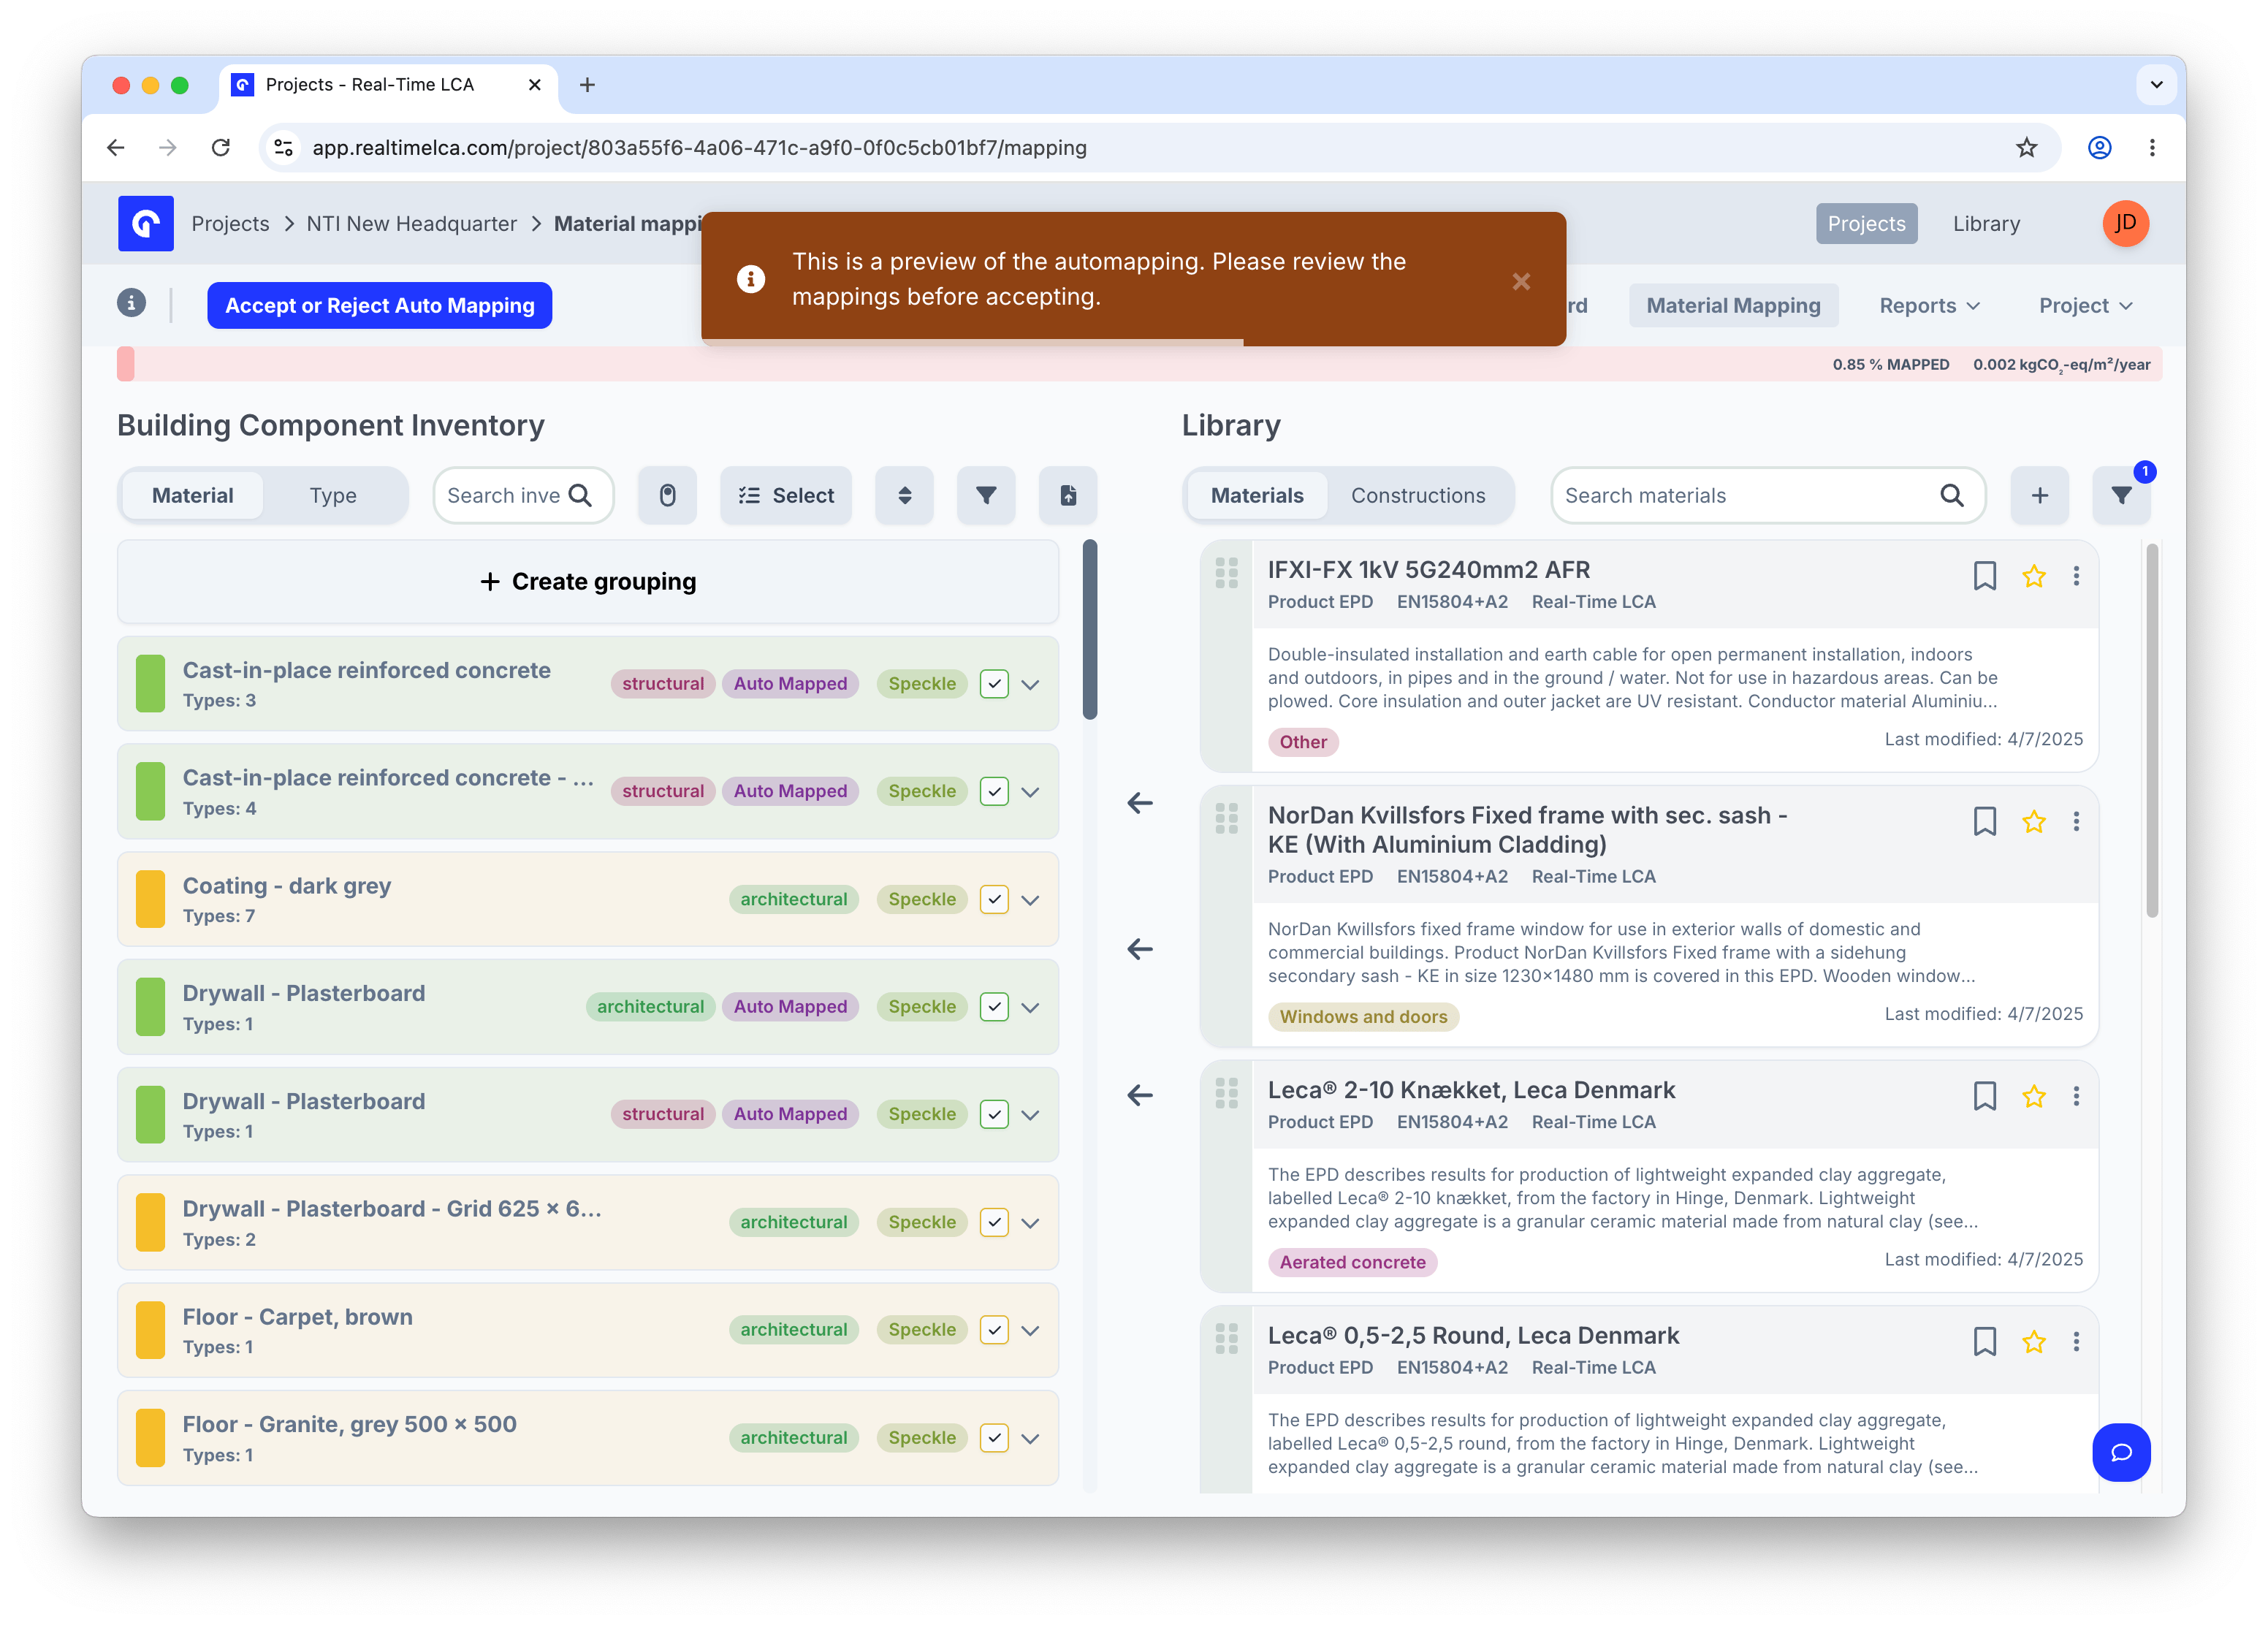 Walk through the inventory and spot-check the proposed EPDs. Anything you do not like can be unmapped or remapped manually before you commit.
### Accept or reject
When you are happy, click **Accept or Reject Auto Mapping** in the top-left to open the decision modal.
Walk through the inventory and spot-check the proposed EPDs. Anything you do not like can be unmapped or remapped manually before you commit.
### Accept or reject
When you are happy, click **Accept or Reject Auto Mapping** in the top-left to open the decision modal.
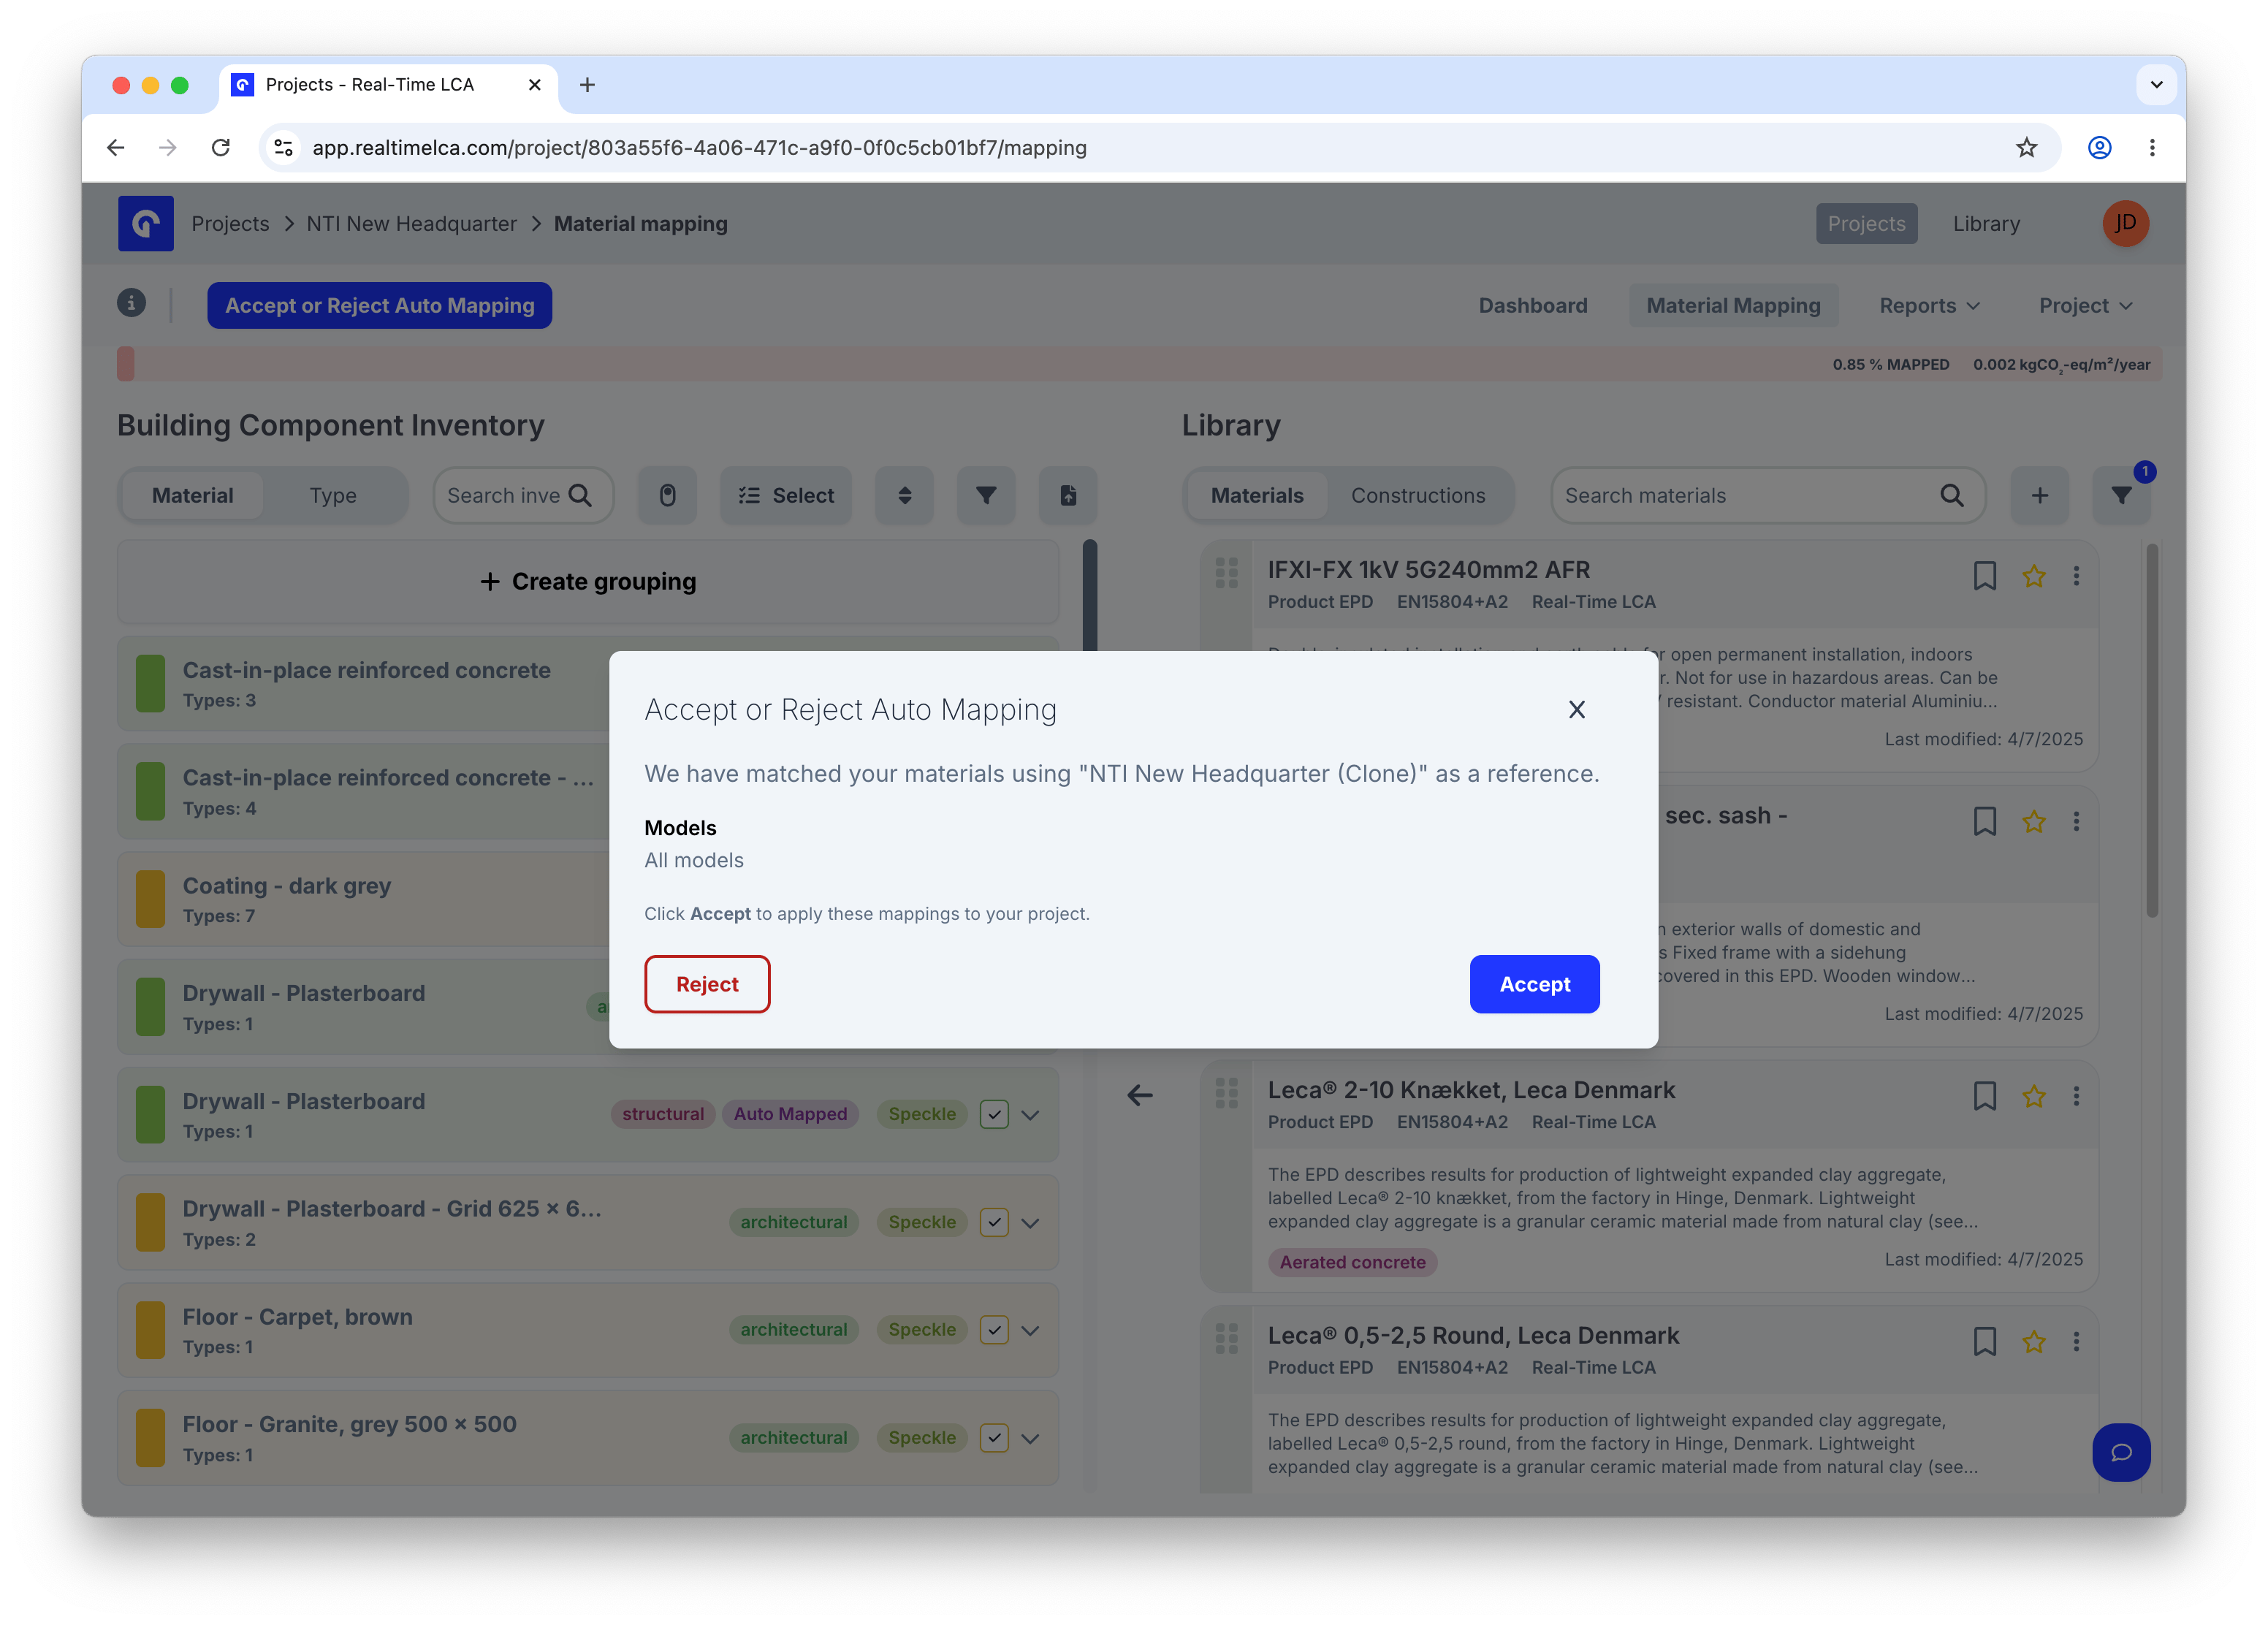 * **Accept** — commit every proposed mapping in one go.
* **Reject** — discard the entire preview and return to where you started.
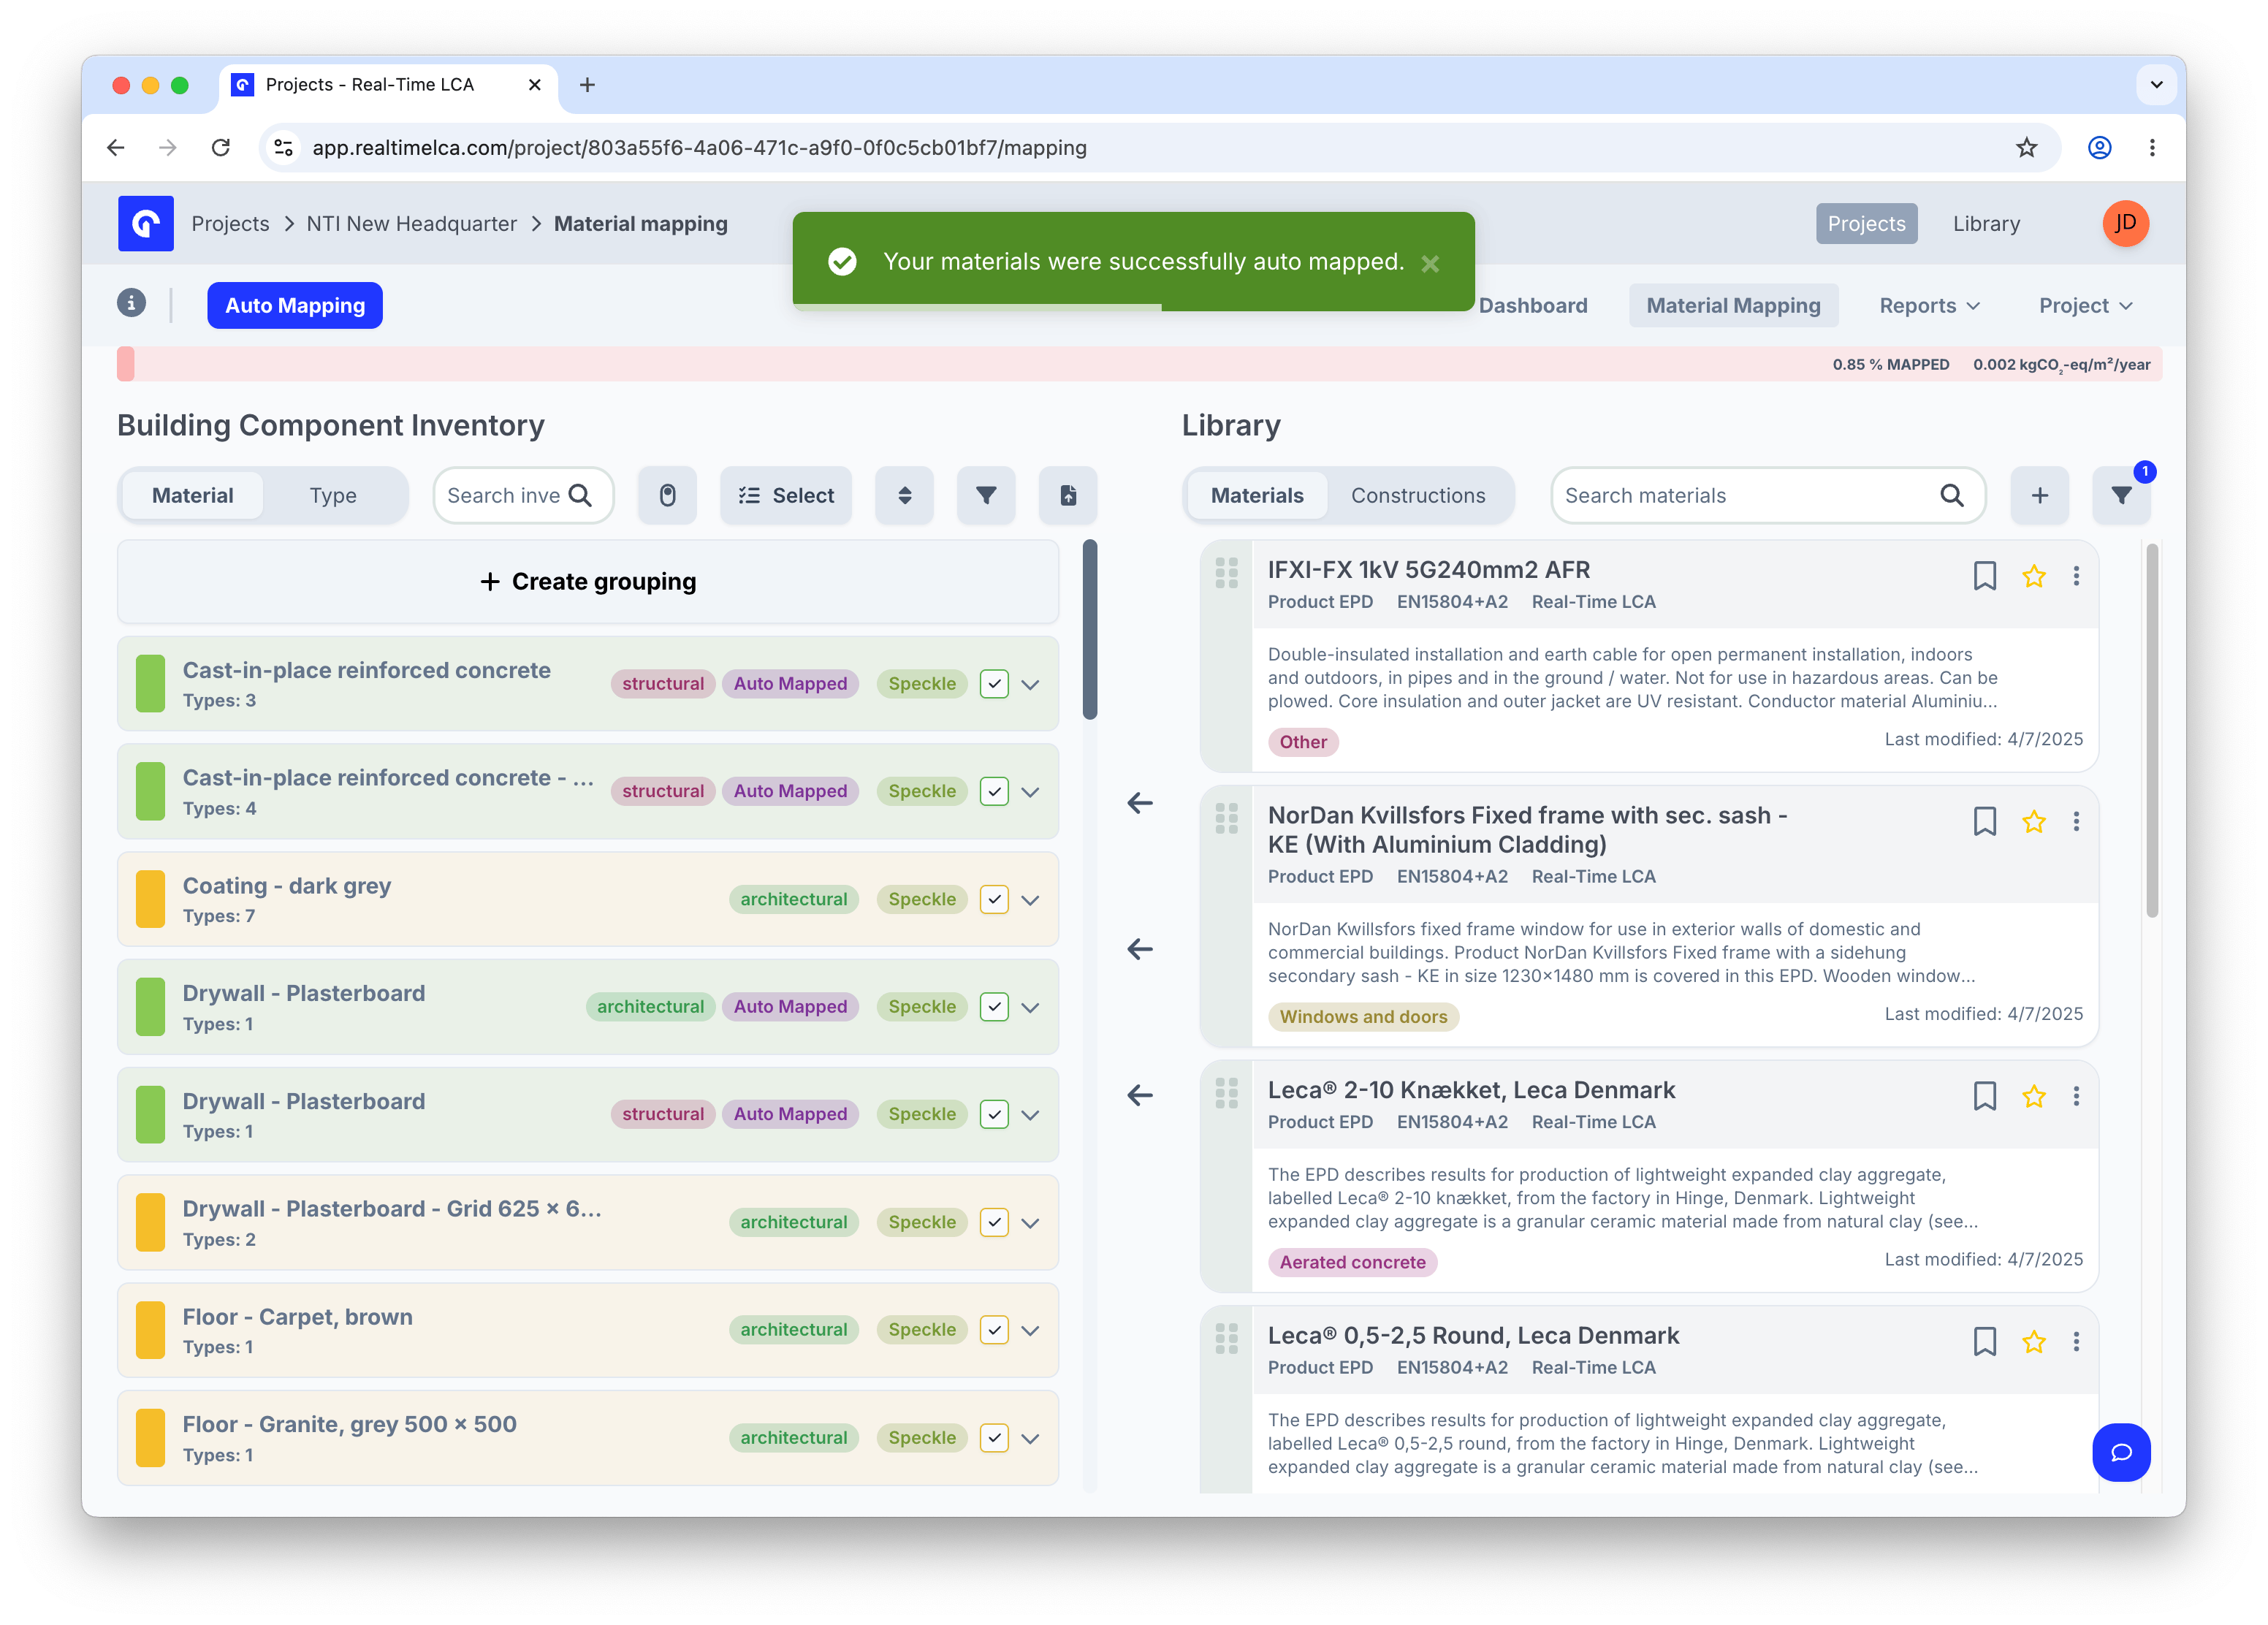
A success toast confirms when the pass has been applied.
* **Accept** — commit every proposed mapping in one go.
* **Reject** — discard the entire preview and return to where you started.
A success toast confirms when the pass has been applied.
 Auto mapping is iterative — run it once with **Most frequent** to cover the obvious cases, map the tricky ones by hand, then run **By project** later when you want to align this project with a finished sibling.
## AI Classification
**AI Classification** suggests the right building-element classification codes for inventory items whose BIM source code is missing or incorrect. It runs on a selection you choose — not the whole inventory — so you stay in control of where AI is applied.
### Select materials to classify
The **AI Classification** button in the top-left stays gray until you pick items. Use the **Select** bar above the inventory to enter selection mode and tick the rows you want to classify, then click **AI Classification** to run on that selection.
### Review and apply results
Classification takes a moment. When it finishes, the suggested codes appear in a review table — accept the suggestions as-is or overwrite any code you disagree with before applying.
AI Classification uses third-party AI models from **Anthropic**, **OpenAI**, or **Mistral**. AI-generated codes are labelled and should be reviewed before they are applied.
Not all classification systems are currently supported.
AI Classification is an open beta — enabled per organisation on request.
Auto mapping is iterative — run it once with **Most frequent** to cover the obvious cases, map the tricky ones by hand, then run **By project** later when you want to align this project with a finished sibling.
## AI Classification
**AI Classification** suggests the right building-element classification codes for inventory items whose BIM source code is missing or incorrect. It runs on a selection you choose — not the whole inventory — so you stay in control of where AI is applied.
### Select materials to classify
The **AI Classification** button in the top-left stays gray until you pick items. Use the **Select** bar above the inventory to enter selection mode and tick the rows you want to classify, then click **AI Classification** to run on that selection.
### Review and apply results
Classification takes a moment. When it finishes, the suggested codes appear in a review table — accept the suggestions as-is or overwrite any code you disagree with before applying.
AI Classification uses third-party AI models from **Anthropic**, **OpenAI**, or **Mistral**. AI-generated codes are labelled and should be reviewed before they are applied.
Not all classification systems are currently supported.
AI Classification is an open beta — enabled per organisation on request.